KYC-Chain Management App Documentation
1. Getting Started
1.1 About KYC-Chain:
KYC-Chain is a managed workflow solution that helps financial service providers perform KYC in a simple way. The KYC-Chain application makes the KYC process effortless by providing secure, compliant data sharing.
Why is KYC important?
The purpose of KYC is to protect your business from being used by criminal elements for money laundering or other illegal activities. Complementary procedures also enable you to better understand your customers and your financial dealings.
How does KYC-Chain help?
KYC-Chain is built around the actual legal framework regarding identity and customer data on a global scale.
KYC-Chain provides a secure platform for sharing suitable data and/or documents to satisfy compliance requirements for KYC onboarding or refresh without compromising the privacy of owners while preserving the integrity of the data.
1.2 Setting up the KYC-Chain app:
What inputs are required from you to set up the KYC-Chain application?
The first step when setting up your KYC-Chain app is for our team to personalize it for your company and project. In order to do that, you will receive a list of requirements with all necessary details for this customization. Some of the information required is:
Company (and project) details
- How would you like us to spell the name in the app and the url?
- Timeline and scale of your project
- Name and email address of the main point of contact from your company
Setup details
- E-mail address of the team members that will use the app
- Your terms and conditions
- Preferred method for sending emails from our app: Email sending is enabled as soon as your official email address and domain are verified by our system.
- Preferred storage location for your documents. We can integrate with AWS S3 or Google Cloud.
Customer communications
- The email communications sent through our app can be customized at your request. Once the app is configured, please test it and let us know if there are changes that you'd like made to the wording in an email subject or body.
Styling
- Your logo (preferably a png image) and favicon can be used in the app
- Link to your style guide or listing of your brand hex codes that you would like us to use in the emails to customers.
API documentation:
You can access our API documentation via the following link: https://apidocs.kyc-chain.com/#/ Please create a ticket to get the login credentials.
Helpdesk support details:
Throughout the entire process, our KYC-Chain team is ready to help you. If you have any questions or suggestions you are welcome to contact us by email at help@kyc-chain.com.
1.3 Use of the guide:
It is important to note that all the information contained in this guide is private and intended for the sole purpose of training users of the KYC-Chain application.
Without the explicit written permission of KYC-Chain, it is prohibited to copy in whole, or in part, any of the content on this guide and any other linked document property of KYC-Chain ltd.
KYC-Chain does not provide legal advice and suggests that your business consults the proper legal counsel prior to establishing specific KYC requirements for your project and jurisdiction.
In no event shall KYC-Chain be liable for the misuse of the application or the information provided in this guide resulting in any incident or unlawful action.
2. User roles & responsibilities:
In the KYC-Chain app, there are two different roles which define the permissions and responsibilities of each user: Manager and Applicant.
2.1 Manager: Management User:
Primary Roles:
- Reviews all KYC applications assigned to them
- Responsible for checking sanctions screening results
- Screens answers and documents provided by the user
- Approves or rejects KYC applications
2.2 Applicant: KYC Applicant:
Primary Role: Participates in the KYC process, answering the questions and uploading the documents established in each specific KYC template.
3. Using the KYC-Chain application:
The KYC-Chain app allows managers to set up KYC verification processes that applicants can easily complete by navigating the application. Each project can be customized depending on the specific needs and documentation required. KYC-Chain also facilitates any necessary follow-up for each process, and the approval, rejection or cancellation of an application.
In this section, you can find an overview of all the main features available. For details on how to carry out specific procedures, go to our "How to" and "FAQs" sections below.
Each application moves through different stages. Below you can find the KYC-Chain app's statuses, which show you updates and changes to KYC processes. If the applicant submitted the KYC process or the Manager was assigned to the process, you will see a new status.
| Status Name | Description |
|---|---|
| Approved | The KYC Process was approved |
| Rejected | The KYC Process was rejected |
| Cancelled | The KYC Process was cancelled |
| Customer Invited | The applicant has been invited to the KYC Process |
| Terms Accepted | The applicant has accepted the terms and conditions, beginning the KYC Process |
| Customer Processing Requirement | The applicant is providing values for the requirements in their KYC Process |
| Documentation Ready For Review | The applicant has completed and submitted the KYC application. The applicant can't modify their application |
| Additional Items Requested | A new requirement was added to the application, or an existing requirement was removed |
| Manager Assigned* | A manager has been assigned to the KYC Process. |
| Process Re-Opened* | The KYC Process has been re-opened. The current status is now the last non-ambiguous status from before the Process was closed. |
| Data Check and Sanctions Screening* | Our software has run the relevant external checks for this KYC Process, including Sanctions, AML, PEP, and others when applicable (eg. Company Registry, ID Document Verification, ID Data Verification). |
| Manager Filled Requirements* | A manager has filled/updated one or more requirements on behalf of the applicant. |
* Statuses with a * are considered "ambiguous" in our software because they could occur at multiple points throughout the application process. The "Current Status" property of a KYC Process will show the latest status which is not considered ambiguous (so as to avoid a scenario where the current status shows "manager assigned" when the more helpful indication would be "Documentation Ready For Review"). All status records can still be viewed in the order they occurred in the Audit Trail.
If you have any questions, contact your account manager or email us at help@kyc-chain.com.
3.1 The Dashboard:
The Dashboard provides managers with an overview of all completed KYC Processes. The KYC Process Reports give the manager the number of approved, rejected, declined, cancelled, in progress and ready for review KYC processes at-a-glance.
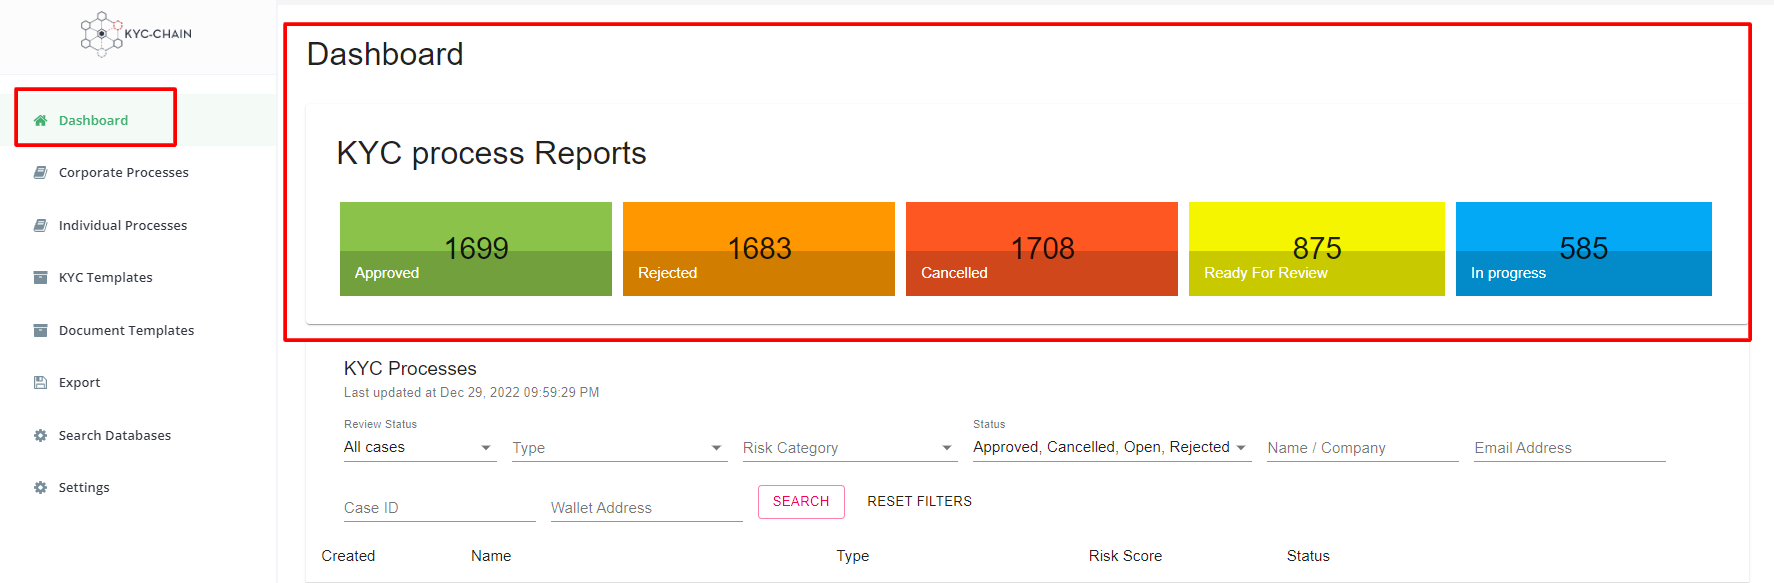
The dashboard also offers a summary view of the Completed KYC Processes. Filtering options allow the manager to search all processes by type (individual/corporate), status (including any of the 4 closed statuses mentioned above), email address (with partial email matching), and crypto wallet address. Each manager's preferred filtering parameters are saved between sessions to allow you to pick-up where you left off.
To access and view the full details of a case from this screen, simply click on the View & Modify button (text icon on the right side of the screen):
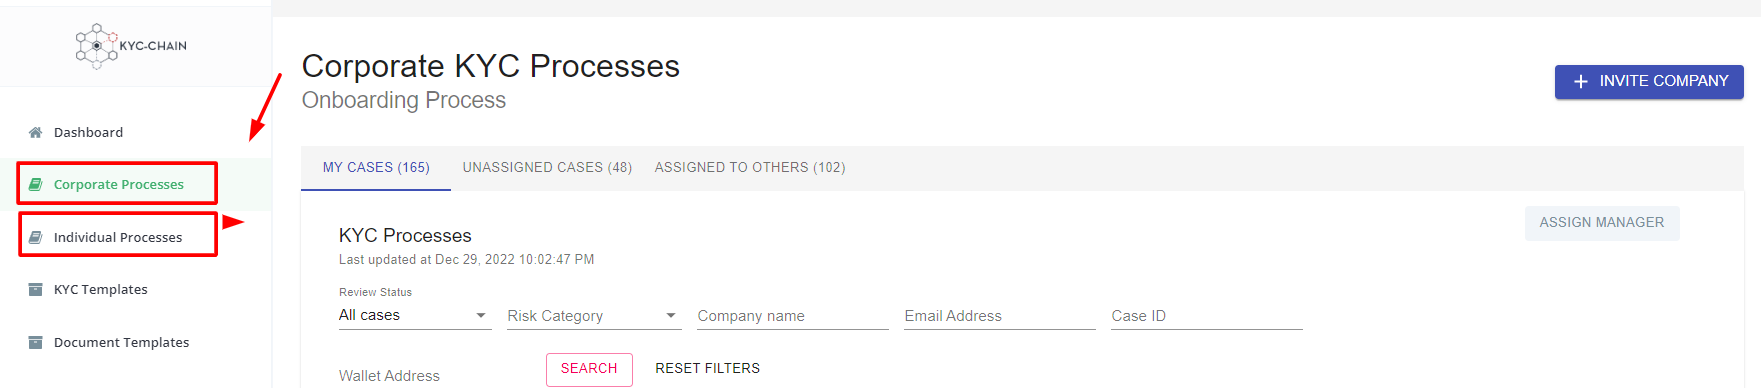
3.2 Processes: Individual and Corporate:
In the KYC-Chain app, the processes are organized into two different categories:
- Individual Processes: In this tab the manager can find and manage all the processes created for individuals.
- Corporate processes: Here the manager can handle from this tab the processes created for companies or organizations.
The Individual and Corporate Processes tabs list the "open" applications that have been initiated and are not yet in a fully closed state, meaning all applications shown in these tabs are either awaiting input from applicants, or awaiting a review from managers. Within the process pages, managers can assign, review, and change the status of KYC applications:
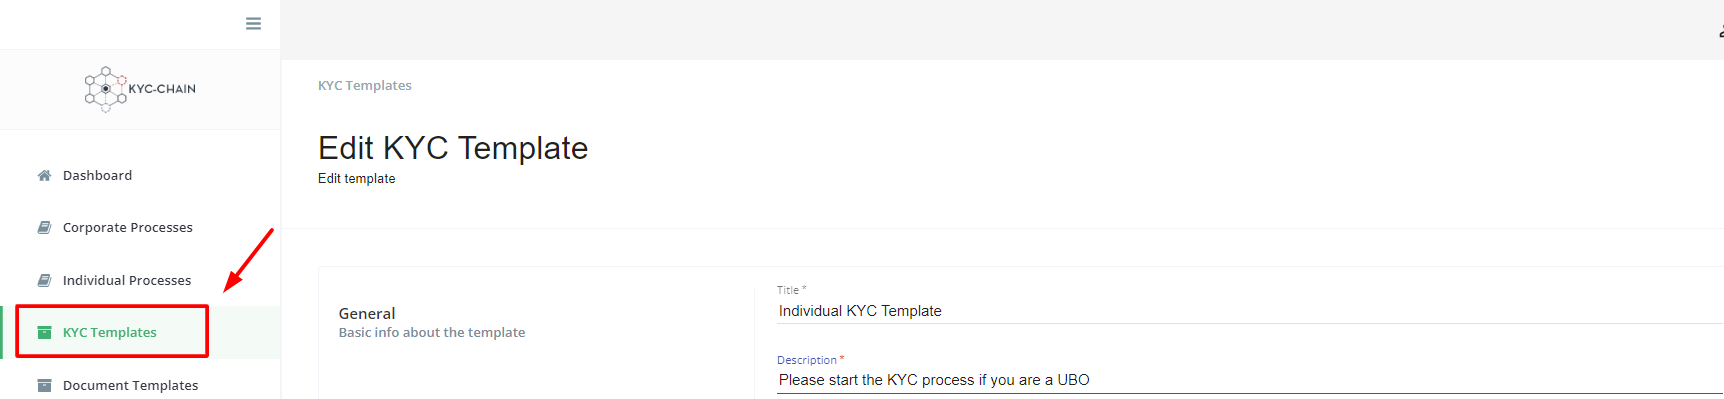
3.3 KYC Templates:
The KYC Templates section allows the Manager to customize the information required from the user for each process. Within the KYC Templates tab, Managers can create new KYC templates or edit existing templates. Some of the customizable options are:
- The template’s title and description
- The questions, documents, and forms
- Making certain requirements optional
- Changing the order of the requirements
- Assigning a default manager for each template
- Enable/Disabling certain options and features
3.4 Document Templates:
The Document Templates tab gives Managers the freedom to configure and customize key document templates according to their needs. Document templates can be added to KYC Templates in 1 of 2 places: as a Legal Document (Terms & Conditions), or as a Form.
Example: A Manager will customize the ‘Terms and Conditions’ document to be used in their onboarding flow. This document template can then be made active and added to one of more KYC Templates in the Legal Document field.
The document editor allows managers to add a signature box, date selector, check boxes and more.

3.5 Export KYC Data:
The Export tab gives Managers the ability to export user data in CSV format. They can either export a subset of specific users (approved individuals, for example) or the entire user list:

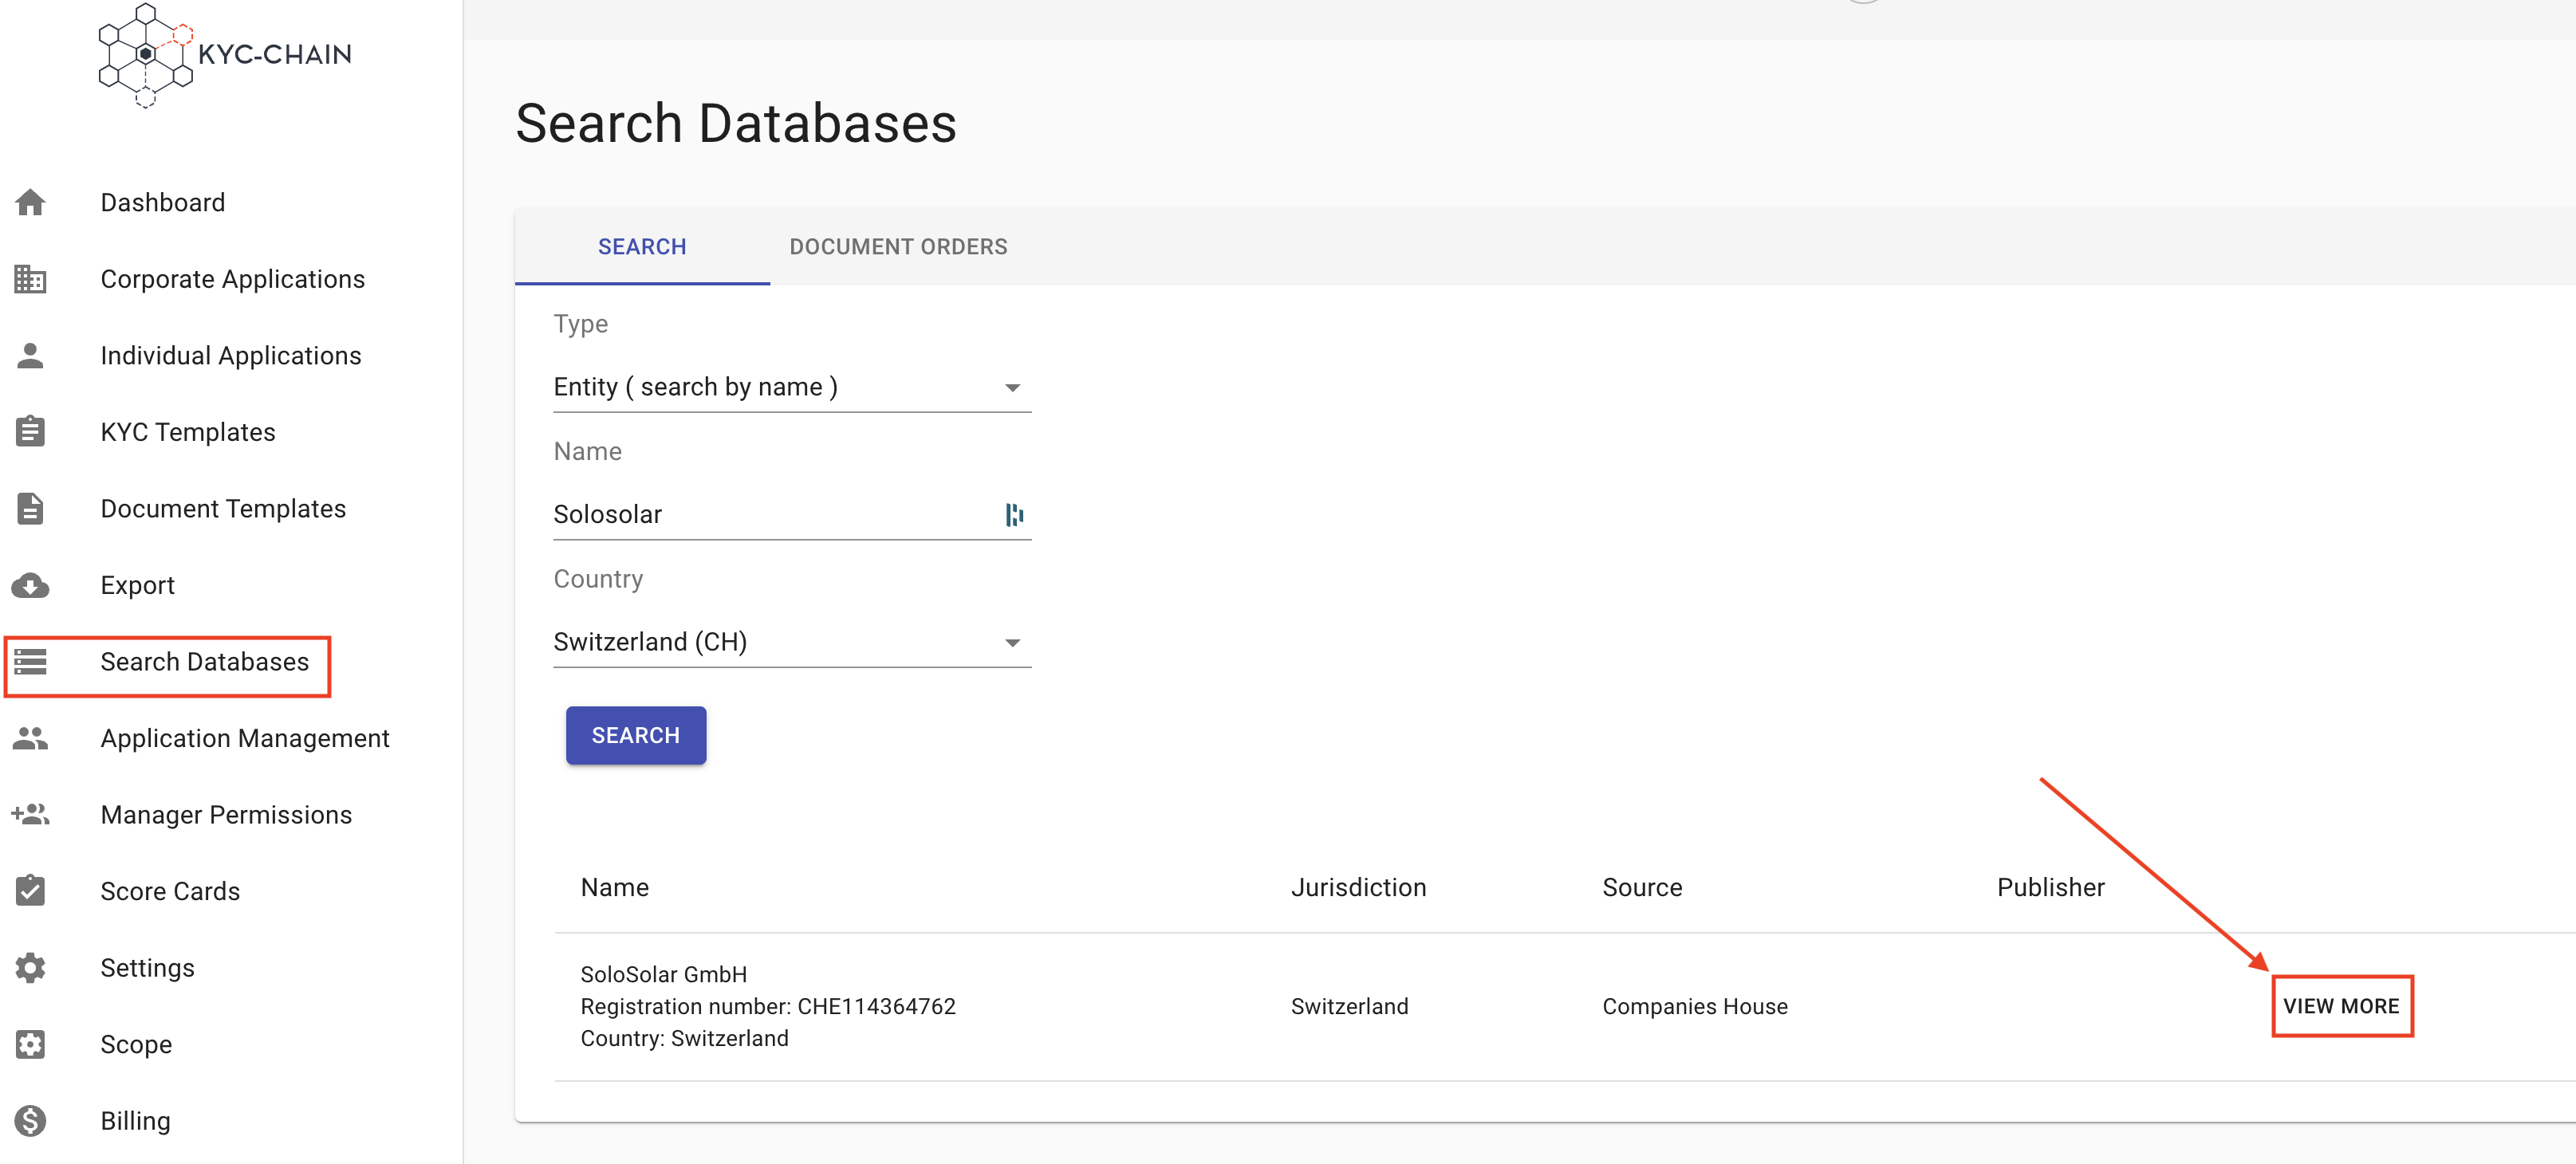
3.6 Search Databases:
The Search Databases tab gives managers the ability to run the following checks without first initiating and submitting a KYC process:
- Sanctions Screening
- Adverse Media
- Politically Exposed Persons (PEPs)
- Company Registry (the Jurisdiction is a required field)
First, the manager selects the type of search: Individual or Entity (corporate). Then they enter search parameters and click the Search button. To access and view full details for each match, click on the View More button:
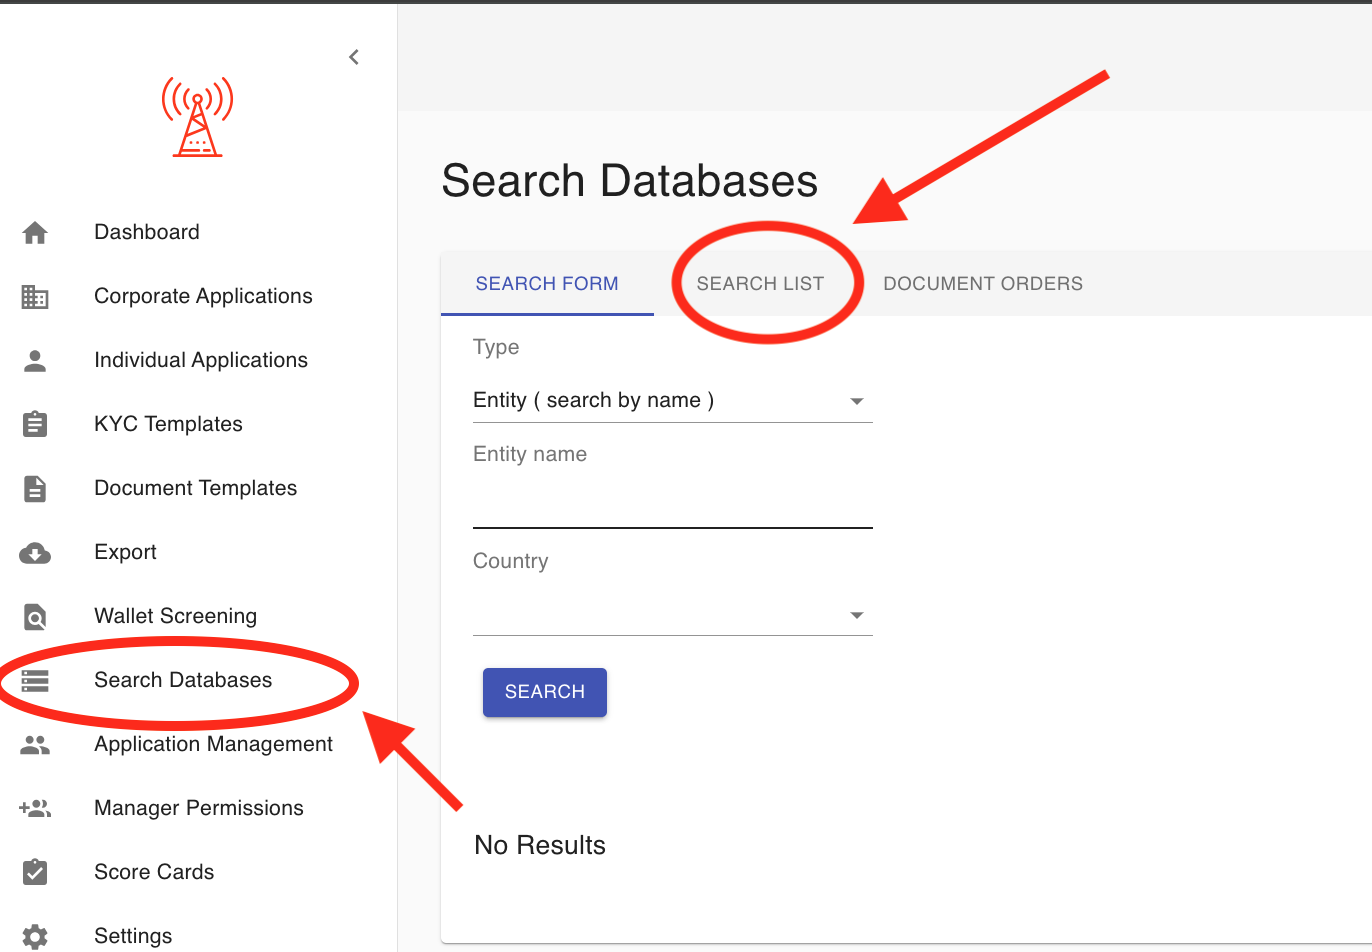
To access completed AML checks and their results:
- Click Search Databases in the left navigation menu
- Select the SEARCH LIST tab in the main window
- View a complete history of all previous AML checks and their results
This feature allows you to track and review all previously conducted AML screenings in one centralized location.
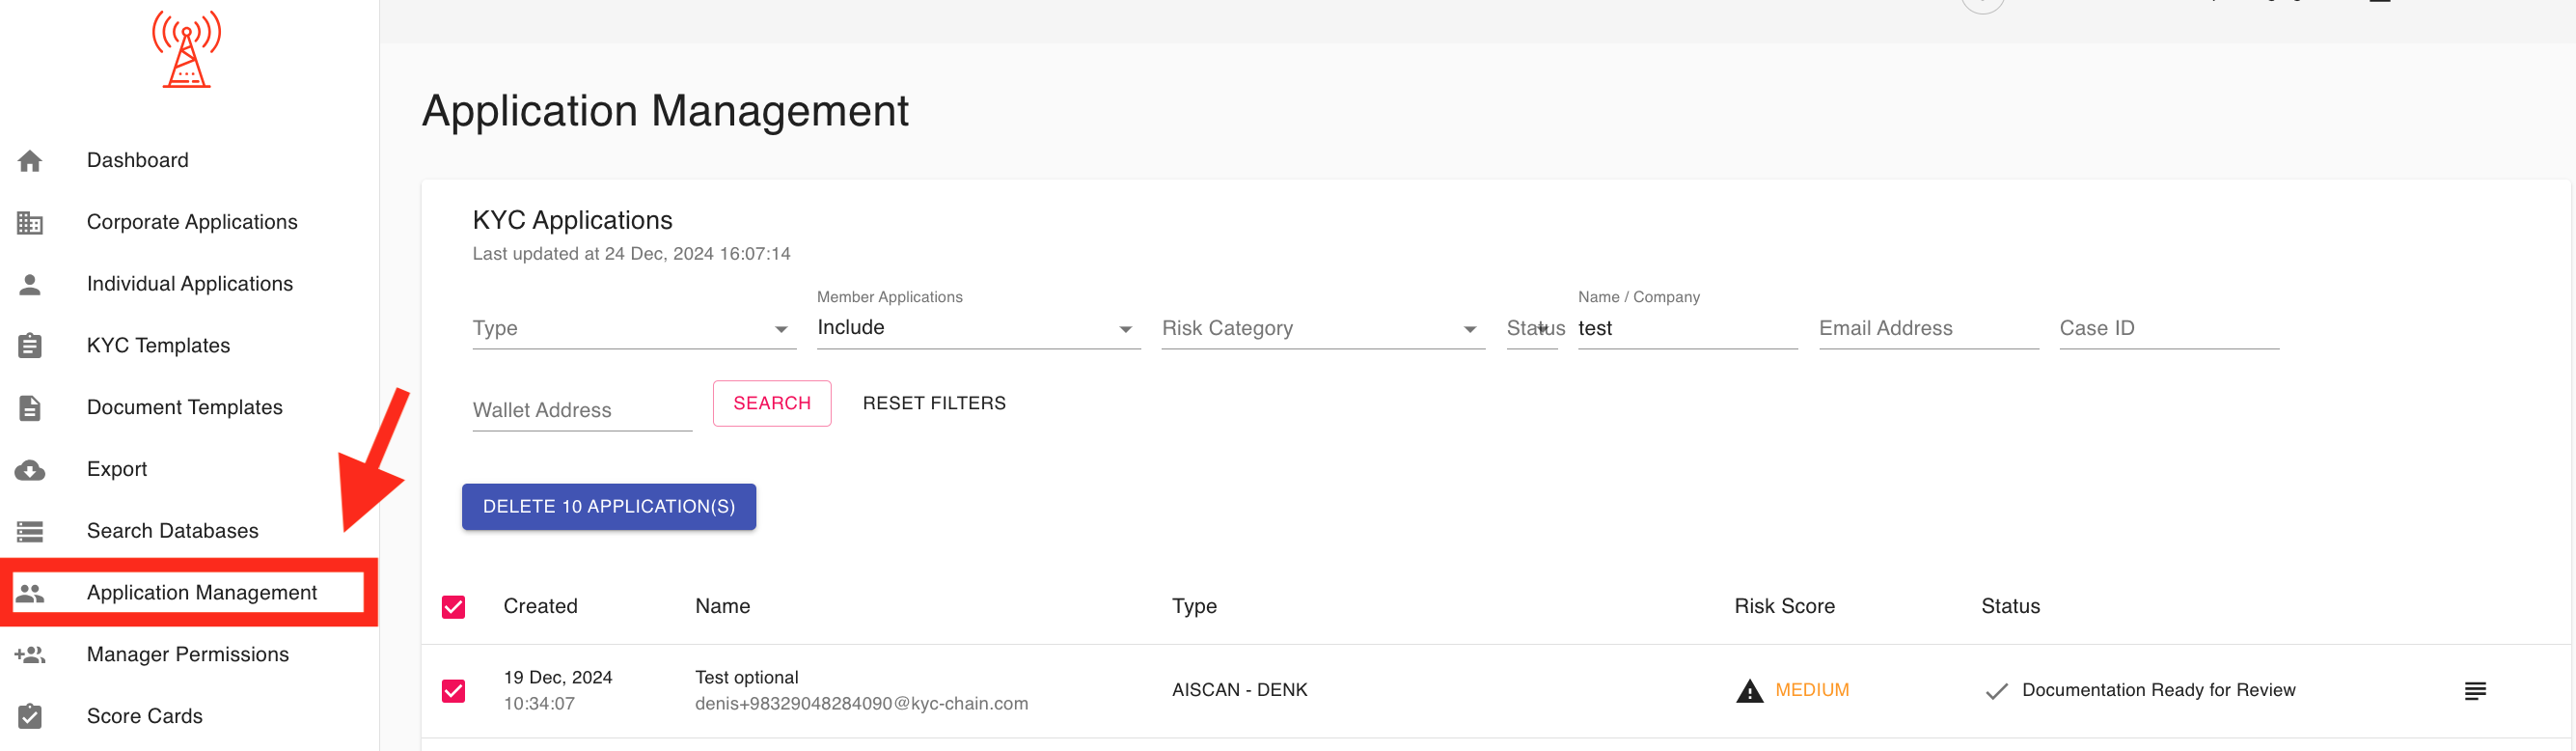
3.61 Application Management:
This tool allows managers to permanently delete applications including all data and files from the database.
1. Search and Filter Options:
- Allows administrators to locate applications quickly by applying filters such as type, wallet address, risk category, or status.
- Includes a search bar to find specific applications by name, email address, or case ID.
2. Application Selection:
- Administrators can use checkboxes to select one or multiple applications for deletion.
3. Bulk Deletion:
- A prominently displayed "Delete Applications" button allows for the removal of selected applications in a single action.
4. Application Details for Deletion:
- Displays essential information, such as applicant name, email address, risk score, and status, to help administrators make informed decisions before deleting applications.
This section is a key tool for maintaining an organized and efficient KYC application database by removing outdated or unnecessary entries.
IMPORTANT NOTE: Application's can't be restored after deletion
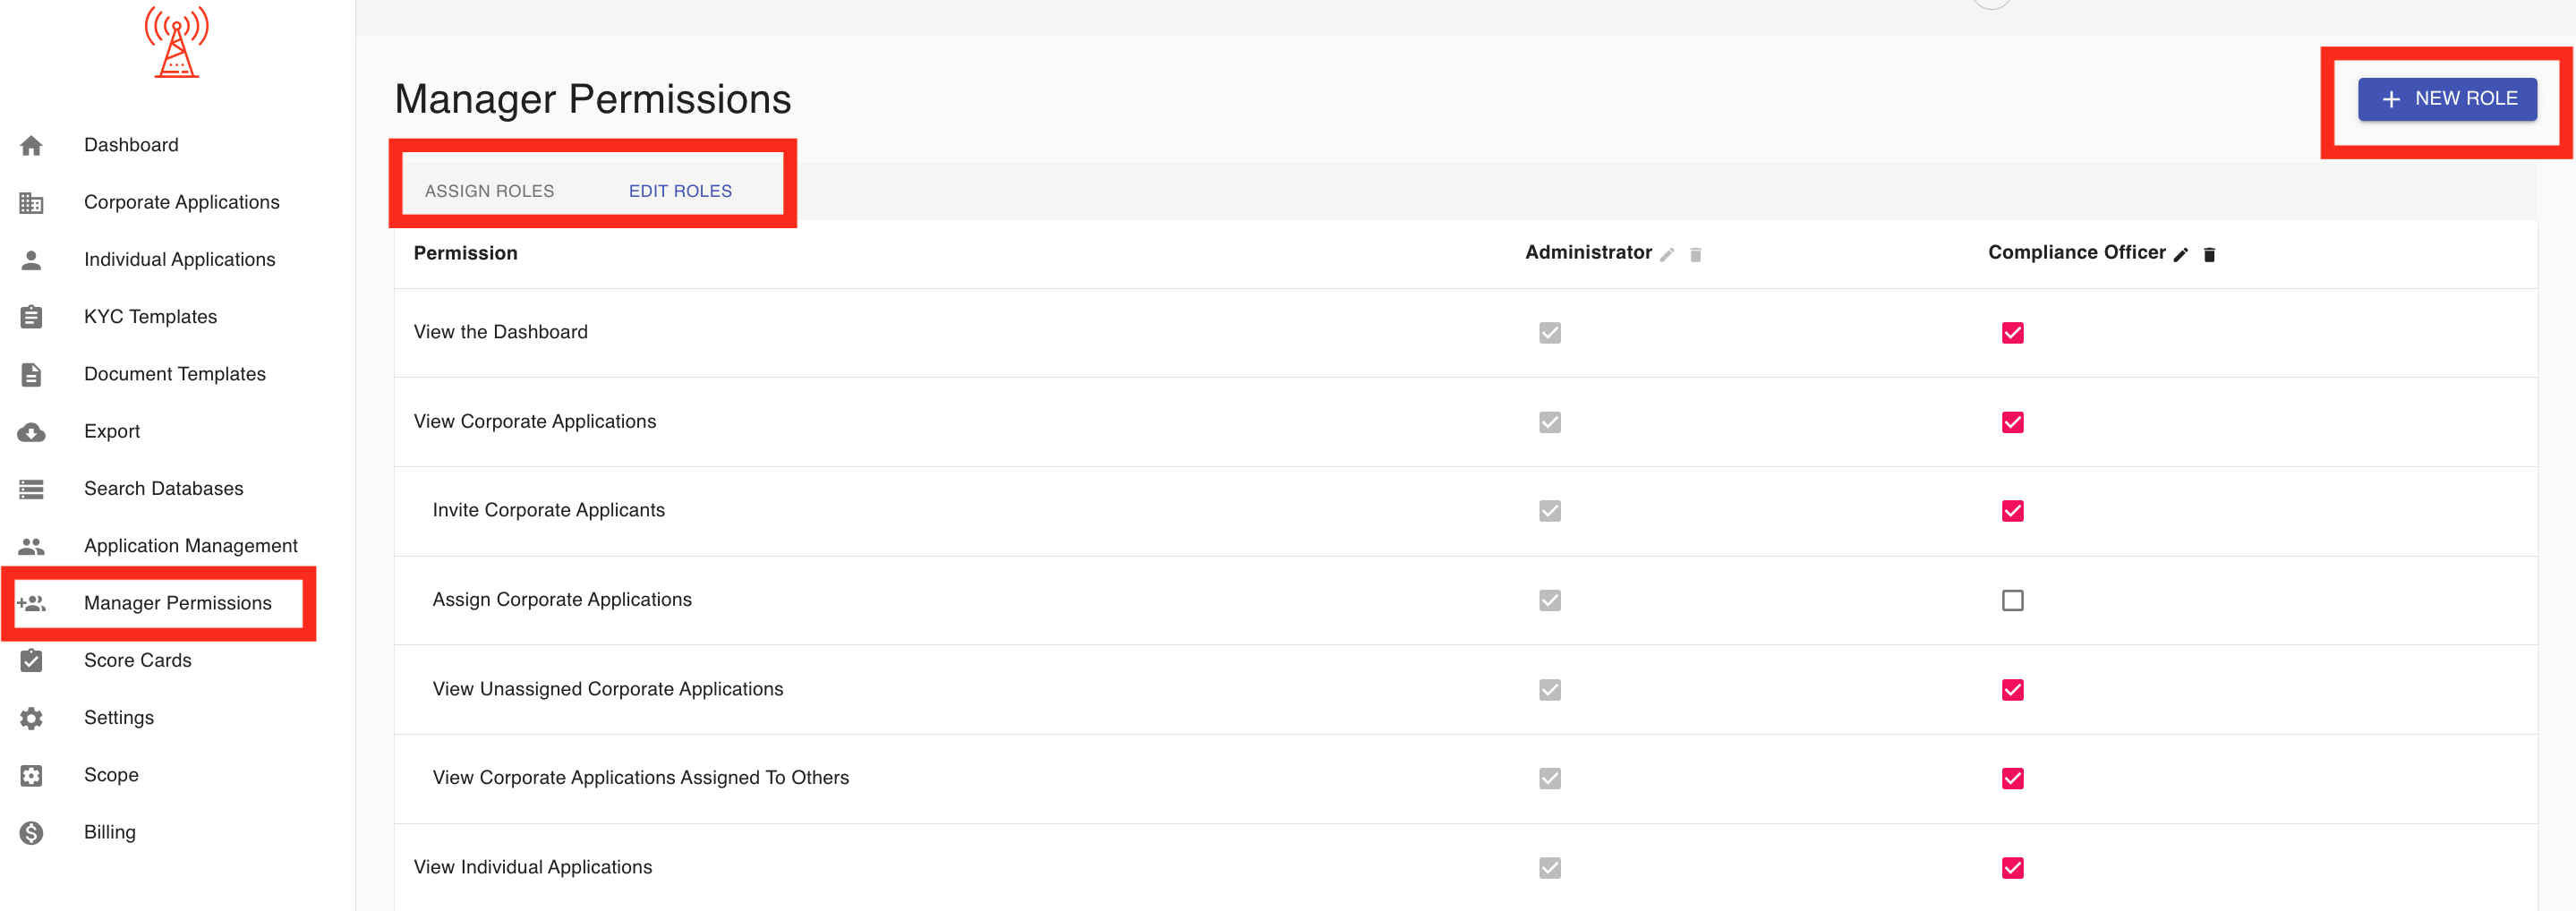
3.62 Manager Permissions:
The Manager Permissions section in the KYC management application provides a centralized interface for managing and customizing access levels for managers. Its key features include:
1. Assign Roles: Managers can be assigned specific roles, such as "Administrator," to define their level of access and authority within the platform. Each manager’s role is displayed alongside their email and name for easy identification.
2. Edit Roles and Permissions: Administrators can not only adjust or remove roles but also edit permissions specific to each role. This ensures a tailored access control system that aligns with organizational requirements.
3. Manage Active and Inactive Managers: A toggle option allows administrators to view and manage both active and inactive managers, providing flexibility in handling current and past users.
4. Add New Managers: The “+ New Manager” button facilitates the addition of new team members. Administrators can assign roles and set permissions for new users during the onboarding process.
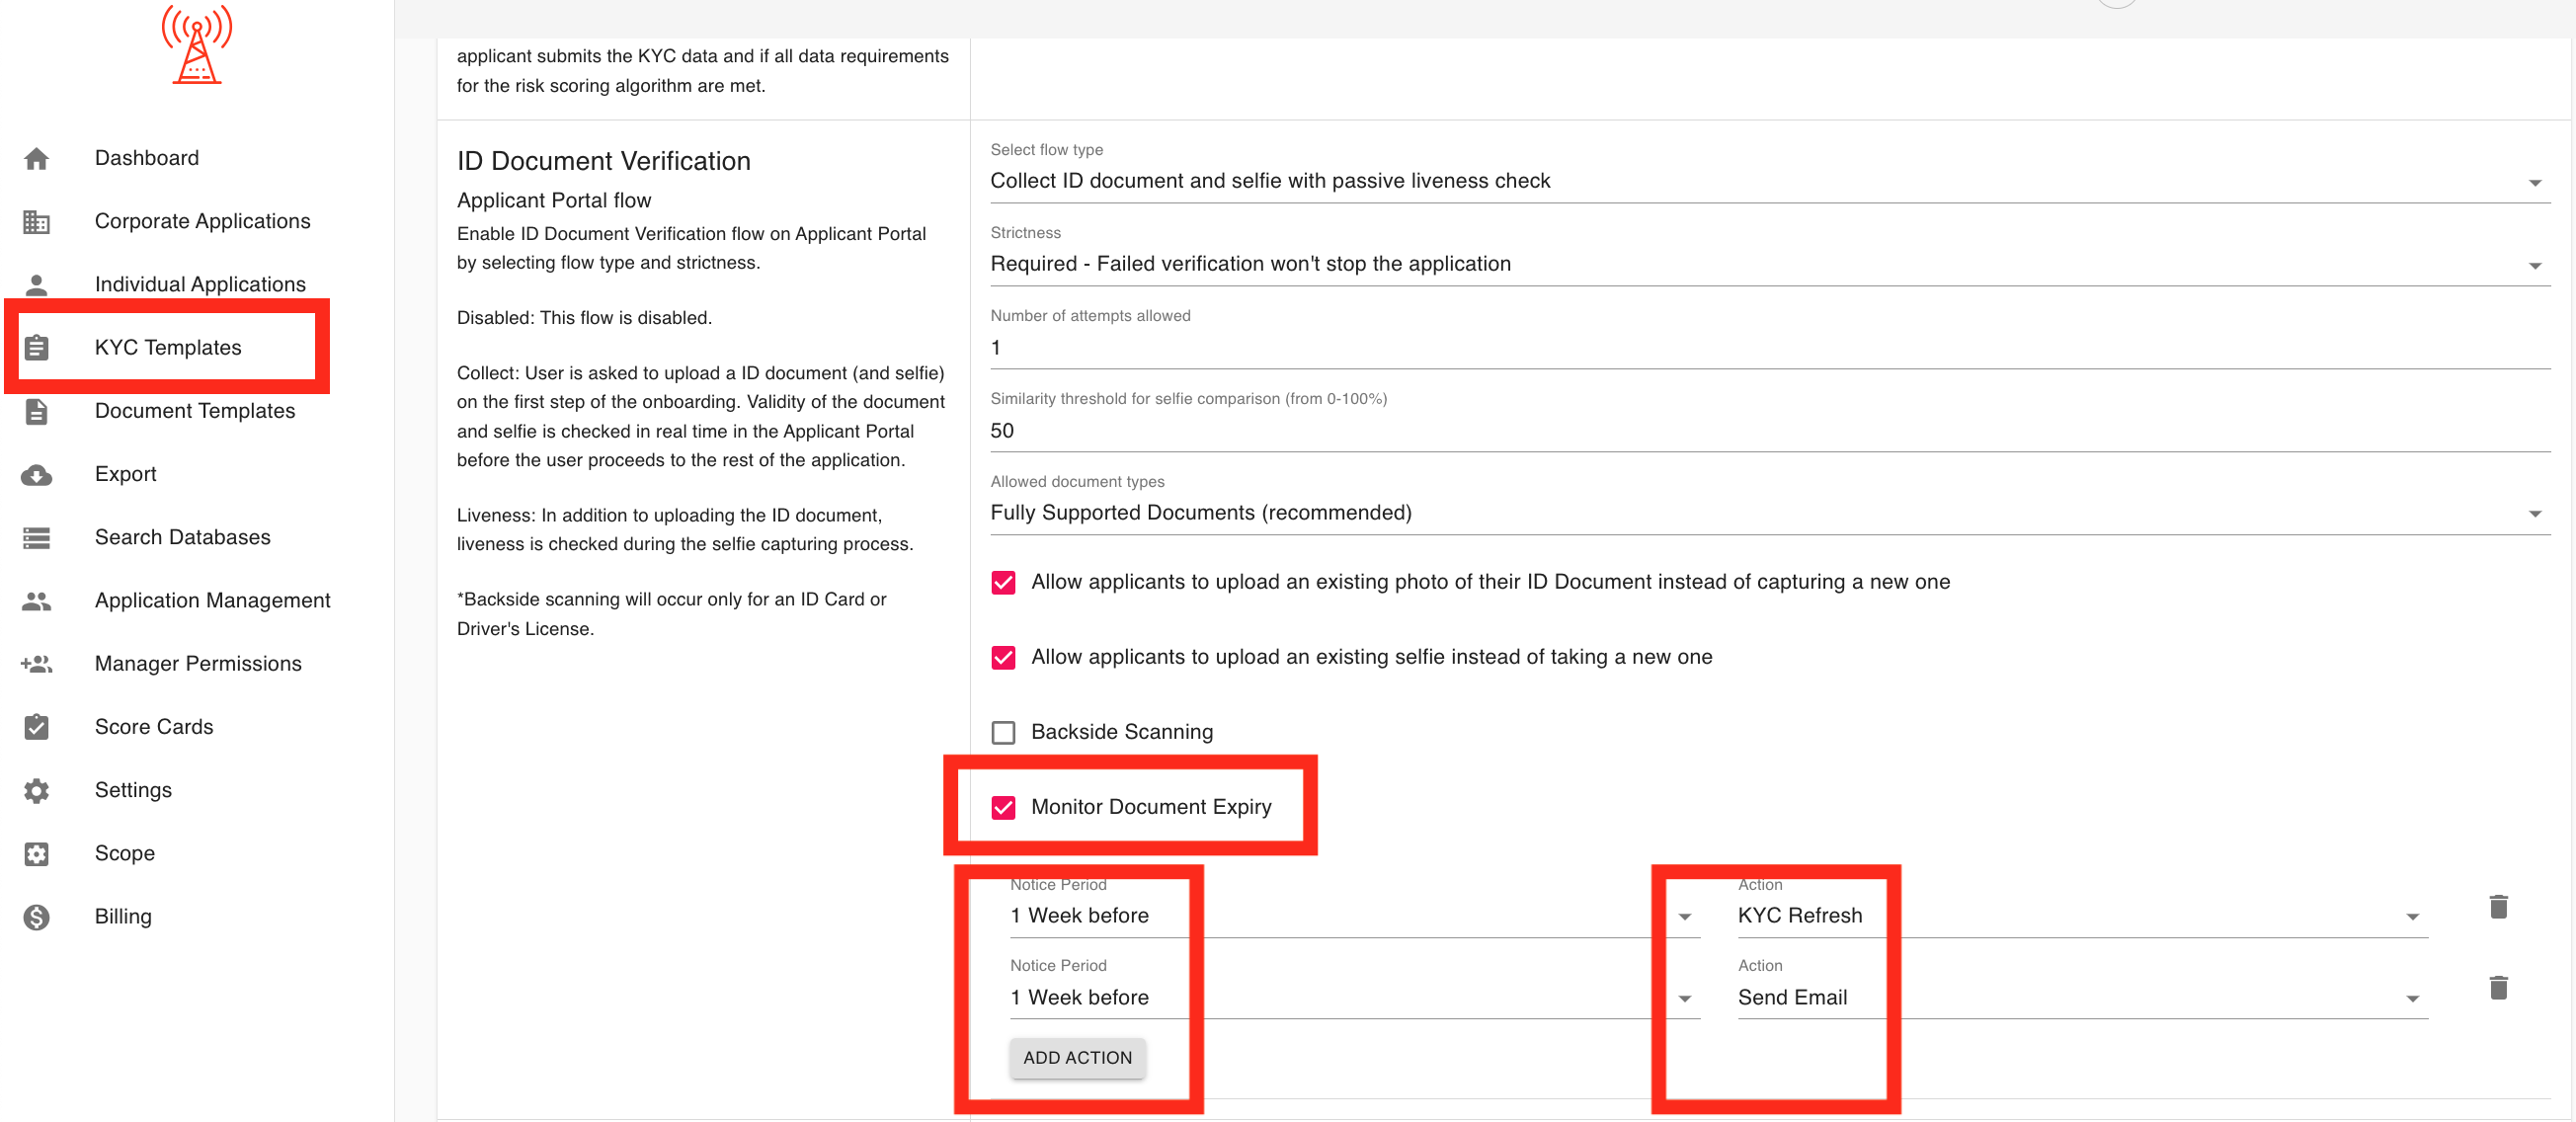
3.63 Document Expiry Monitoring:
The Document Monitoring Expiry feature tracks the expiration of customer ID documents and triggers actions based on a defined notice period. It helps ensure compliance by notifying both applicants and compliance managers before document expiration.
Key Features:
- Notice Period: Set a notice period (e.g., 7 days) before document expiration to trigger actions.
- Actions:
- KYC Refresh: Automatically reopens the approved application and requests the applicant by email to redo their KYC process.
- Email Notification: Sends an email to the manager about the impending document expiry.
How It Works: Go to the KYC Templates section, and open the template you want to customize. Set the notice period (e.g., 7 days) for expiry notifications. When the document is nearing expiration, a KYC refresh is triggered, and both the applicant and compliance manager are notified. The applicant receives a request to redo their KYC, and the compliance manager is alerted in advance.
This feature ensures timely updates and keeps your KYC data compliant and accurate.
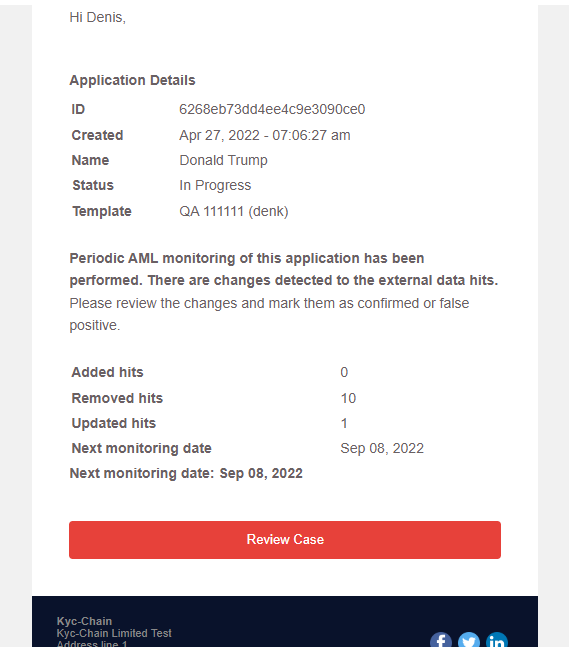
3.7 Ongoing AML Monitoring:
When does ongoing AML monitoring begin for an application?
Ongoing AML monitoring does not begin immediately upon an application’s approval. Instead, the initial monitoring check is scheduled for a specific future date, and subsequent checks will then occur at configured intervals.
This feature helps managers keep AML results for their applicants up-to-date. The monitoring interval can be set for each risk category (Low, Medium, High) within the KYC Templates (Daily, Weekly, Monthly, Every 6 Months, or Annually).
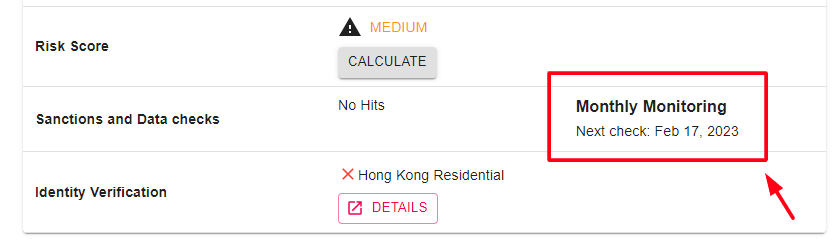
Important Notes: * Monitoring is only performed for applications that have a data check result. * Applications with ‘Cancelled’, ‘Rejected’, or ‘Ready for Review’ statuses are ignored. * Managers receive an email notification if any changes are detected in external databases for a monitored application. * The ‘Overview’ section of an application displays when the next AML check is scheduled.
Important Note: Cancelled, rejected, ready for review and any applications that don't have a data check result will be ignored.
To set this up:
- Go to KYC Templates
- Select and open a KYC Template
- Scroll down and find Ongoing Monitoring
- Select the interval for Low, Medium and/or High risk applications and click save.

The Overview section will also show when the next AML check is going to happen:
You can use the search filter option on the dashboard to display only applications with Monitoring Updates:

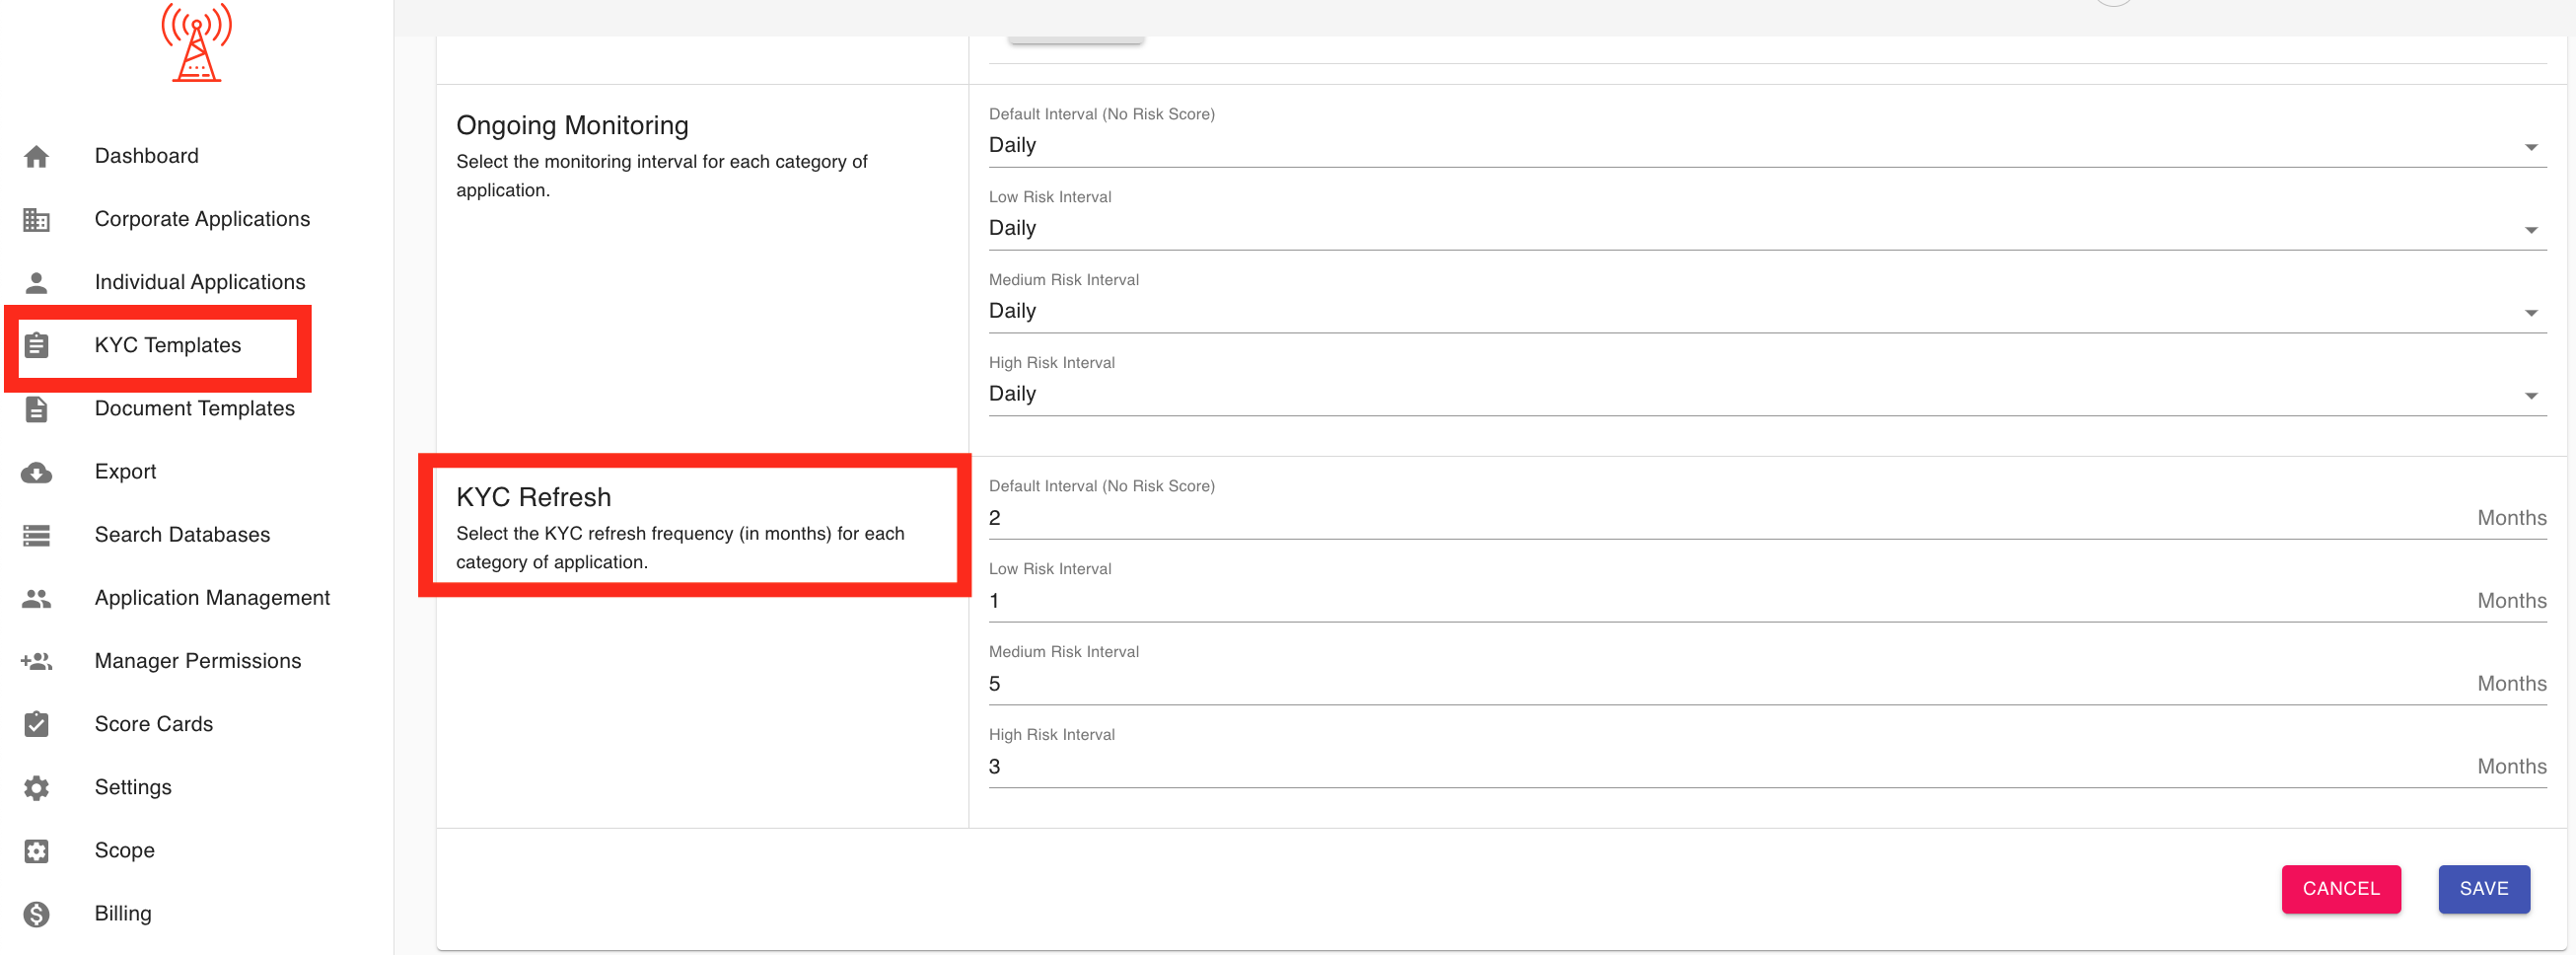
3.7.1 KYC Refresh:
The KYC (Know Your Customer) Refresh feature enables organizations to manage and maintain up-to-date customer records by setting a refresh frequency for each risk category. This feature ensures that customer information is periodically reviewed to comply with regulatory requirements and enhance security by refreshing data at appropriate intervals based on the risk profile.
Key Functionality:
- KYC Refresh Frequency Selection: The application allows users to set a refresh frequency for each customer category (e.g., low, medium, high risk). The refresh frequency is defined in months, enabling tailored intervals for different levels of risk.
- Customizable Intervals: For each risk category, users can specify a custom refresh period (in months) to ensure that high-risk customers are reviewed more frequently compared to lower-risk customers. This customization helps meet regulatory compliance and internal risk management requirements.
- Risk-Based Customization: The refresh intervals can be adjusted per customer risk category, allowing for more stringent monitoring of high-risk clients and reduced oversight for low-risk ones.
- Compliance and Monitoring: By setting appropriate refresh frequencies, organizations ensure they remain compliant with KYC regulations and can proactively manage potential risks by keeping customer data accurate and current.
3.71.1 Easy Fill:
The Easy Fill feature is a powerful tool designed to streamline the KYC process by enabling compliance officers to submit client data and documents on behalf of the applicant, ensuring a seamless and efficient workflow. With this feature, compliance officers can complete the entire application process without requiring any direct involvement from the applicant.
This feature is particularly useful for scenarios where applicants prefer not to complete the KYC process themselves but instead provide all necessary information and documents via email or other channels. The compliance officer can then input the applicant's details, upload supporting documents, and submit the application. Once submitted, all required checks are automatically triggered, allowing the KYC process to proceed smoothly.
The Easy Fill feature ensures flexibility and convenience, making it an ideal solution for clients who value a hands-off approach to KYC while maintaining full compliance with regulatory requirements. This functionality is designed to save time, reduce friction, and provide a professional experience for both applicants and compliance teams.
3.8 Settings:
In the Settings section, managers can set custom configurations for the KYC-Chain app and more:
Reminders:
KYCC can automatically send a reminder email to applicants who have an incomplete application that needs their attention:

In this section you can enable/disable this feature and configure how often the emails will be sent, as well as the maximum number of reminders to send to any one applicant. You can also choose to ignore old applications (even if they have not reached the reminders limit) so that enabling the feature doesn't necessarily result in emails going out to past applicants.
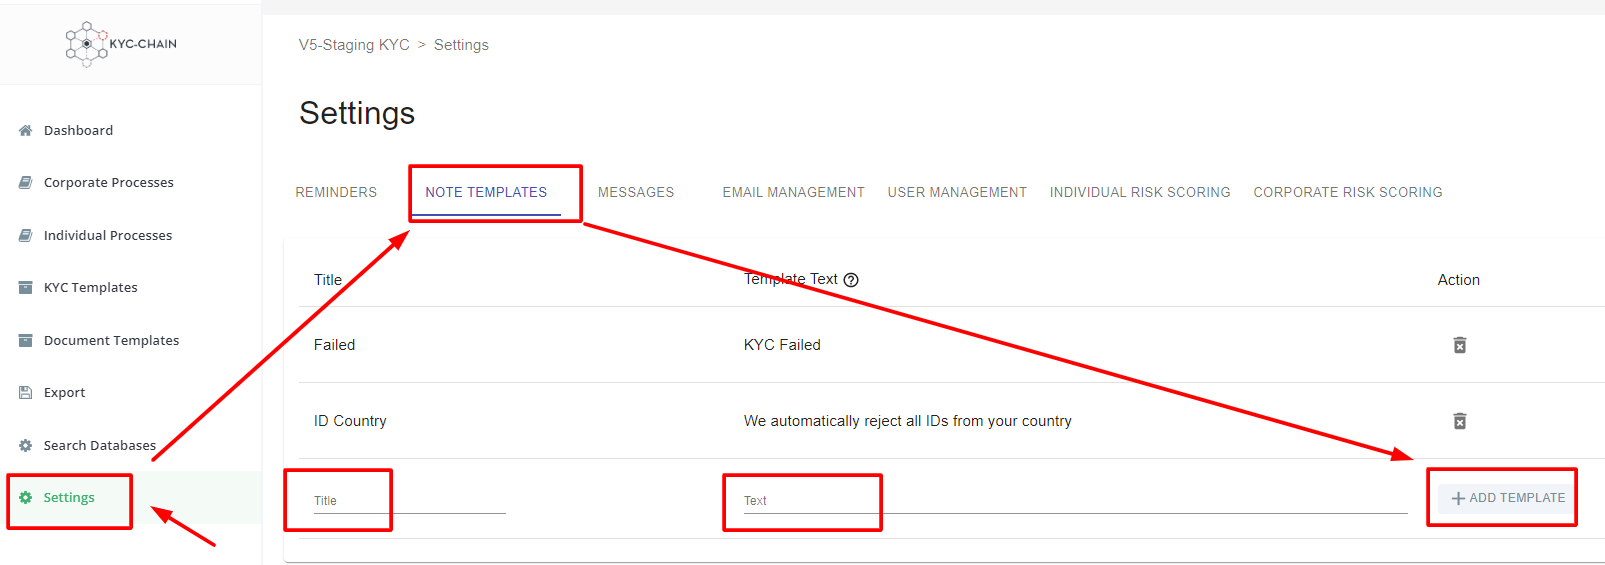
Note Templates:
Add frequently used rejection reasons to speed up the compliance workflow. Managers can save frequently used explanations here and then select them when rejecting a KYC application:
Email Management:
The Email Management section allows you to enable or disable email notifications for applicants and managers, customize the subject line, and send test emails to preview how they look.
Note: To update the actual email content, please contact our technical team.

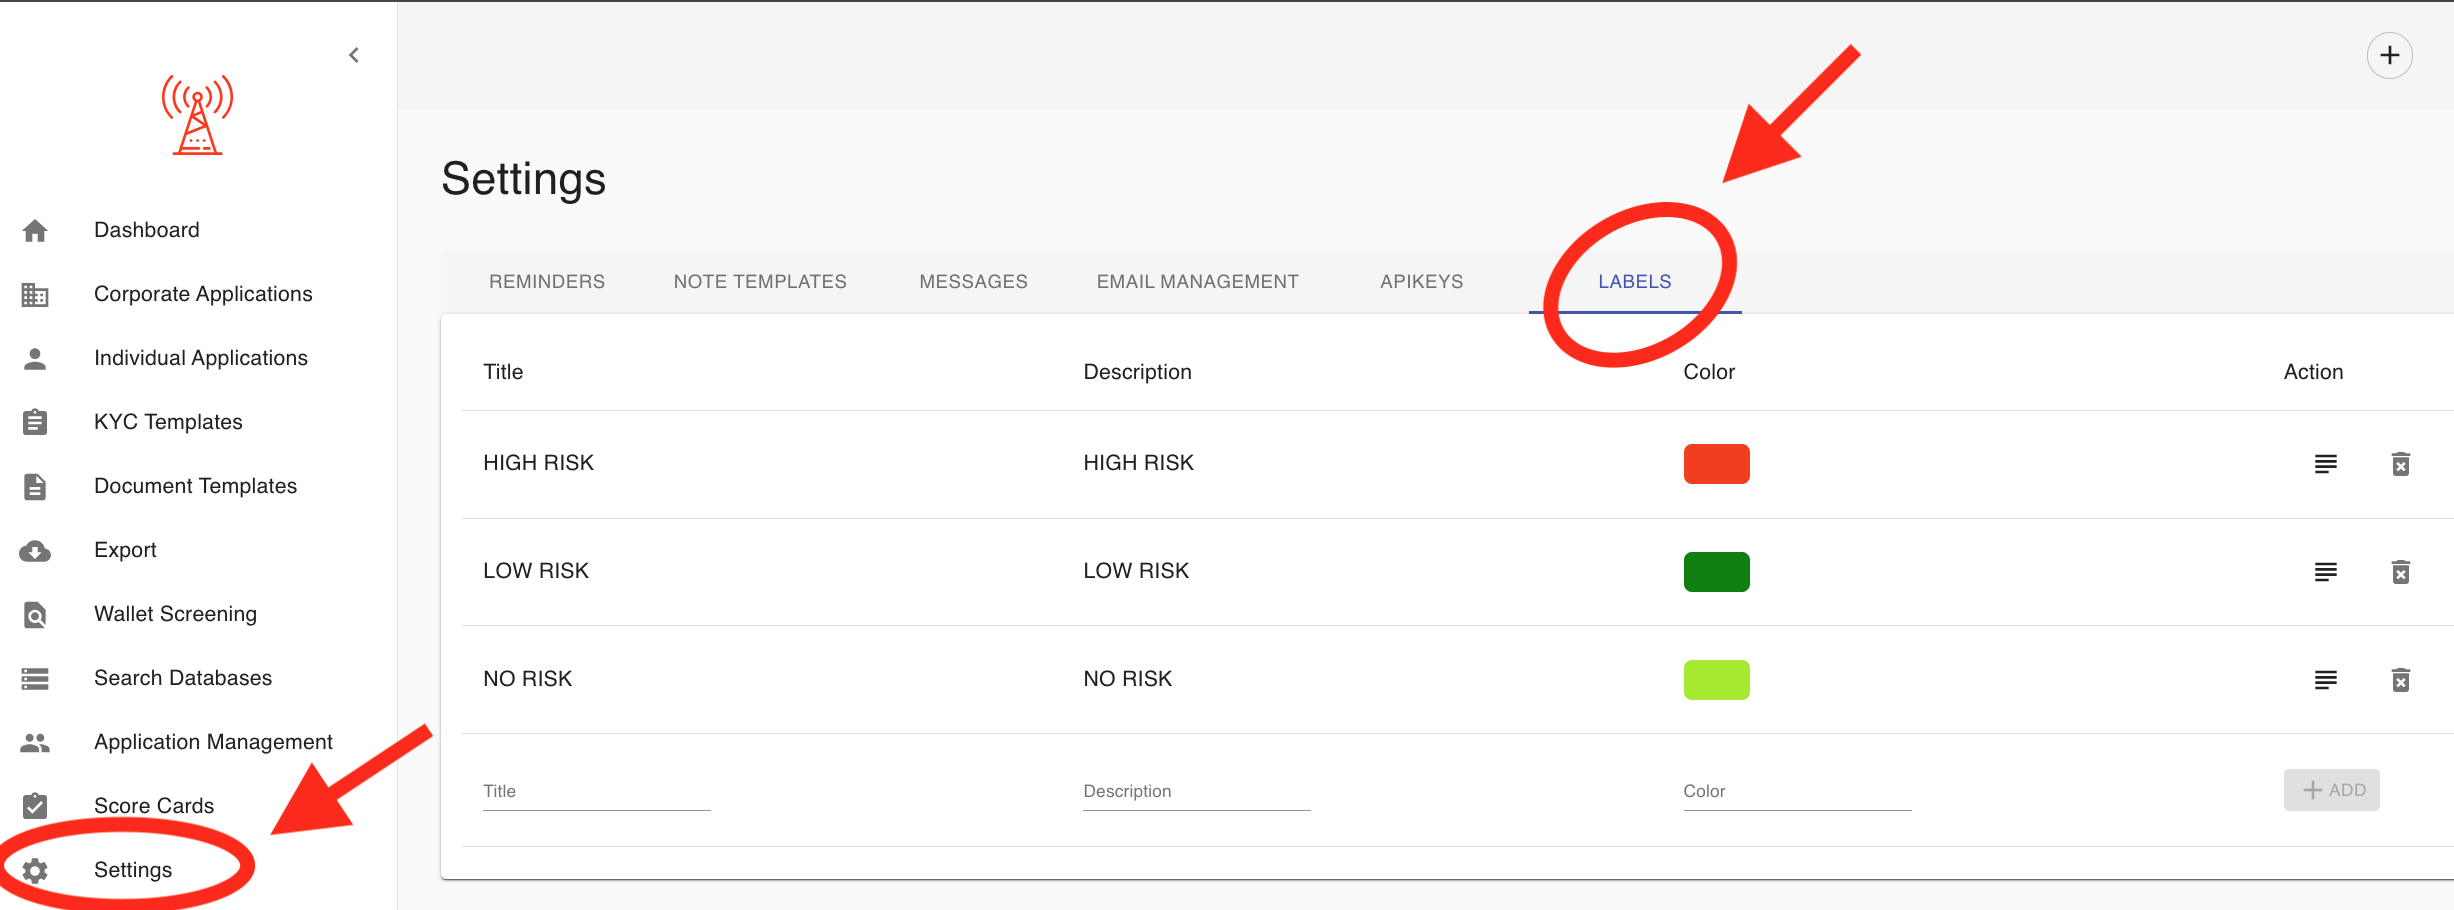
Labels:
Labels are a powerful tool for categorizing applications within the Management app. For example, you can use labels to mark applications as HIGH RISK or LOW RISK, or for any other purpose—such as adding notes or flagging applications for later review.
When creating a label, you can assign a custom title and choose a color to help visually organize and differentiate your labels. To create and manage labels, simply go to the Settings section.
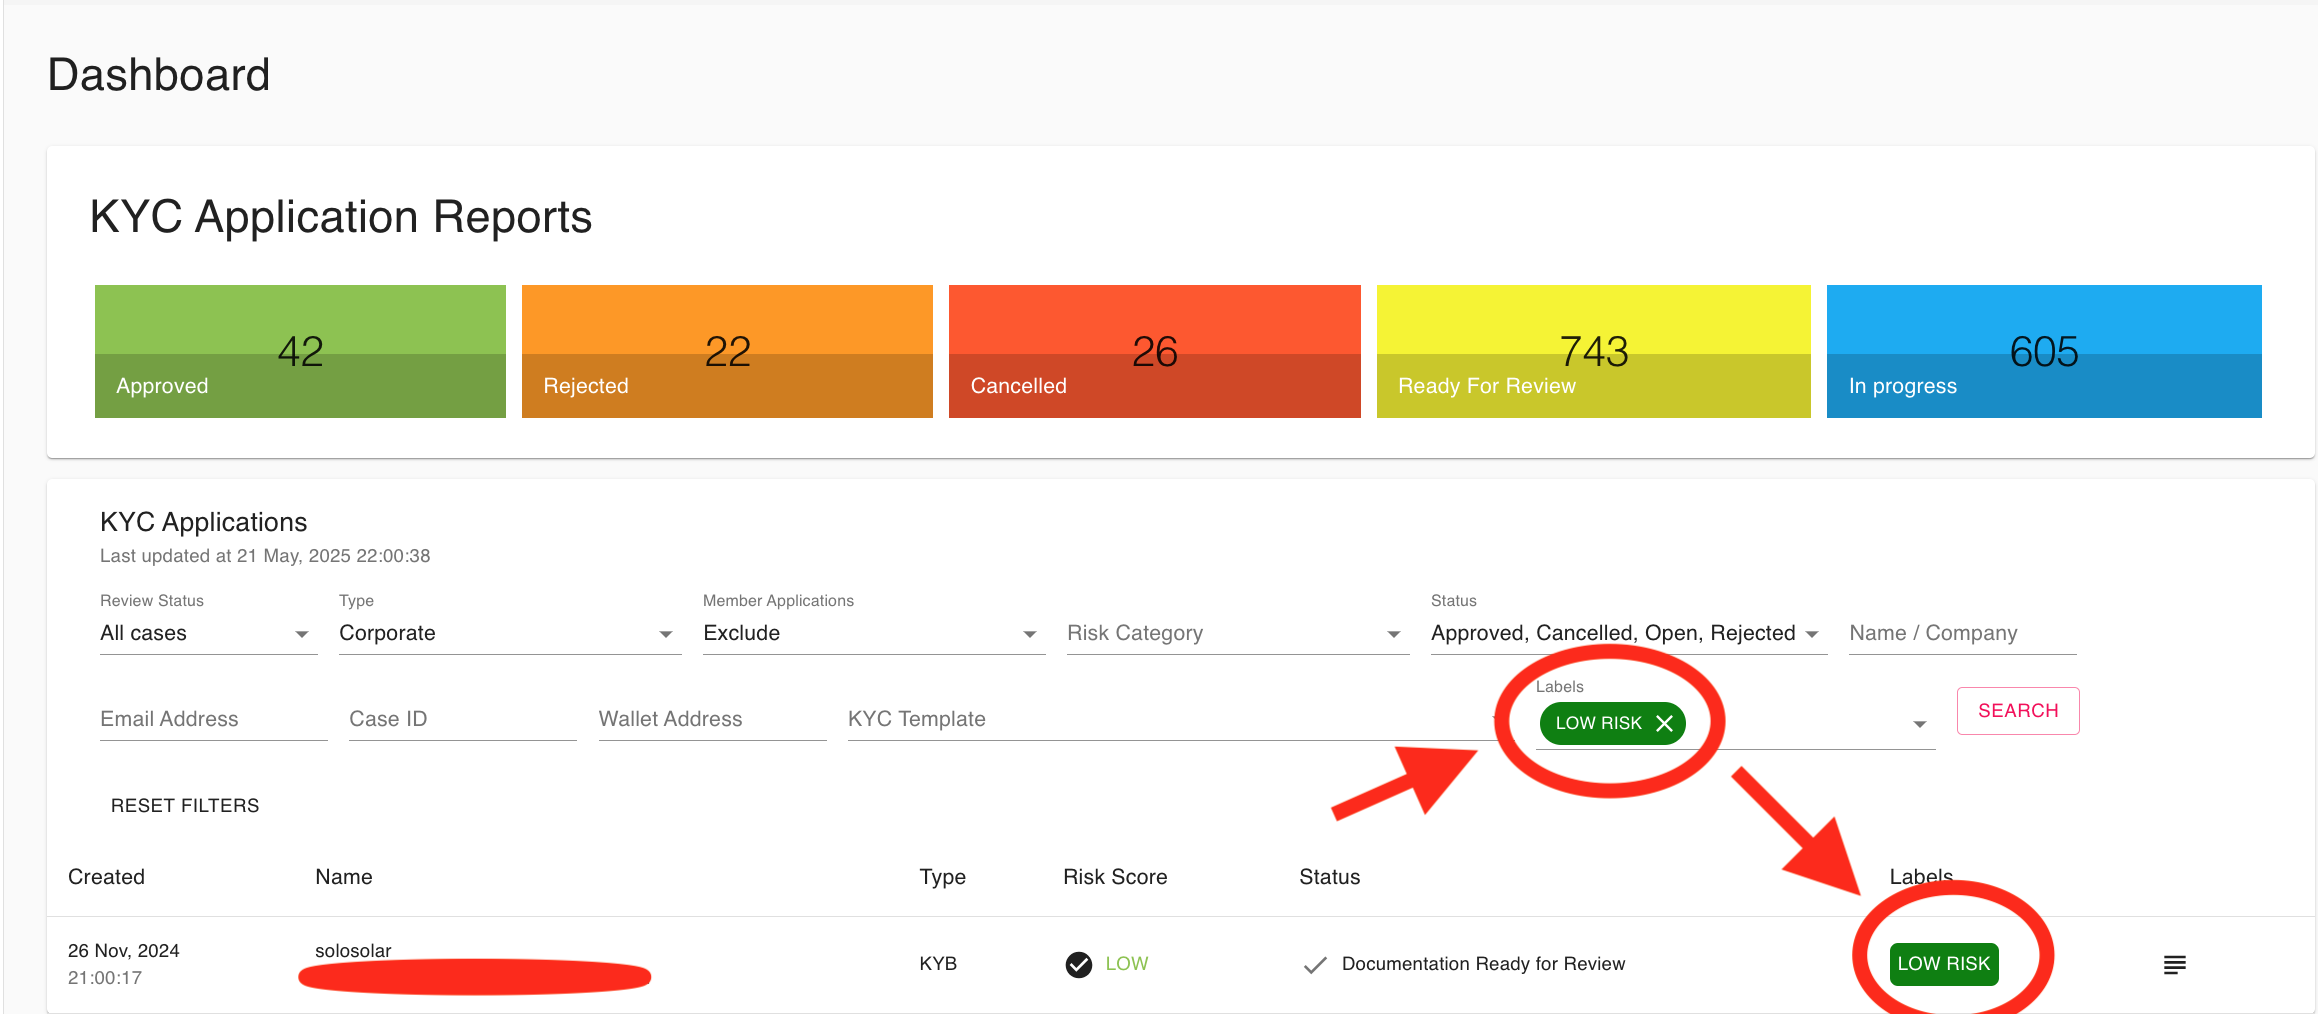
You can also search for applications by their labels, making it easy to organize and quickly locate specific cases:
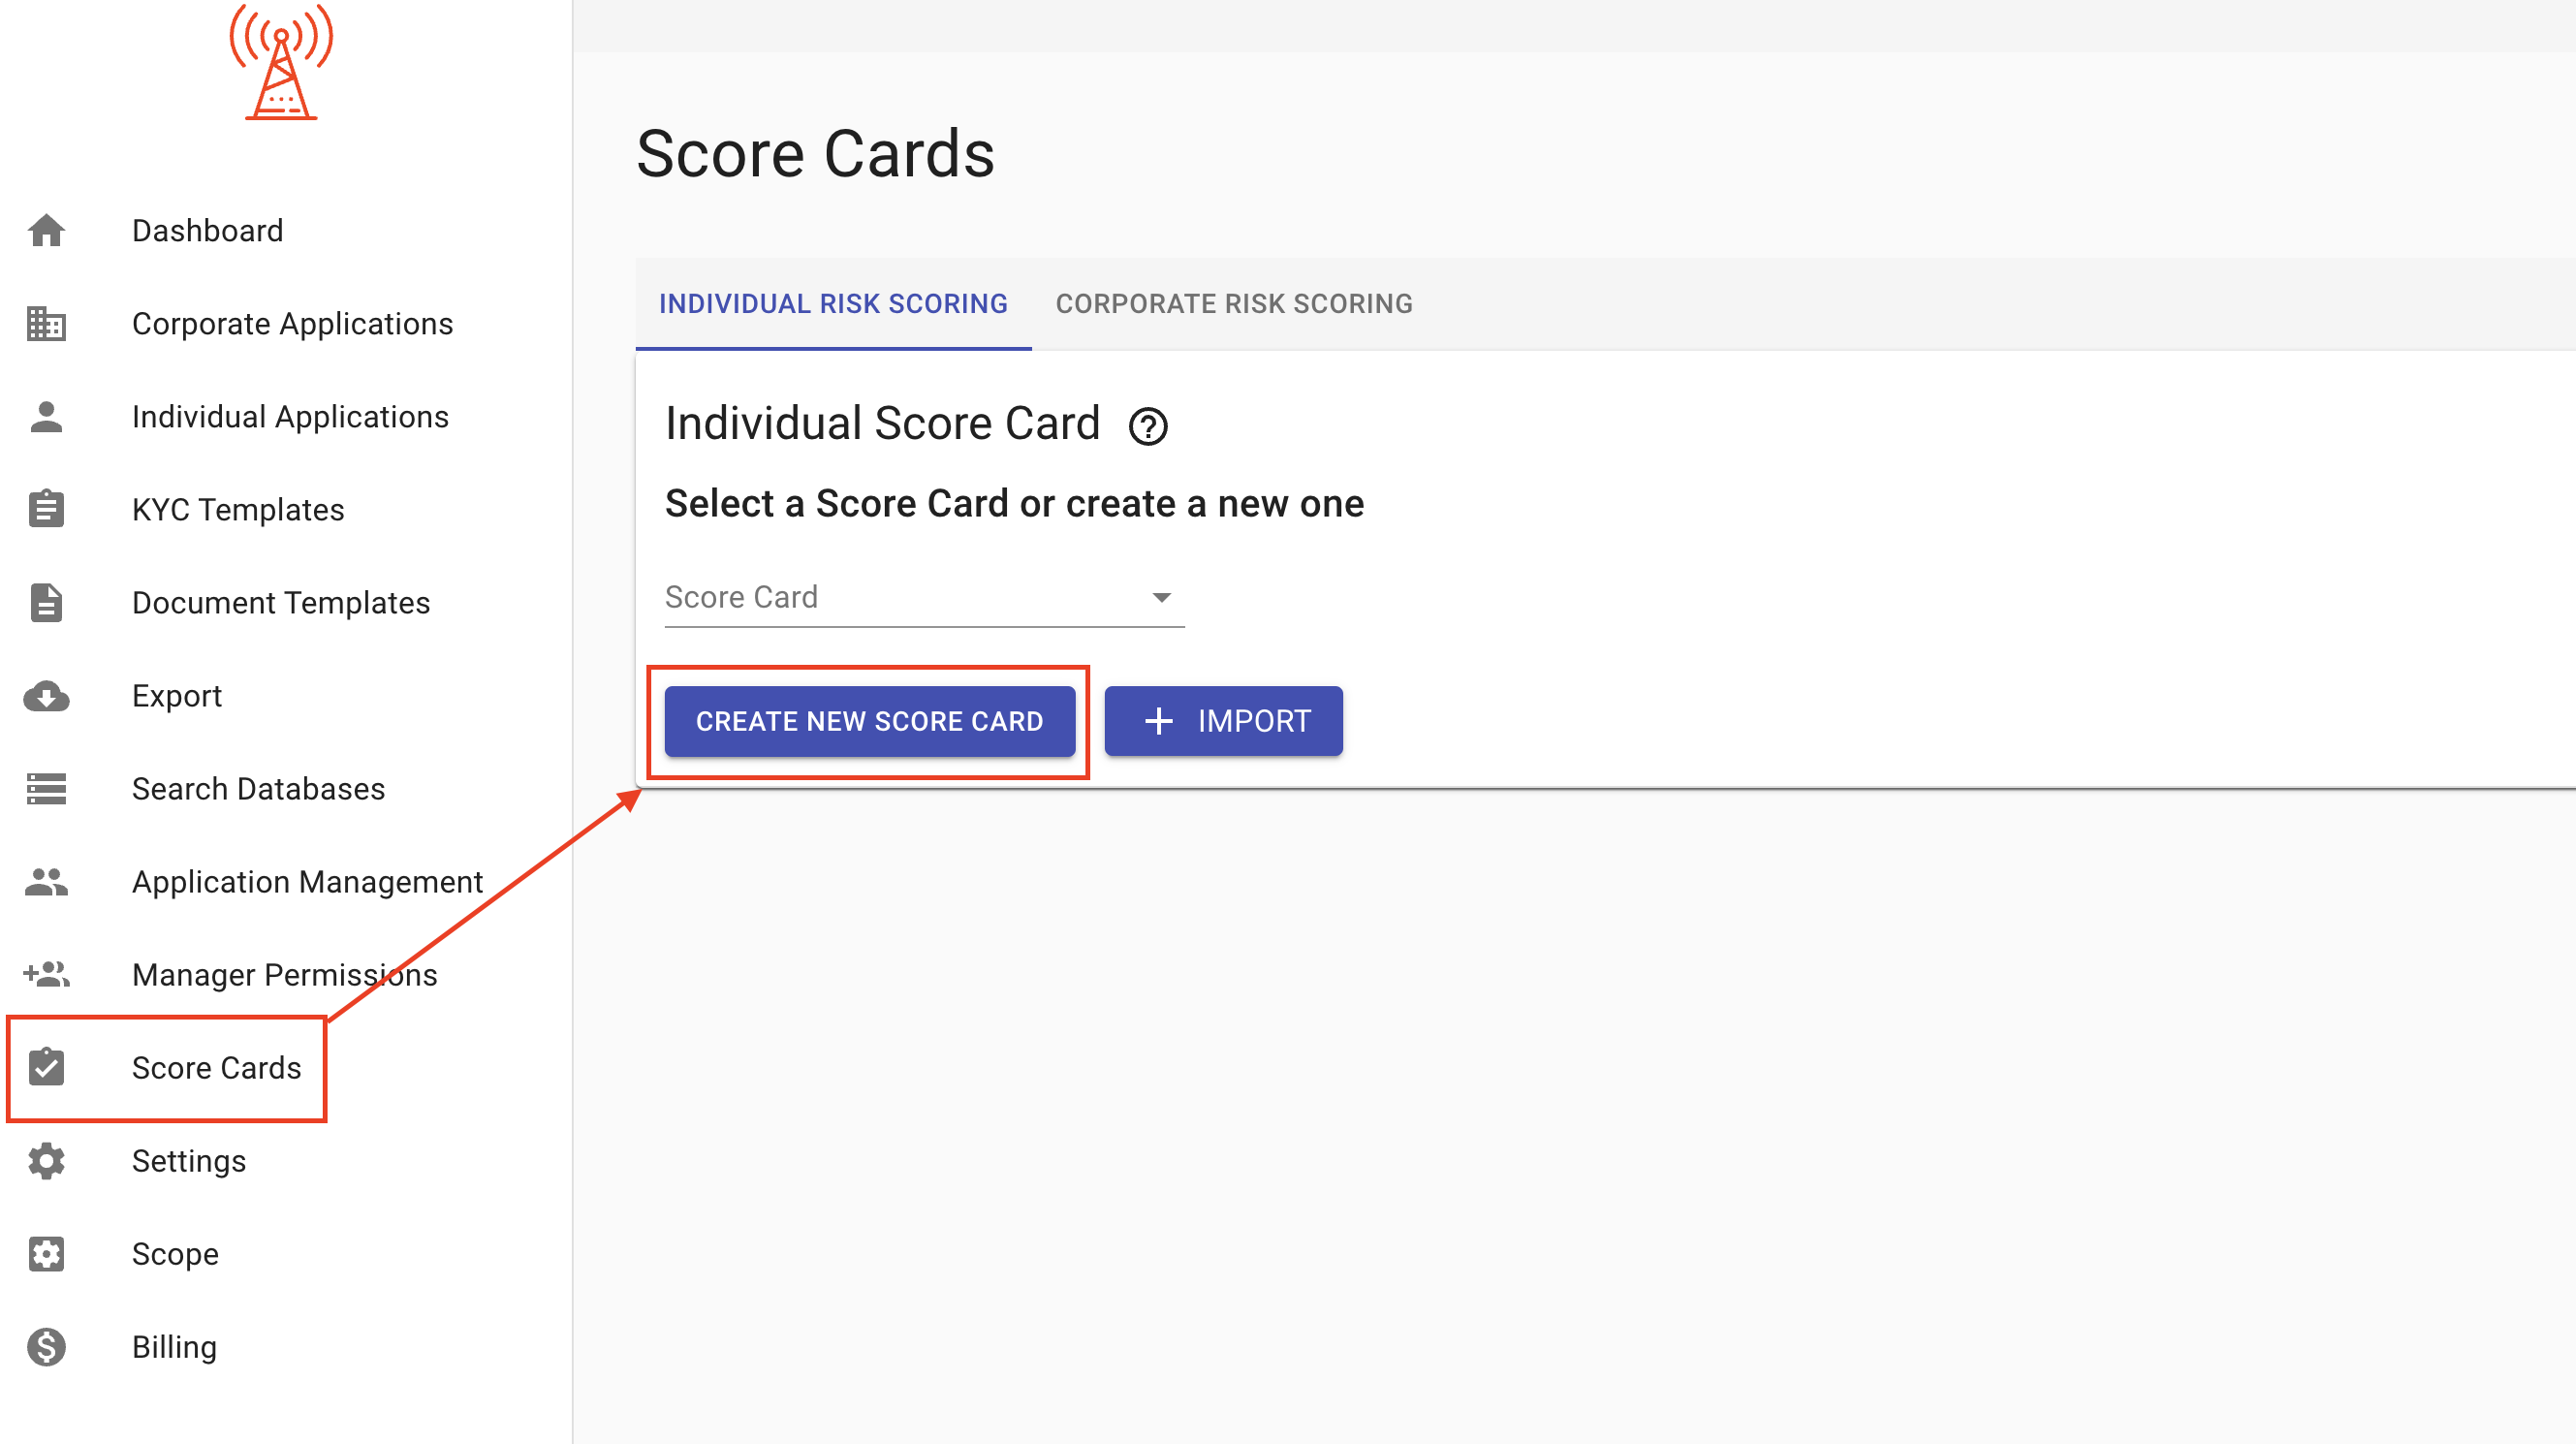
3.9 Risk Scoring:
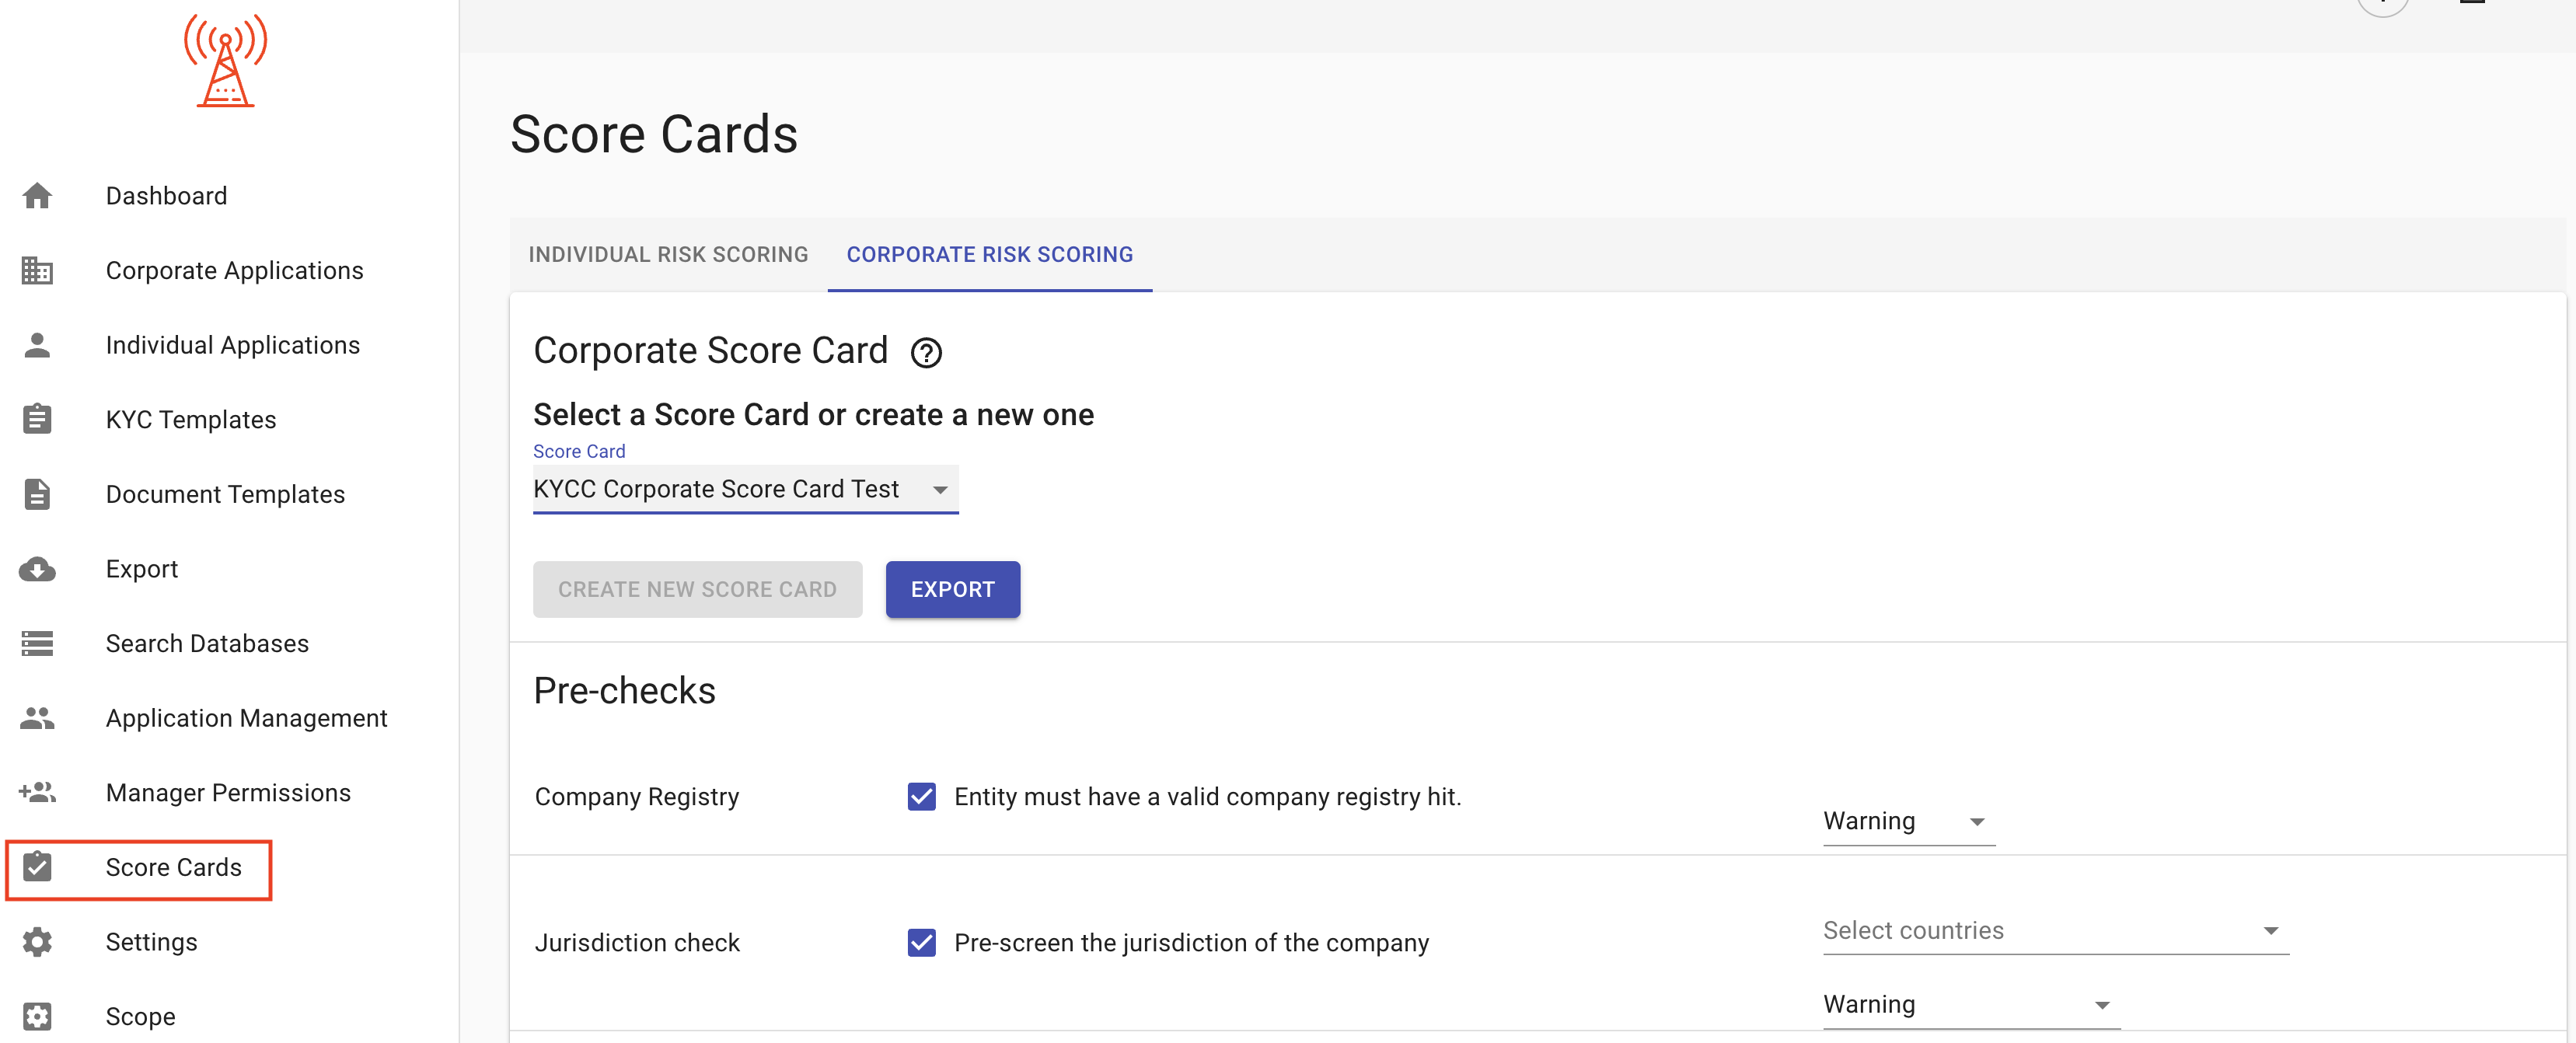
The Score Cards tab allows managers to configure multiple Risk Score Cards which each have customized parameters, and which can be assigned to KYC Templates so that KYC Processes using that template will automatically have their risk score calculated upon submission:
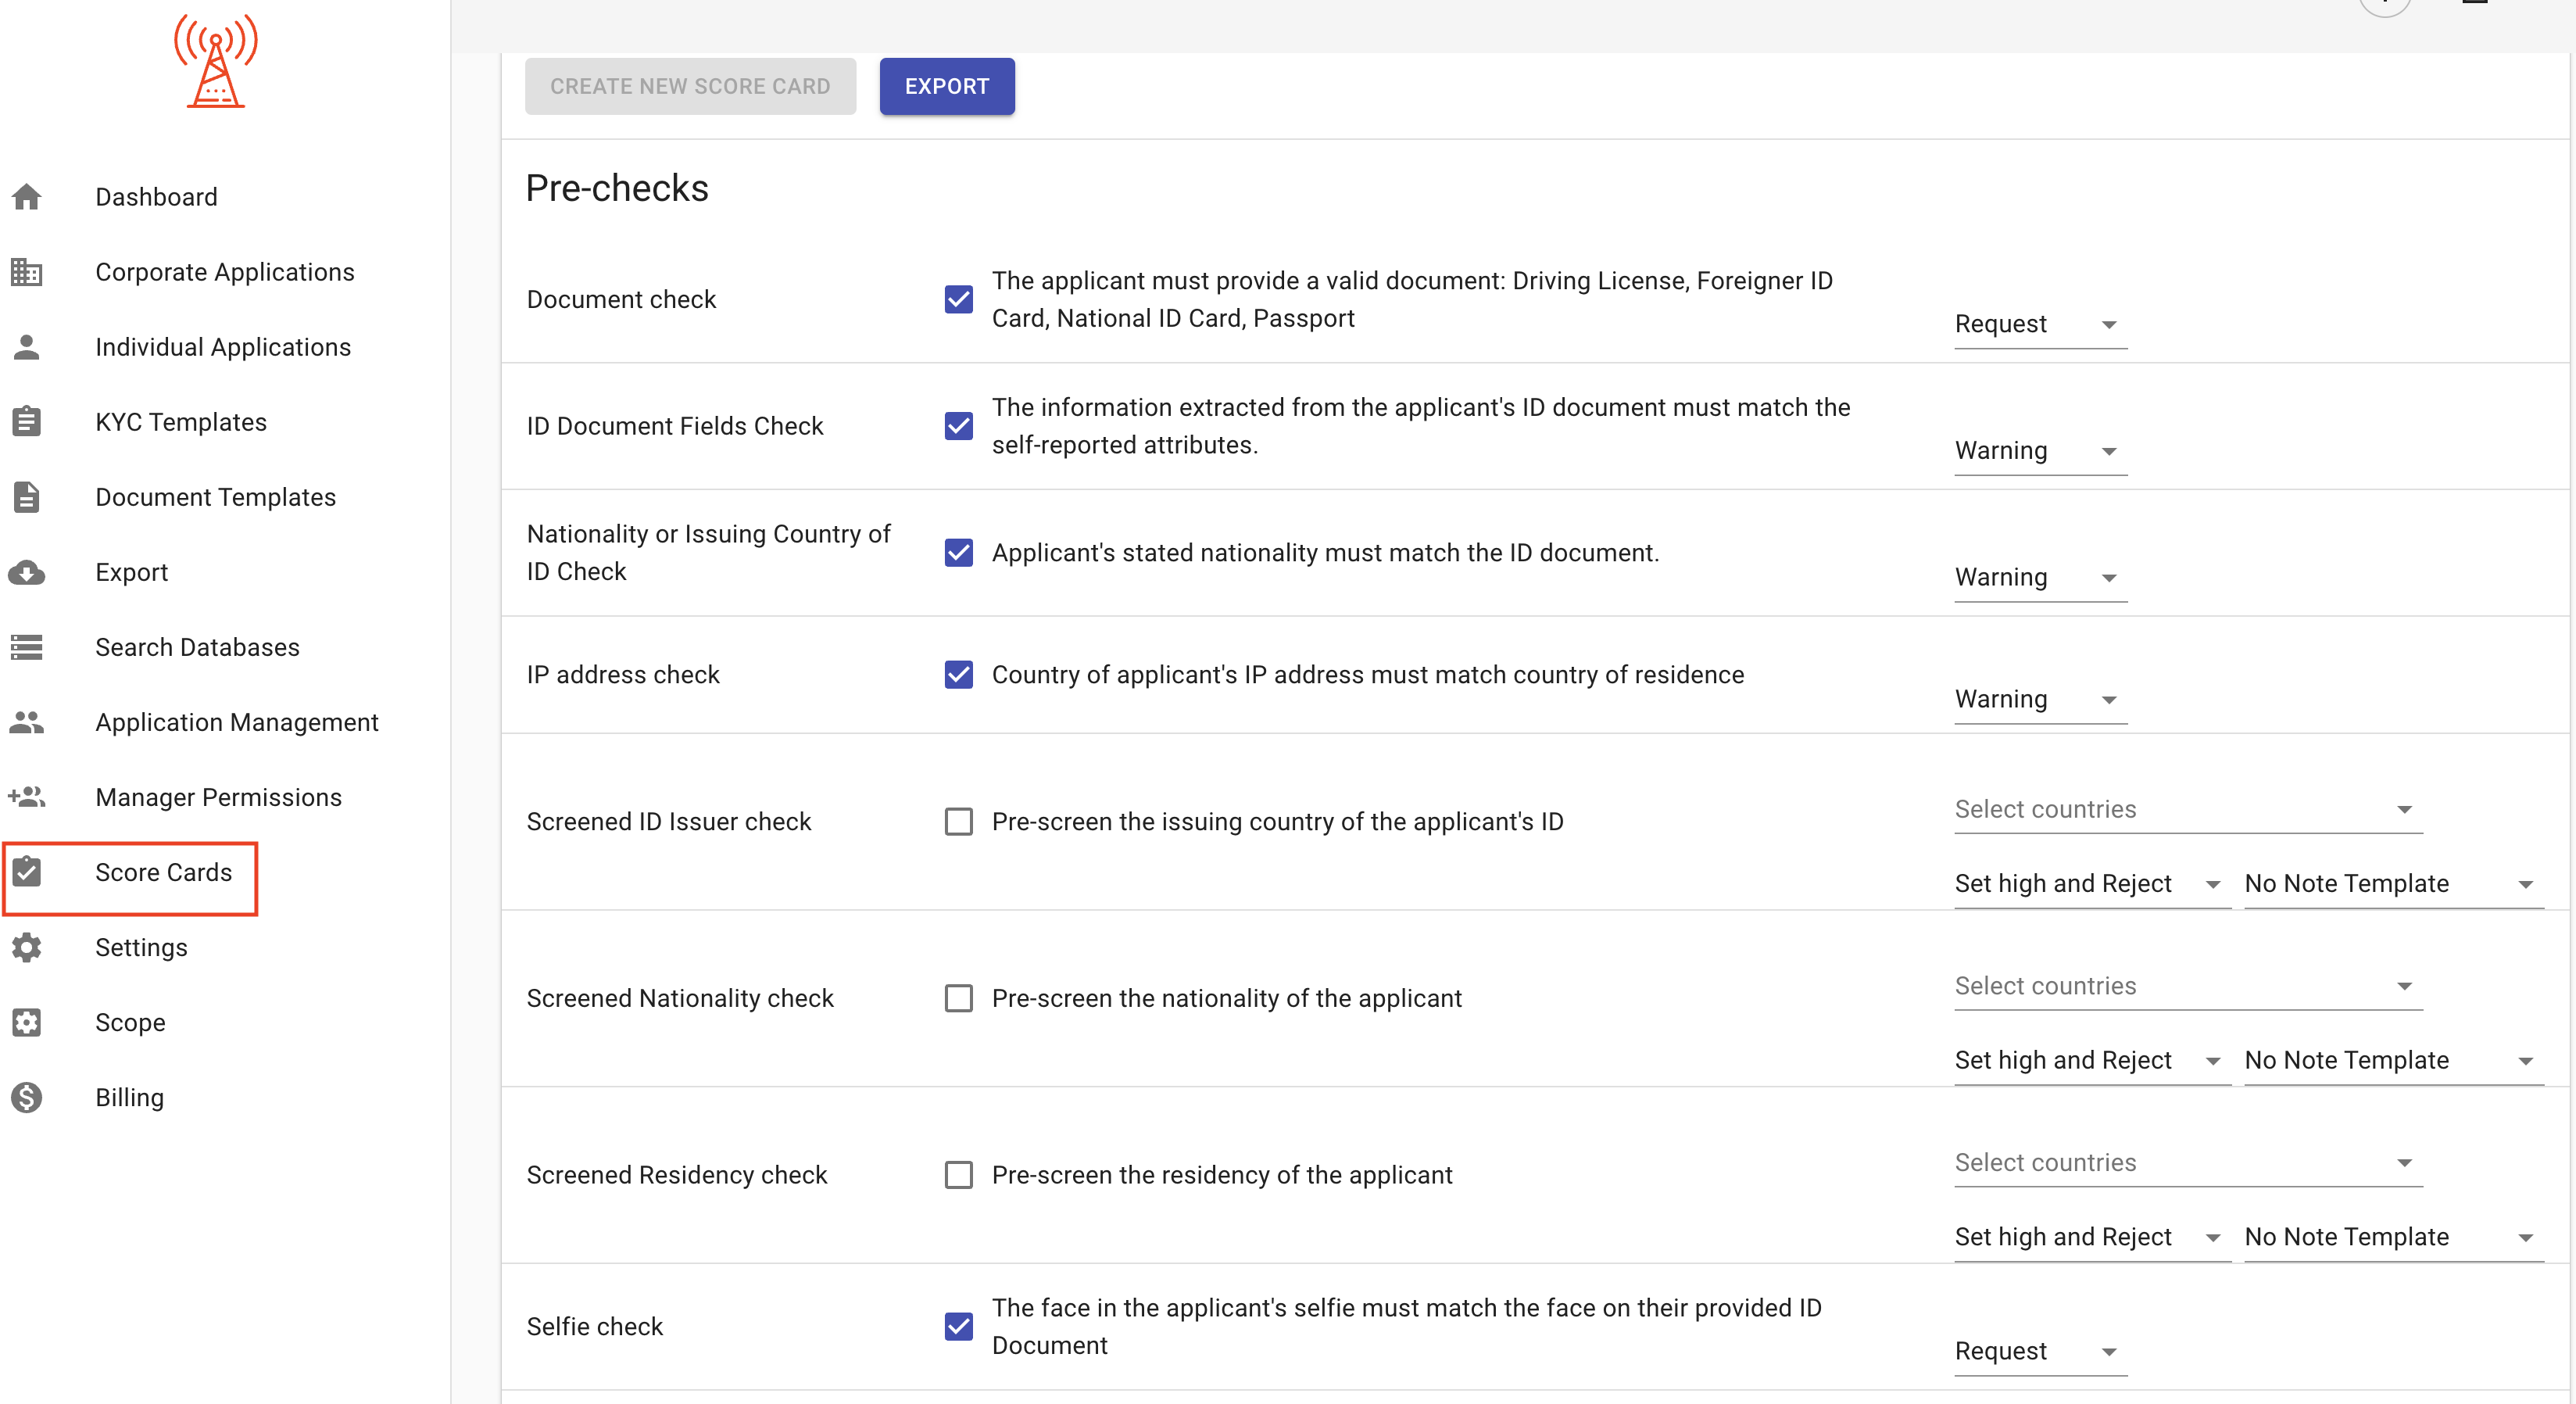
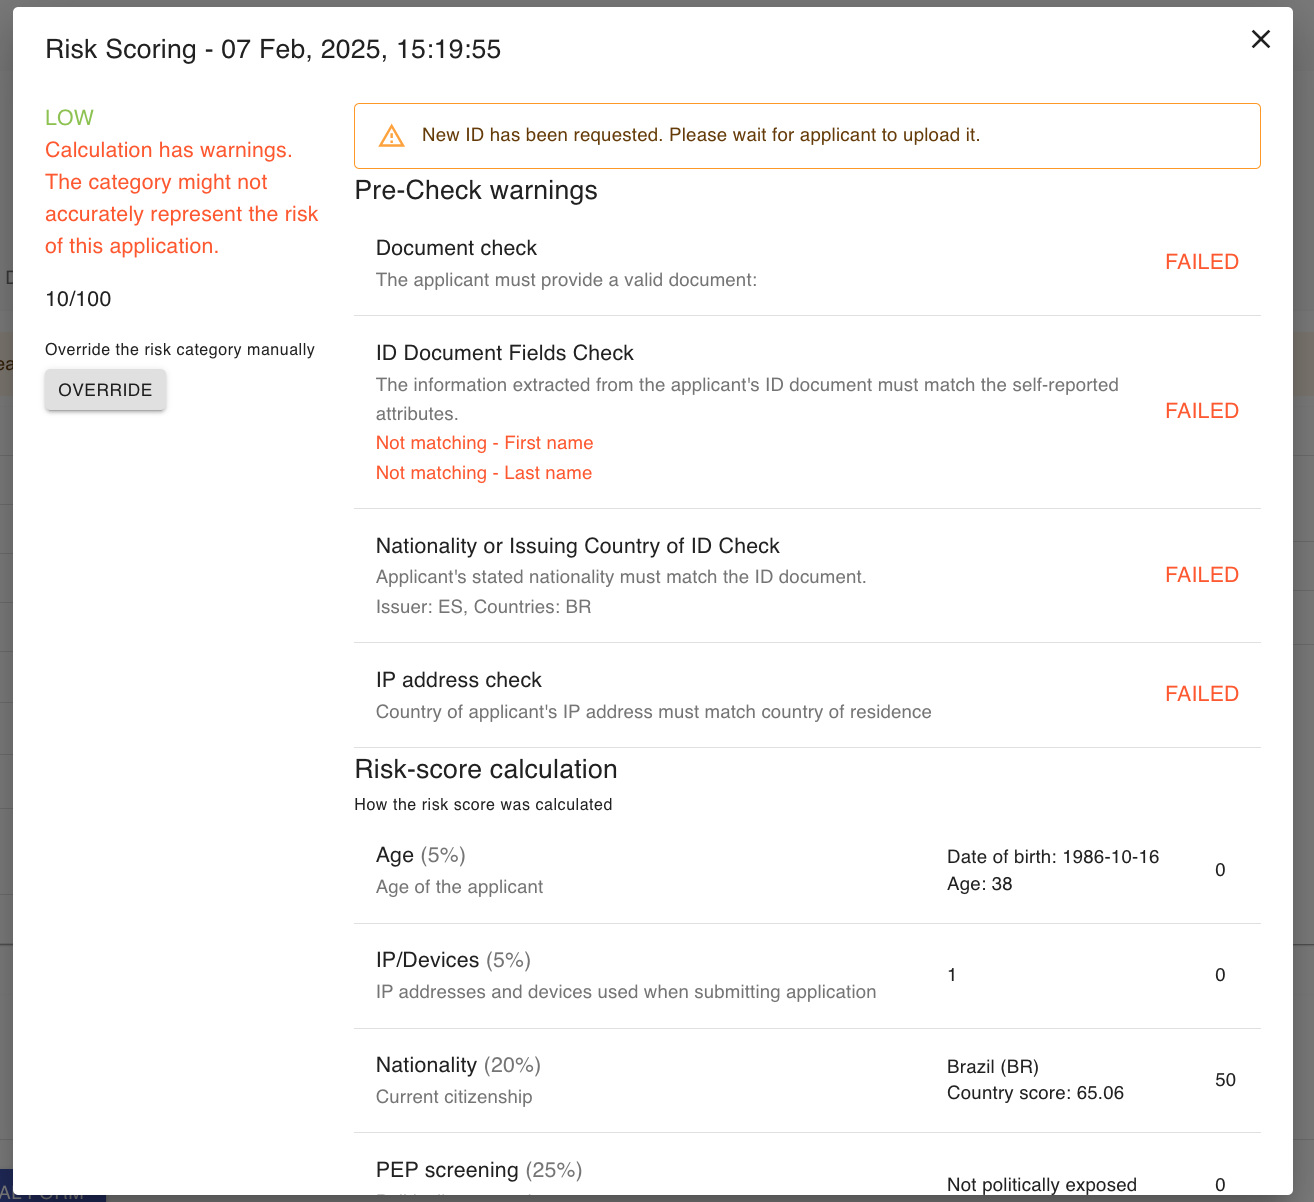
Pre-checks (Individual/Corporate Score Card)
Pre-checks can be individually enabled/disabled for any risk score card. Each pre-check parameter relates to a specific requirement in the KYC Template, and so that requirement must be present for the pre-check to function properly.
Types of Pre-checks:
Individual Score Card Pre-Checks:
- Document check: Will check if the ID document (passport, driving license or national ID card) is valid. This requires the manager to enable the 'IDScan Customer portal flow' on the KYC template.
- ID Document Fields check: Will check if the information extracted from the applicant's ID document matches the self-reported attributes.
- Nationality or Issuing Country of ID check: Will check if the applicant's stated nationality matches the ID document. The pre-check won't work if the Nationality attribute is not required on the KYC template.
- IP address check: Will check if the applicant's IP address matches their stated country of residence.
- Screened ID Issuer check: Will pre-screen the issuing country of the applicant's ID against a configurable list.
- Screened Nationality check: Will pre-screen the nationality of the applicant against a configurable list. The pre-check won't work if the Nationality attribute is not required on the KYC template.
- Screened Residency check: Will pre-screen applicant's country of residence, pre-check won't work if the Country of residence attribute is not required on the KYC template.
- Selfie check Requires the Passport attribute with the "selfie" property enabled.
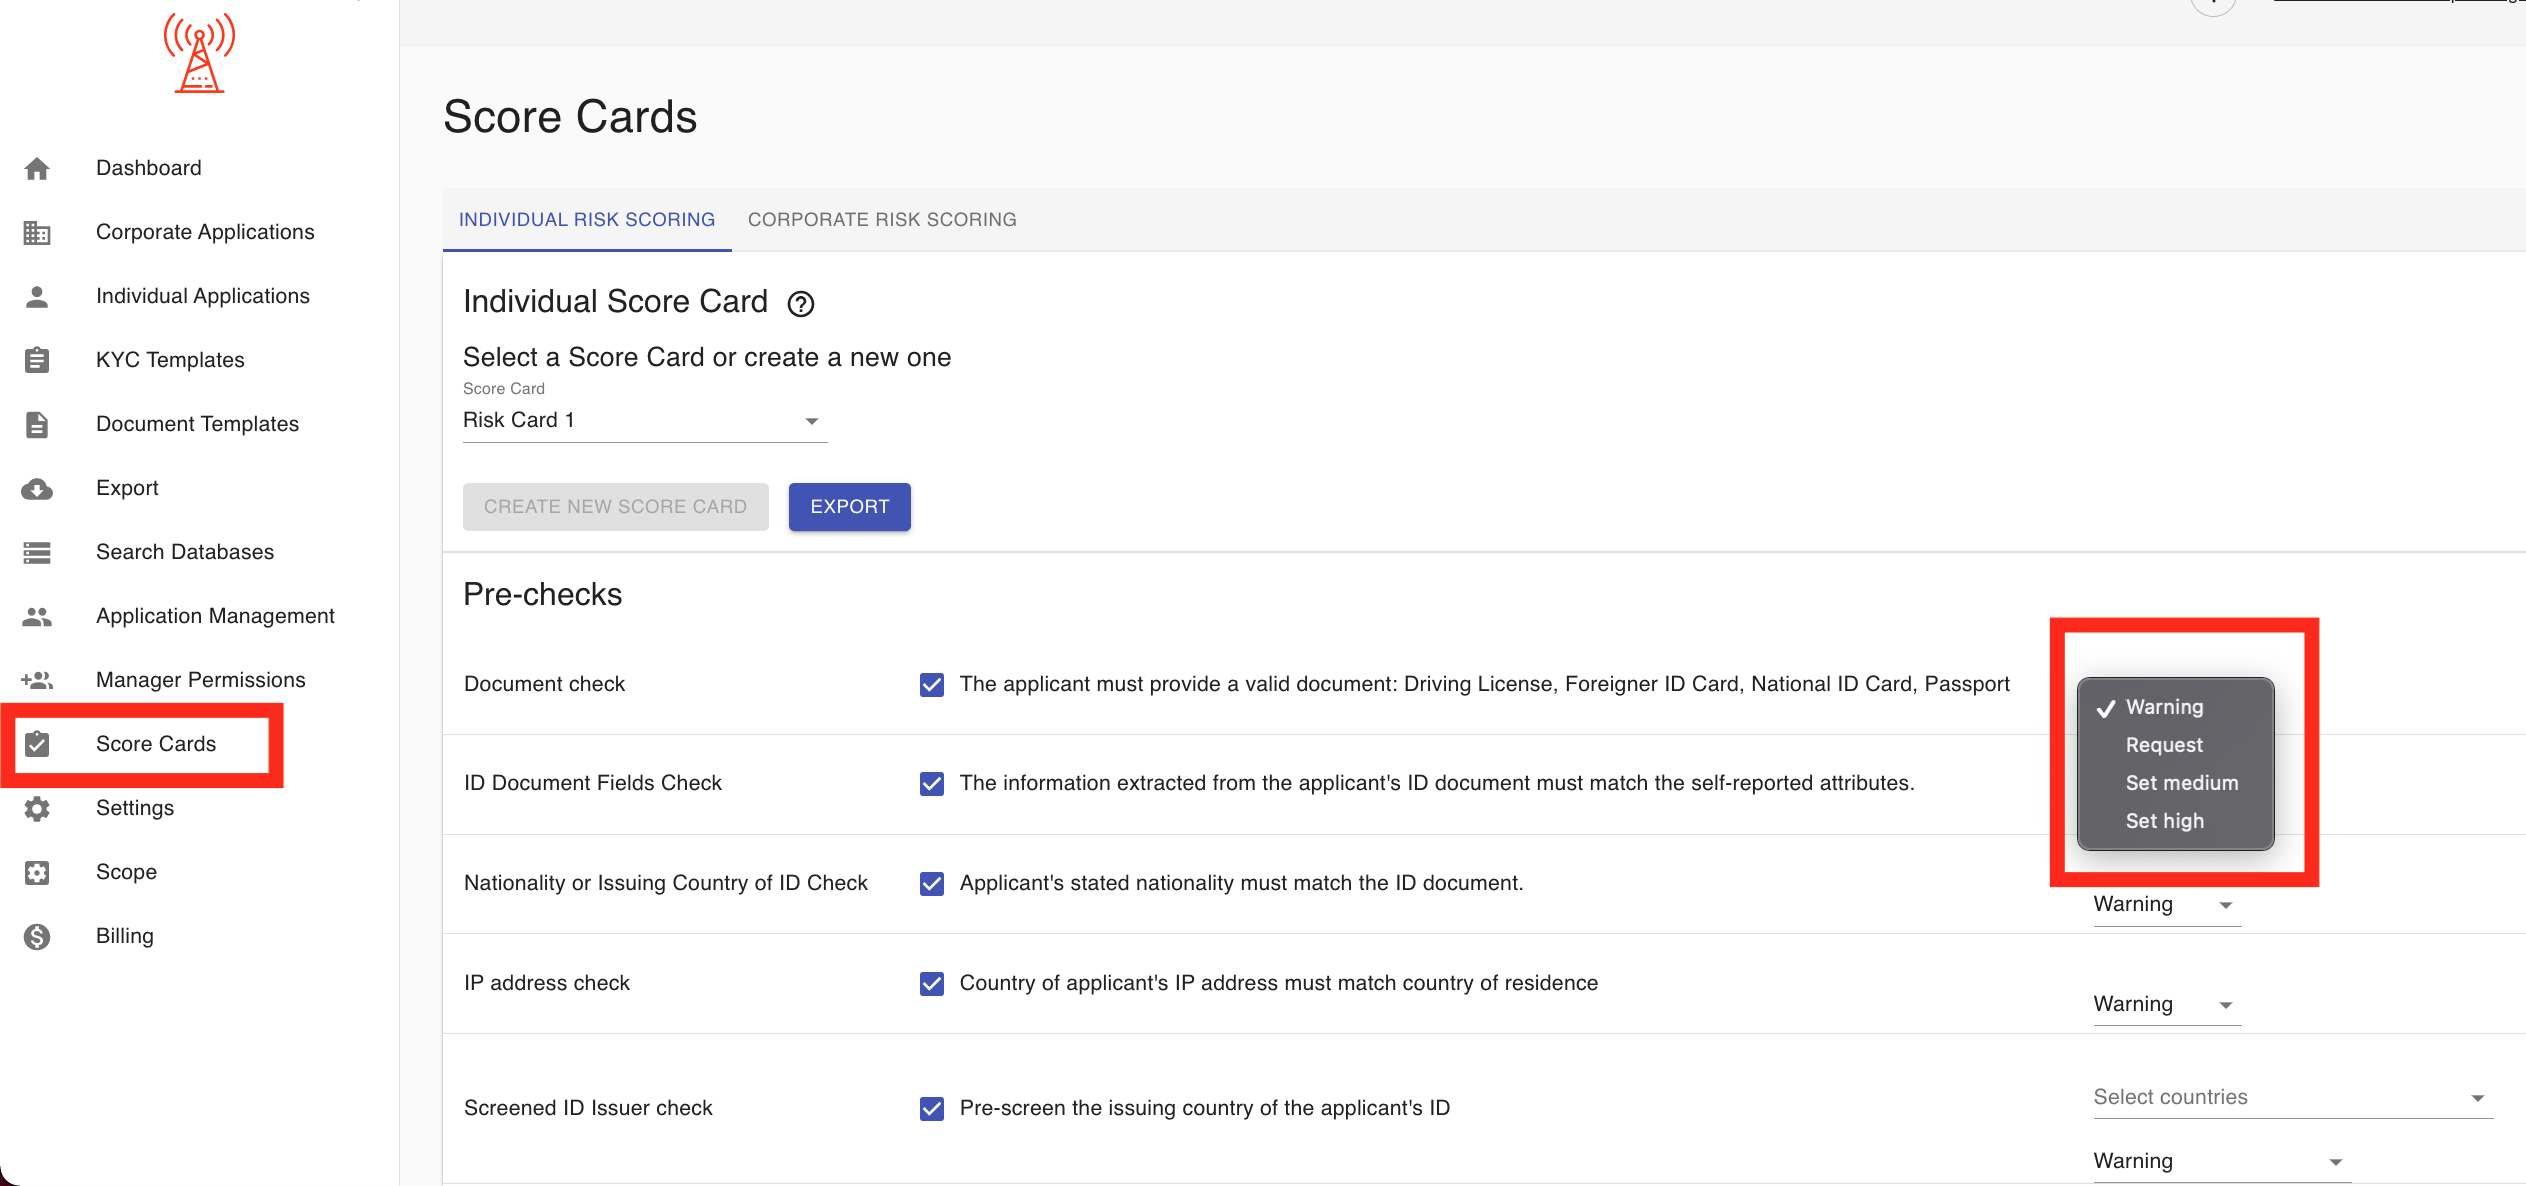
Managers can also configure the action that's taken if a pre-check fails.
- Warning: Issue a warning and continue the risk score calculation. The warning will not change the risk score, but will display alongside the risk score when reviewing an application.
- Set Medium: Automatically set the score for the relevant parameter to Medium.
- Set High: Automatically set the score for the relevant parameter to High.
- Request: Automatically trigger a request for the client to resubmit or update any failed or incomplete requirements.
- Set Medium/High and Reject: Set the risk score accordingly and automatically reject the application.
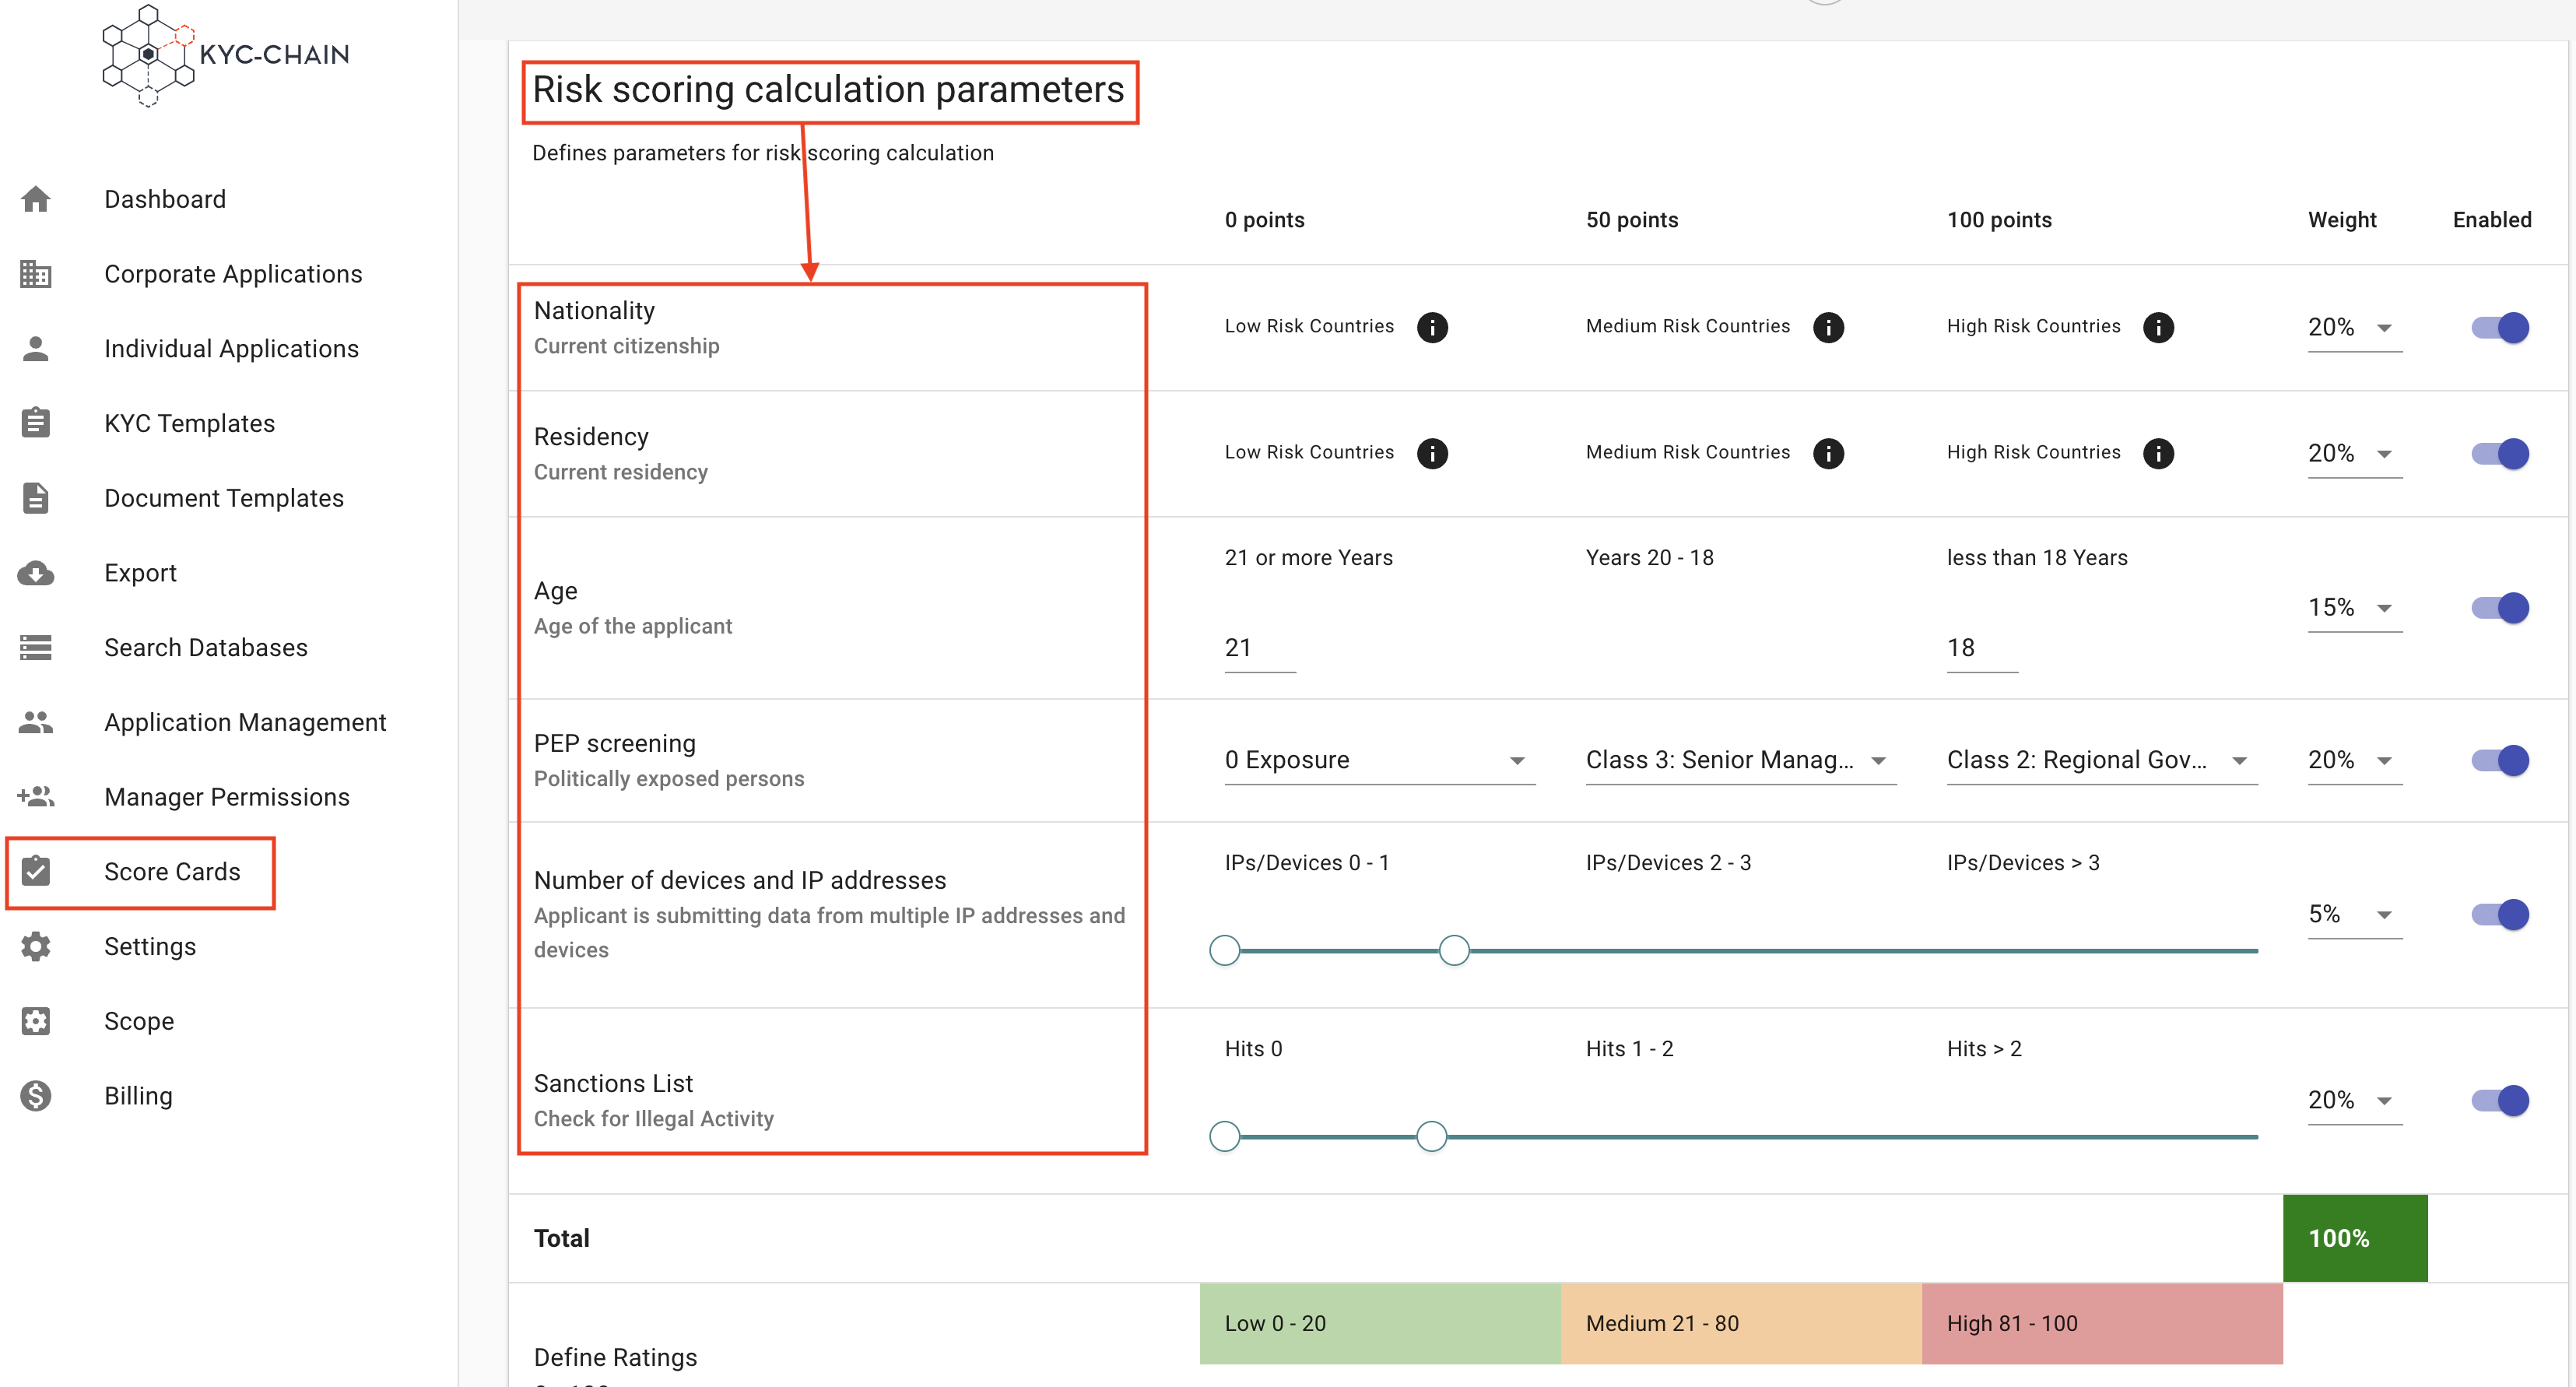
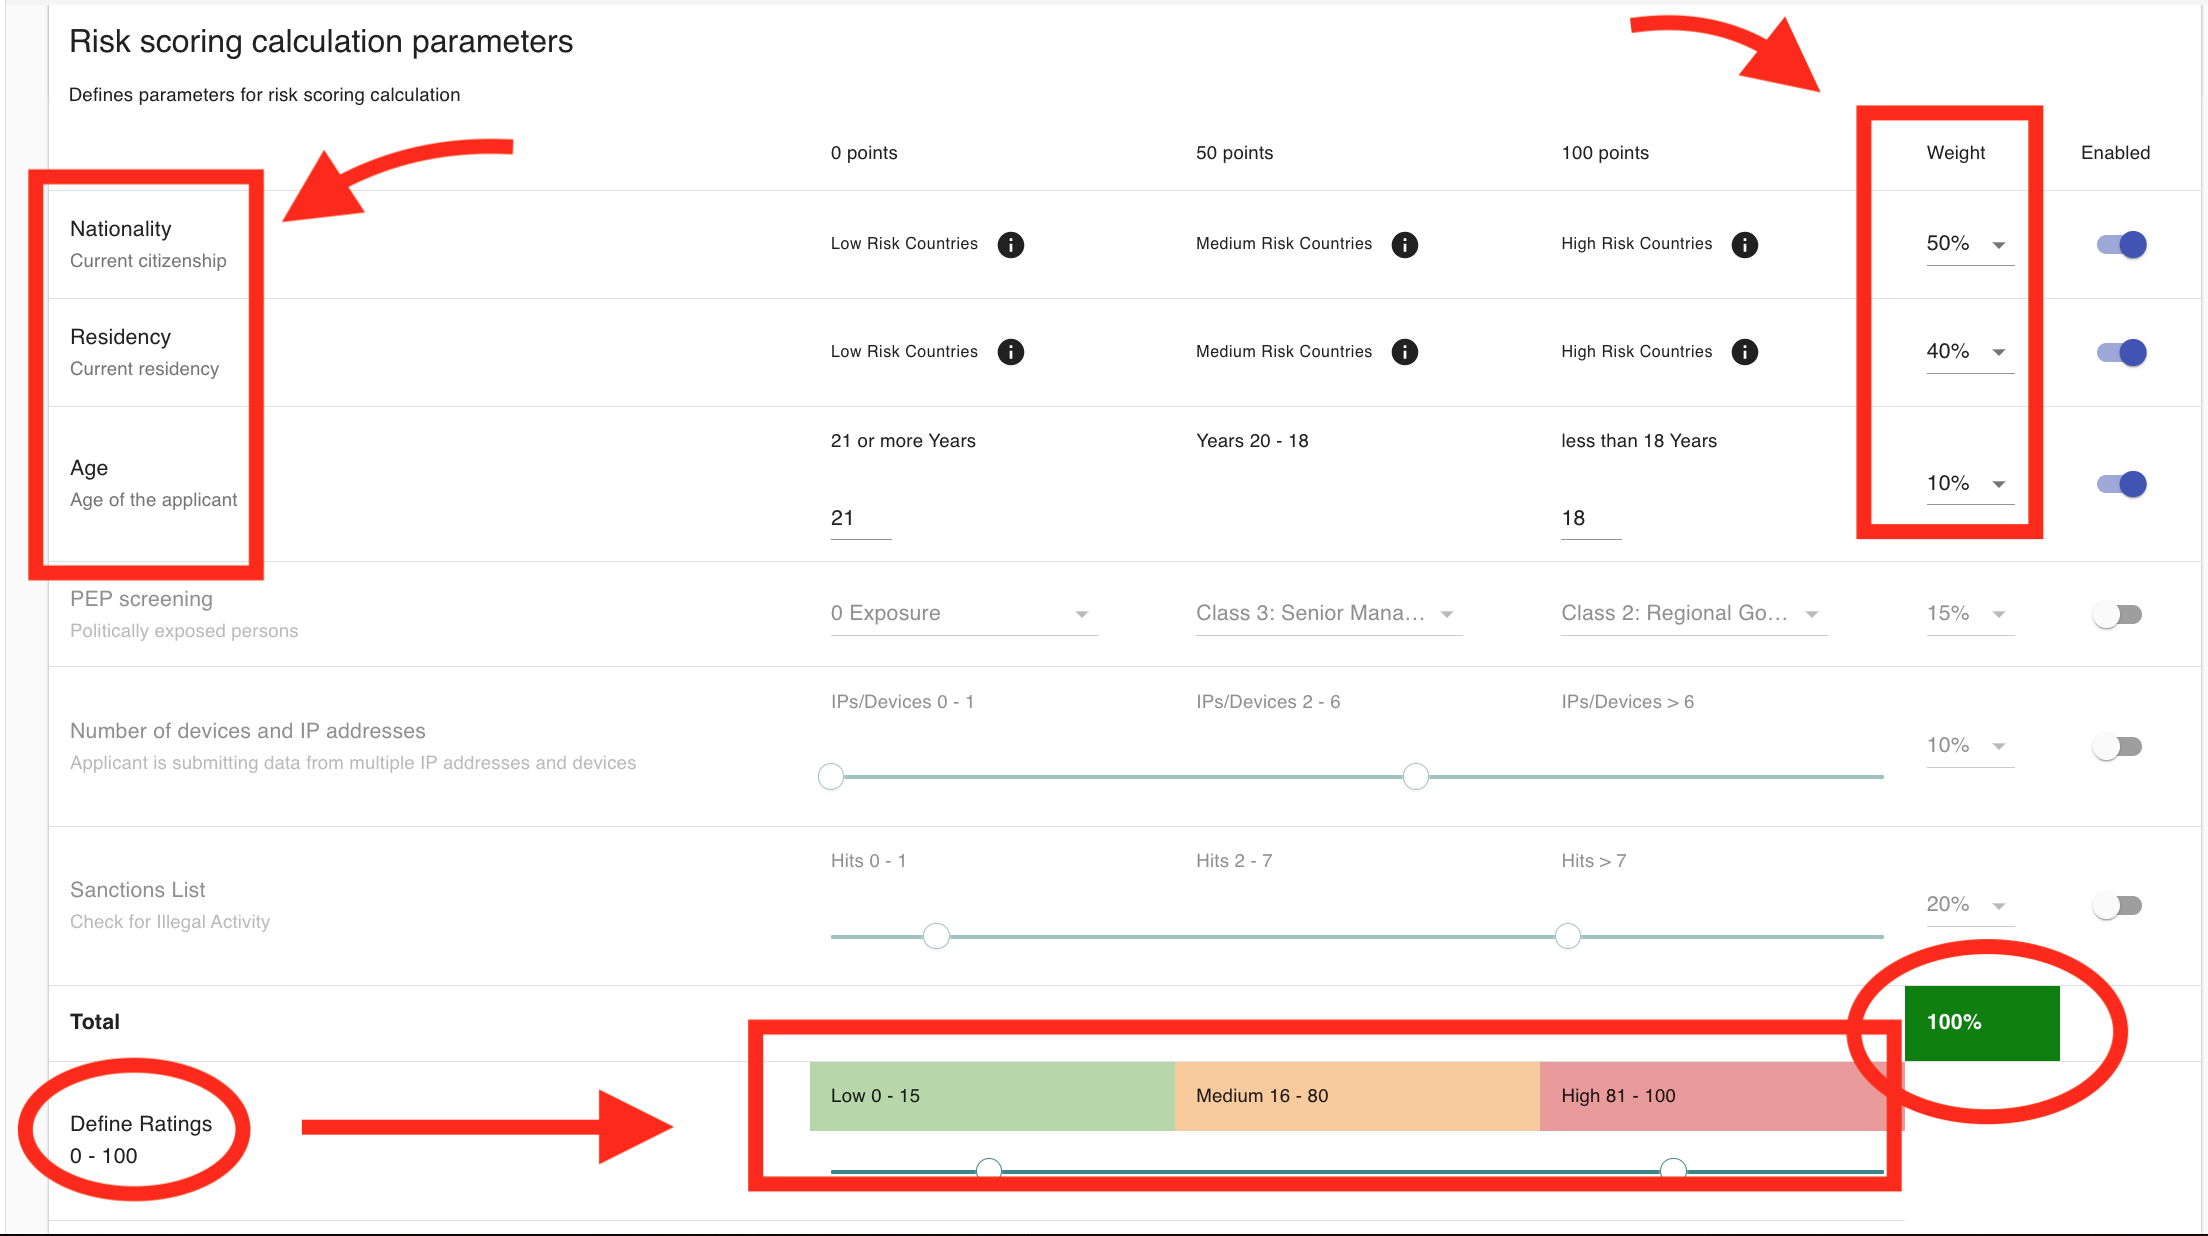
Individual Risk Scoring Parameters: Parameters can be individually enabled or disabled, and their weights can be adjusted so that the sum of all active parameter weights is 100%.
The current Individual Risk Score parameters are as follows:
- Nationality: The nationality entered by the applicant is scored based on the pre-set list of country risk scores. The nationality attribute must be required in the KYC Process.
- Residency: The country of residence entered by the applicant is scored based on the pre-set list of country risk scores. The Country of Residency attribute must be required in the KYC Process.
- Age: The applicant's age is determined using the Date of Birth attribute and the score is applied based on the parameters configured by the manager. The Date of Birth attribute must be required in the KYC Process.
- PEP Screening: The most severe class of confirmed PEP (Politically Exposed Persons) exposure for the applicant is scored according to the configuration in the score card.
- Number of devices and IP addresses: Risk score depends on the number of IP address and devices detected by the system.
- Sanctions List: The number of confirmed sanctions hits for the applicant are placed on the scale configured by the manager and scored accordingly.
Explanation on how risk score is calculated:
Risk Levels and Points:
- Low Risk: 0 points (does not contribute to the overall score).
- Medium Risk: 50 points (partial contribution based on the weight).
- High Risk: 100 points (full contribution based on the weight).
Weighted Contribution:
Each factor has a weight percentage (e.g., 20% for Nationality, 50% for Residence and 10% for age).
The score for each factor is calculated like this:
Score Contribution = Points for Risk Level × Weight
Examples:
- High Risk (100 points):
- If the weight is 50%:
100 × 0.5 = 50
- If the weight is 50%:
- Medium Risk (50 points):
- If the weight is 40%:
40 × 0.2 = 40(Note: Original example had 40% weight, 0.2 multiplier, resulting in 8, which seems incorrect. Assuming it should be 20% weight for 40 value, or 40% weight giving 20. I'll use the example values as given but the math here is a bit off from the example's stated result of 40. For consistency with "50+40+0 = 90", I'll assume50 * 0.4 = 20, but the example says 40. I will keep the original text's calculation for now.) Self-correction: The original example text said "40 x 0.2 = 40" which is incorrect. It should be50 * 0.4 = 20if weight is 40%. Or if the contribution is 40, and points are 50, weight is 80%. The final sum (50+40+0=90) implies the contributions are 50, 40, 0. If Nationality High (100pts) * 0.2 = 20. If Residency Medium (50pts) * 0.X = Y. The example is confusing. I will re-state the calculation more clearly based on the principle.
- If the weight is 40%:
Example Calculation Revised for Clarity: Let's assume the following:
- Nationality: High Risk (100 points), Weight 20% -> Contribution =
100 * 0.20 = 20 - Residency: Medium Risk (50 points), Weight 20% -> Contribution =
50 * 0.20 = 10 - Age: Low Risk (0 points), Weight 5% -> Contribution =
0 * 0.05 = 0
Total Risk Score: 20 + 10 + 0 = 30
(The original image showed a total of 90/100, which implies different contributions. I will stick to the original text example for now, despite its mathematical inconsistency, to preserve the document's intent, but add a note.)
Original Example Text's Calculation: Nationality: High Risk, 20% weight → contributes 20 points. Residency: Medium Risk, 20% weight → contributes 10 points. Age: Low Risk, 5% weight → contributes 0 points. Total Risk Score: 50 + 40 + 0 = 90/100 (Developer Note: The example breakdown (20, 10, 0) does not sum to the example total (90). The image likely reflects the correct calculation logic which might differ from this textual example. Please refer to the image for precise calculation if there's a discrepancy.)
Risk Classification: After calculating the total score, the system maps it to predefined ranges:
- Low Risk: 0–39.
- Medium Risk: 40–69.
- High Risk: 70–100.
Corporate Score Card Pre-Checks:
- Company Registry check: Will check if the entity got at least 1 valid company registry hit.
- Jurisdiction check: Will pre-screen the jurisdiction of the company.
Managers can also configure the action that's taken if a pre-check fails.
- Warning: Issue a warning and continue the risk score calculation. The warning will not change the risk score, but will display alongside the risk score when reviewing an application.
- Set Medium: Automatically set the score for the relevant parameter to Medium.
- Set High: Automatically set the score for the relevant parameter to High.
- Request: Automatically trigger a request for the client to resubmit or update any failed or incomplete requirements.
- Set Medium/High and Reject: Set the risk score accordingly and automatically reject the application.
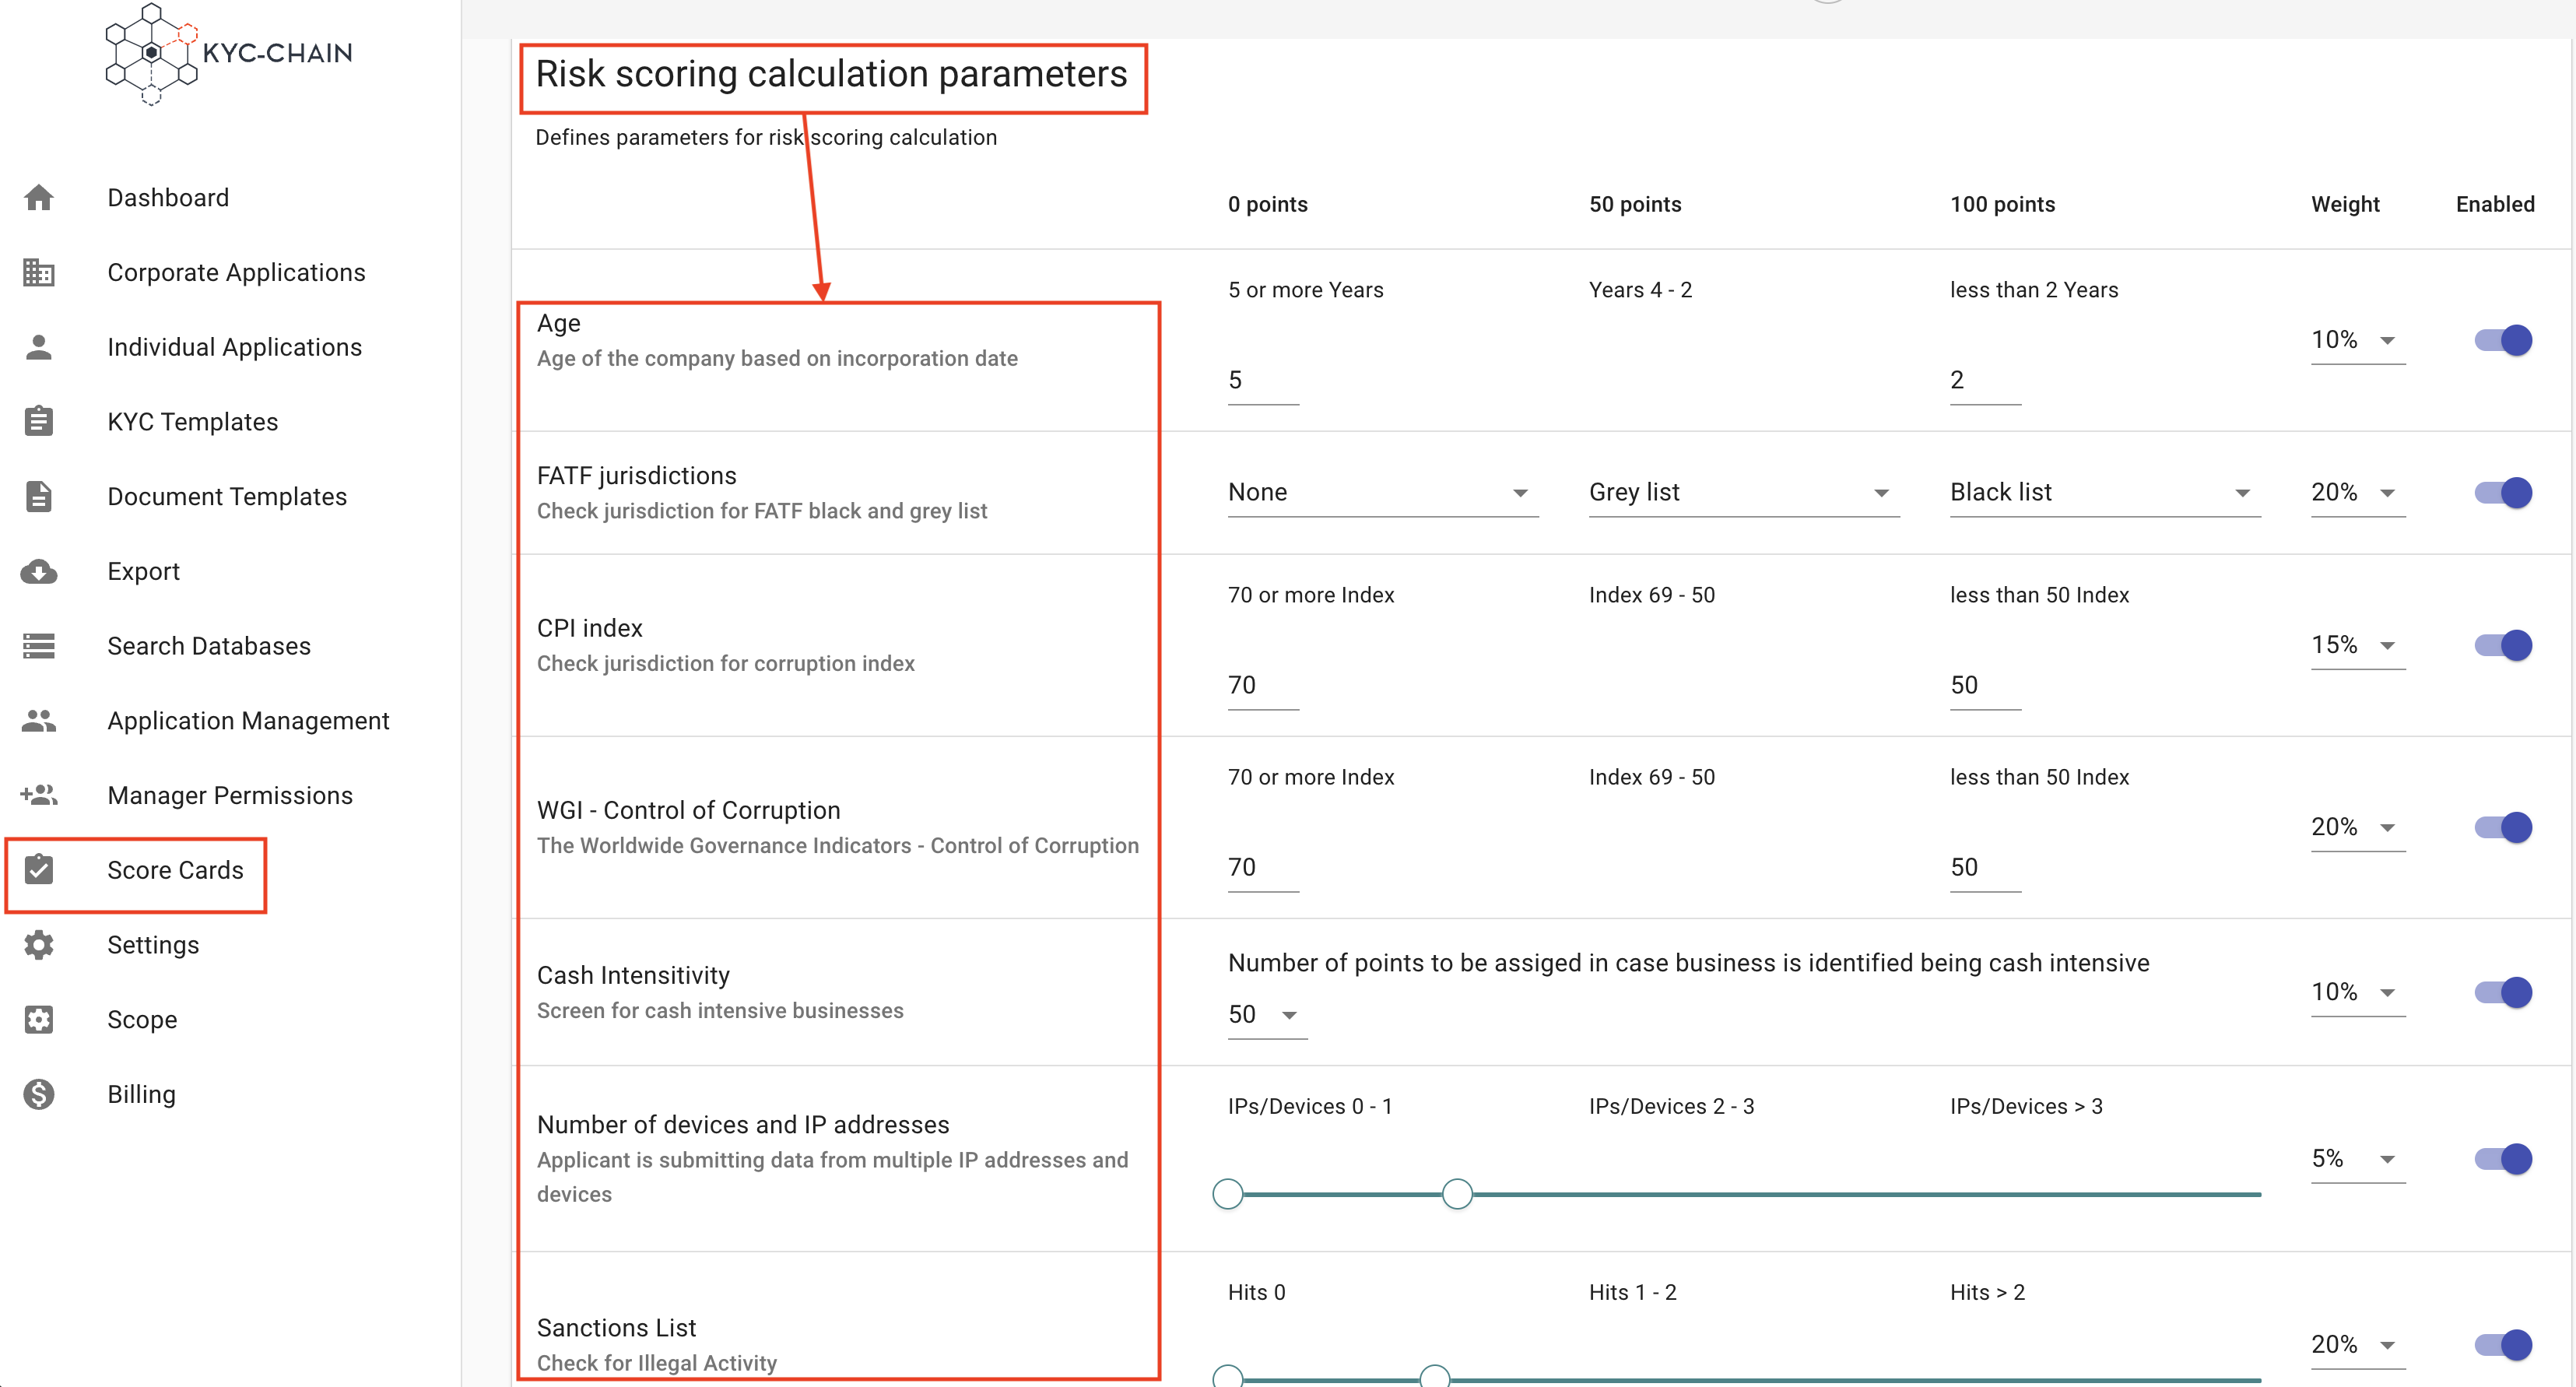
Corporate Risk Scoring Parameters:
- Age = The Company's age is determined using the "Date of Incorporation" attribute and the score is applied based on the parameters configured by the manager. The Date of Incorporation attribute must be enabled on the Individual or Corporate template.
- FATF jurisdictions = Checks jurisdiction for FATF (Financial Action Task Force) black and grey list, black list is HIGH risk, Grey list is MEDIUM risk.
- CPI index = Checks jurisdiction for corruption index, risk score calculation relies on the CPI (Corruption Perceptions Index) levels. Every jurisdiction receives its own score.
- WGI - Control of Corruption = Calculation of risk score relies on the WGI (Worldwide Governance Indicators)'s scores. Each jurisdiction receives its own score.
- Cash Intensivity = This parameter screens for cash intensive businesses and is determined using the ''business types'' attribute.
- Number of devices and IP addresses = Risk score depends on the number of ip address and devices detected by the system.
- Sanctions List: The number of confirmed sanctions hits for the entity are placed on the scale configured by the manager and scored accordingly.
Please note that the PEP and Sanctions parameters rely not only on the initial results of these screenings, but on the confirmed results. This means that if there are results in the "External Data" tab for an applicant, the manager will need to go through them and determine whether they are false positives, or if they do refer to the applicant themself. Only once a selection is made will the risk score calculate for that application.
Automatic Approvals: When enabled, this feature will automatically approve any applications which are given a Low risk score:

Risk scoring notification: When enabled, will send email notification to manager on risk-score calculations. You can also check the actual risk score and additional information related to risk score under Overview section:

3.10 Sybil Checks
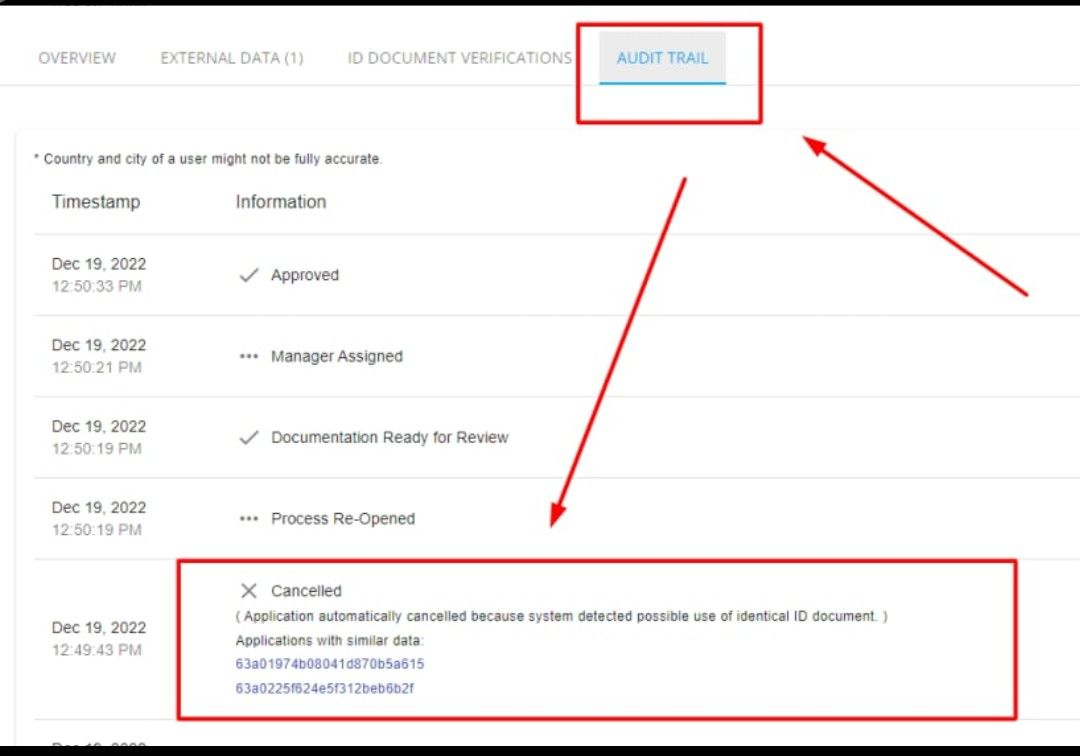
- Sybil check 1 is calculated using a combination of the applicant's IP address, device name, first name, last name, date of birth and KYC template ID. It is performed after applicant submits the application before any data checks are done.
- Sybil check 2 is based on the applicant's passport code (or national ID number) and KYC template ID obtained from our OCR (Optical Character Recognition) data. In the case of passports the MRZ (Machine Readable Zone) line is used, and for national IDs either the document number or personal number along with country code is used. The second sybil check is performed as soon as ID Document Verification data is available.

Note: With sybil checks, the system will automatically cancel applications if it detects duplicate data. The Audit Trail will explain the cancellation and link to applications with similar data:
4. How to
4.1 How To Create and Configure KYC Templates:
Managers can create and customize as many KYC templates as they require for their workflows. Managers can request specific documents or ask KYC applicants questions tailored to their requirements. To do that, they can either create an entirely new template, or customize/duplicate an existing template.
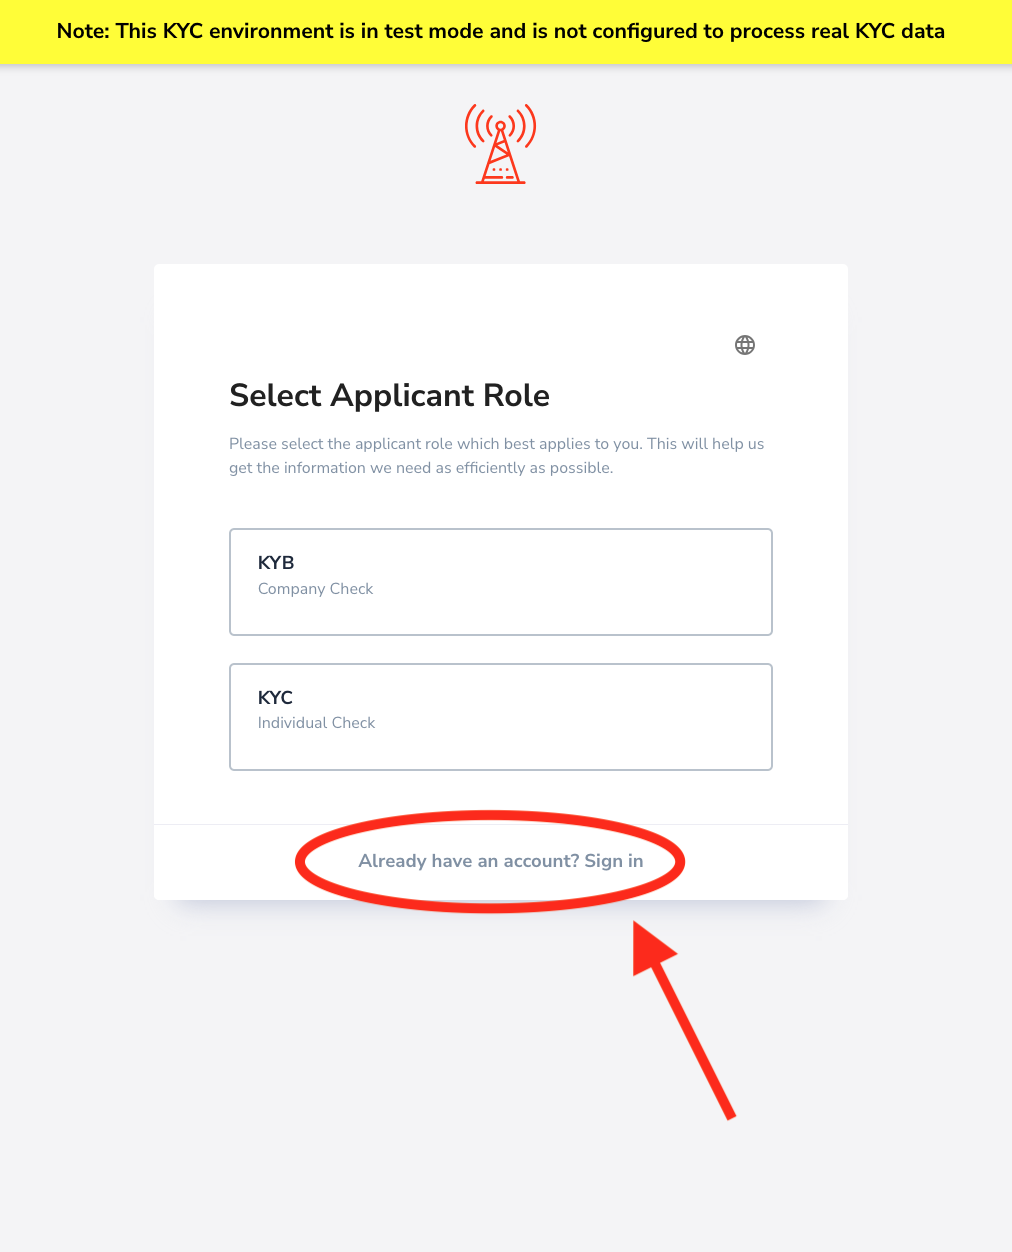
How can I get my invitation link resent?
If you have been invited to start the KYC process but the invitation link has expired or is not working, you can try signing in to the KYC portal directly. Alternatively, you can cancel the application and send a new invitation. Please refer to the following screenshots for guidance:

How can I pause my KYC-Chain subscription or service?
Please send an email to help@kyc-chain.com requesting to pause your service and include your project name. Our team will get back to you as soon as possible.
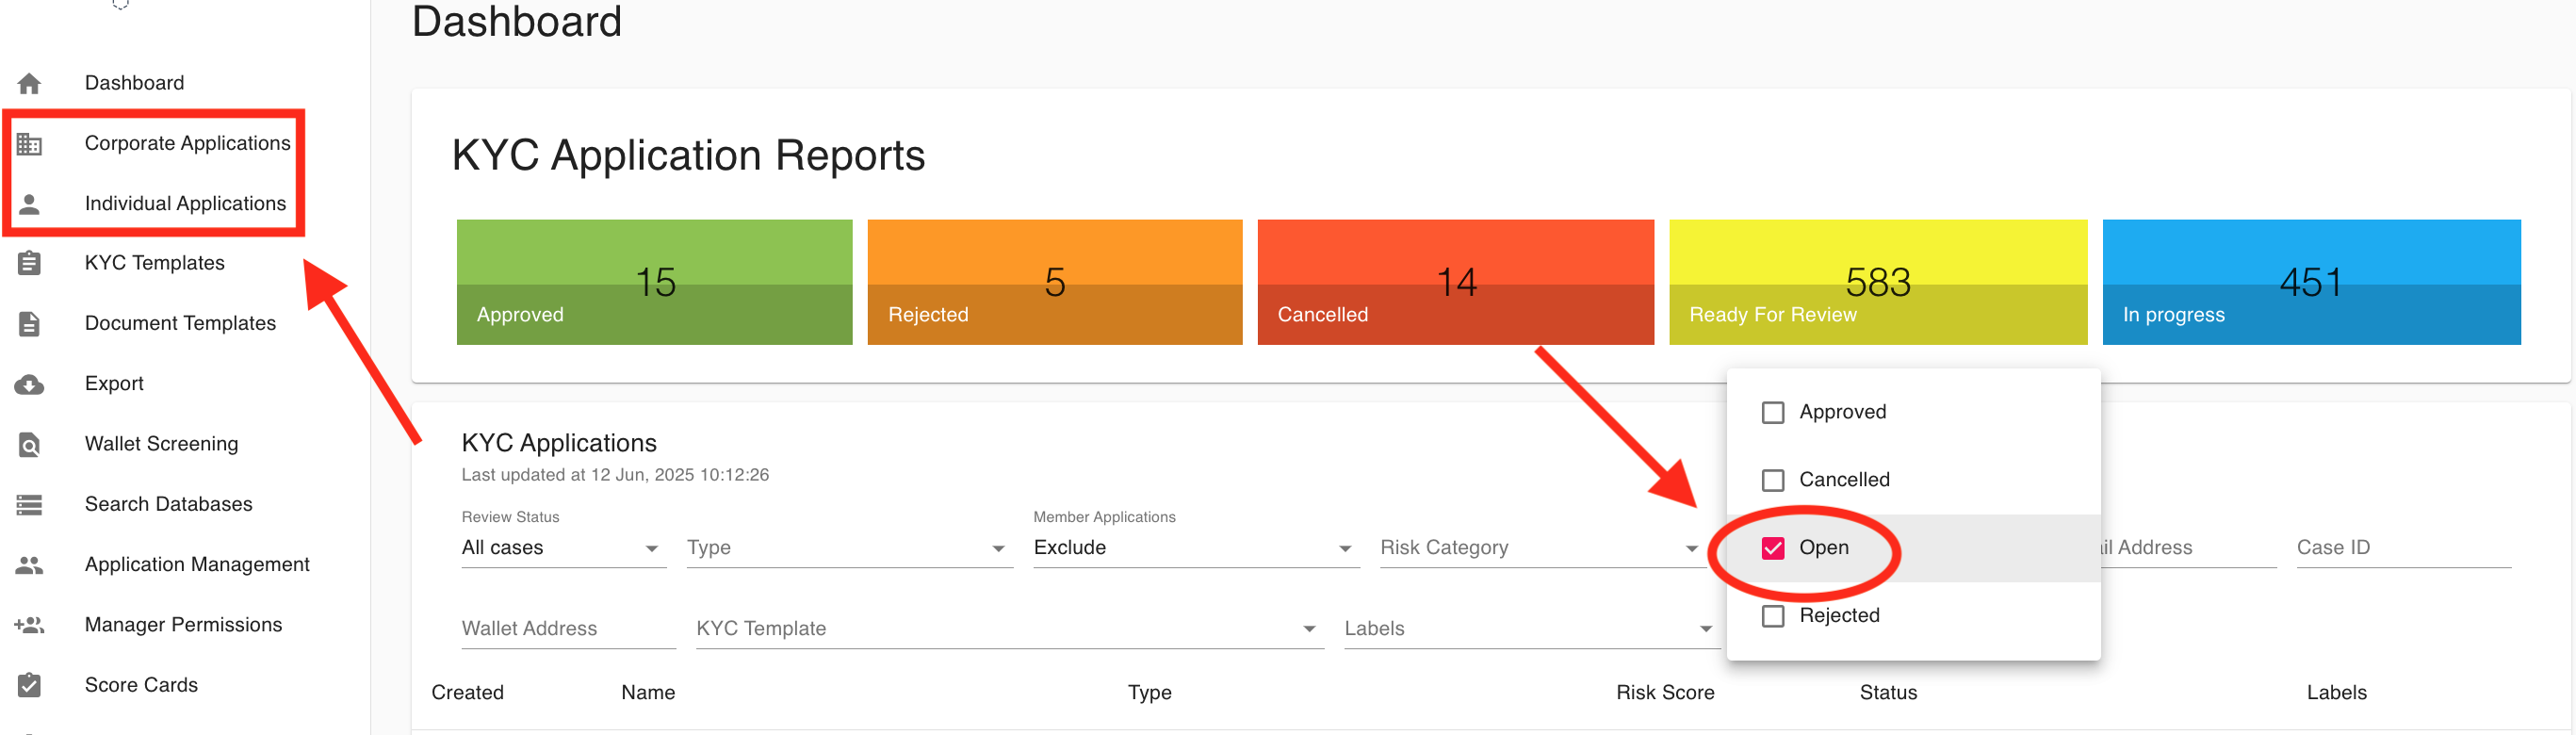
How can I use dashboard filters to view all open or pending applications?
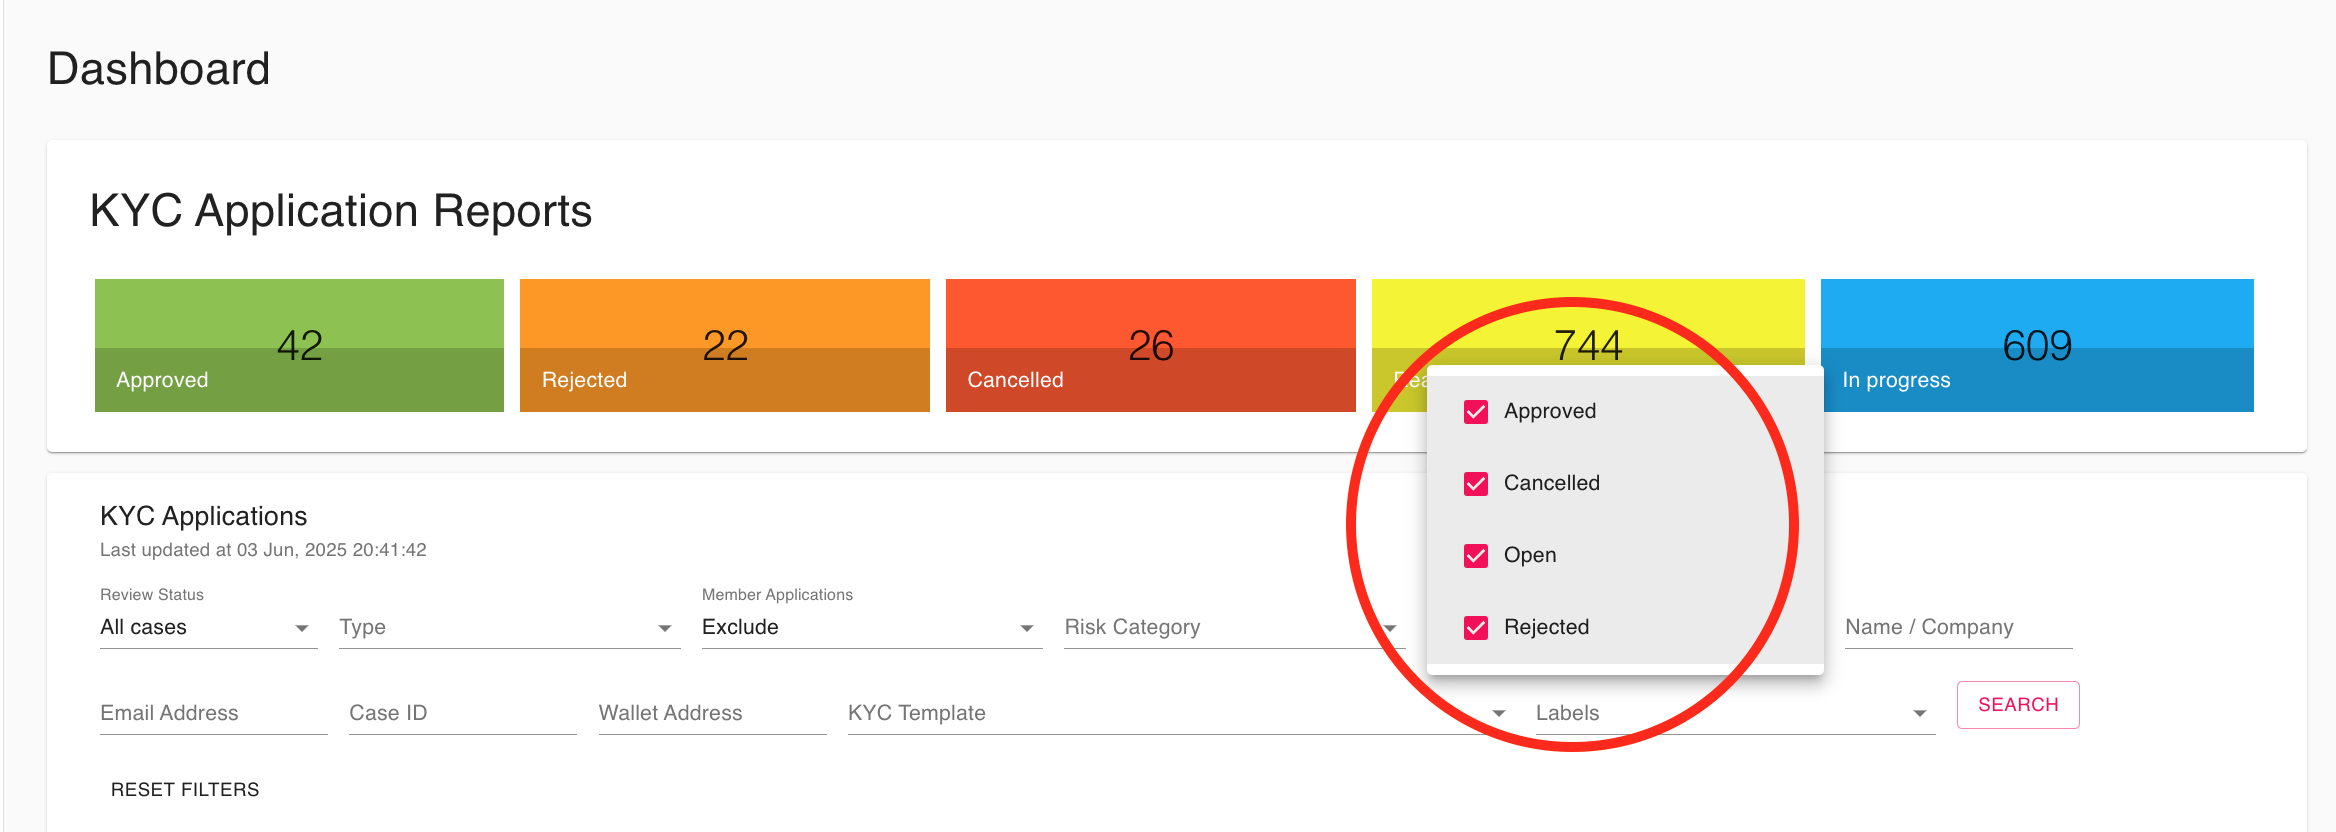
To view all open or pending applications on the dashboard, use the filter options shown in the screenshot:
- Click on the filter dropdown menu (as highlighted in the red circle).
- In the dropdown, ensure that the "Open" option is checked. You may also want to check "In progress" if you consider those as pending.
- Uncheck other statuses such as "Approved," "Cancelled," and "Rejected" if you want to focus only on open or pending applications.
- The dashboard will then display only the applications with the selected statuses.
This allows you to quickly filter and review all applications that are currently open or awaiting further action.
How can data be retrieved from the cloud storage?
Data can be retirved using our API, for more informatin please consult our API documentation or open a ticket with out suport team for assistance.
How can 'N/A' or similar be allowed as an input for non-mandatory fields?
To accommodate 'N/A' inputs:
Configure the field to accept custom text input.
Add an explicit option (e.g., dropdown choice) labeled "Not Applicable" or "N/A" if predefined responses are preferred.
Applicants can then either:
-
Select the "N/A" option, or
-
Manually type "N/A" or similar into the field.
This ensures flexibility while maintaining data clarity.

How to configure manual approval or holding for KYC processes before charges?
To clarify, in KYC-Chain, charges for KYC checks are applied as soon as an application is submitted and checks are triggered—not only after approval. This means you are billed at the point when the verification process starts, regardless of whether the application is ultimately approved or not.
If your goal is to introduce manual approval or a holding step before any checks (and therefore charges) are triggered, please note that this is not the default behavior. The current workflow is designed so that all relevant checks (and corresponding charges) are initiated immediately upon submission. Manual review and approval can be configured for the decision-making process, but the billing will still occur at the time the checks are performed—not after approval.
How you can manage the workflow:
-
Disable Automatic Approvals: In your KYC Template or process settings, ensure that “Automatic Approval” is turned OFF. This will require manual review and approval of each application.
-
Manual Review Process: After the applicant submits their information, the application will remain in a “Pending” or “Review” status. A manager can then manually review documents, screening results, and risk assessments before a final decision is made.
-
Charges Still Apply on Submission: Please be aware that even with manual approval enabled, all verification checks—and their associated charges—will be triggered as soon as the application is submitted and processed by the system.
-
Custom Statuses and Notes: You can use custom statuses or internal notes to track applications that require special handling before final approval.
-
Permissions: Ensure that only authorized managers have the ability to approve or reject applications for compliance and oversight purposes.
Summary: While you can configure your workflow to require manual approval before an application is approved or finalized, charges for KYC checks are still applied immediately upon submission because that is when the checks are triggered in the system.
If you need to discuss alternative billing workflows or have specific requirements, please contact our support team for further assistance.
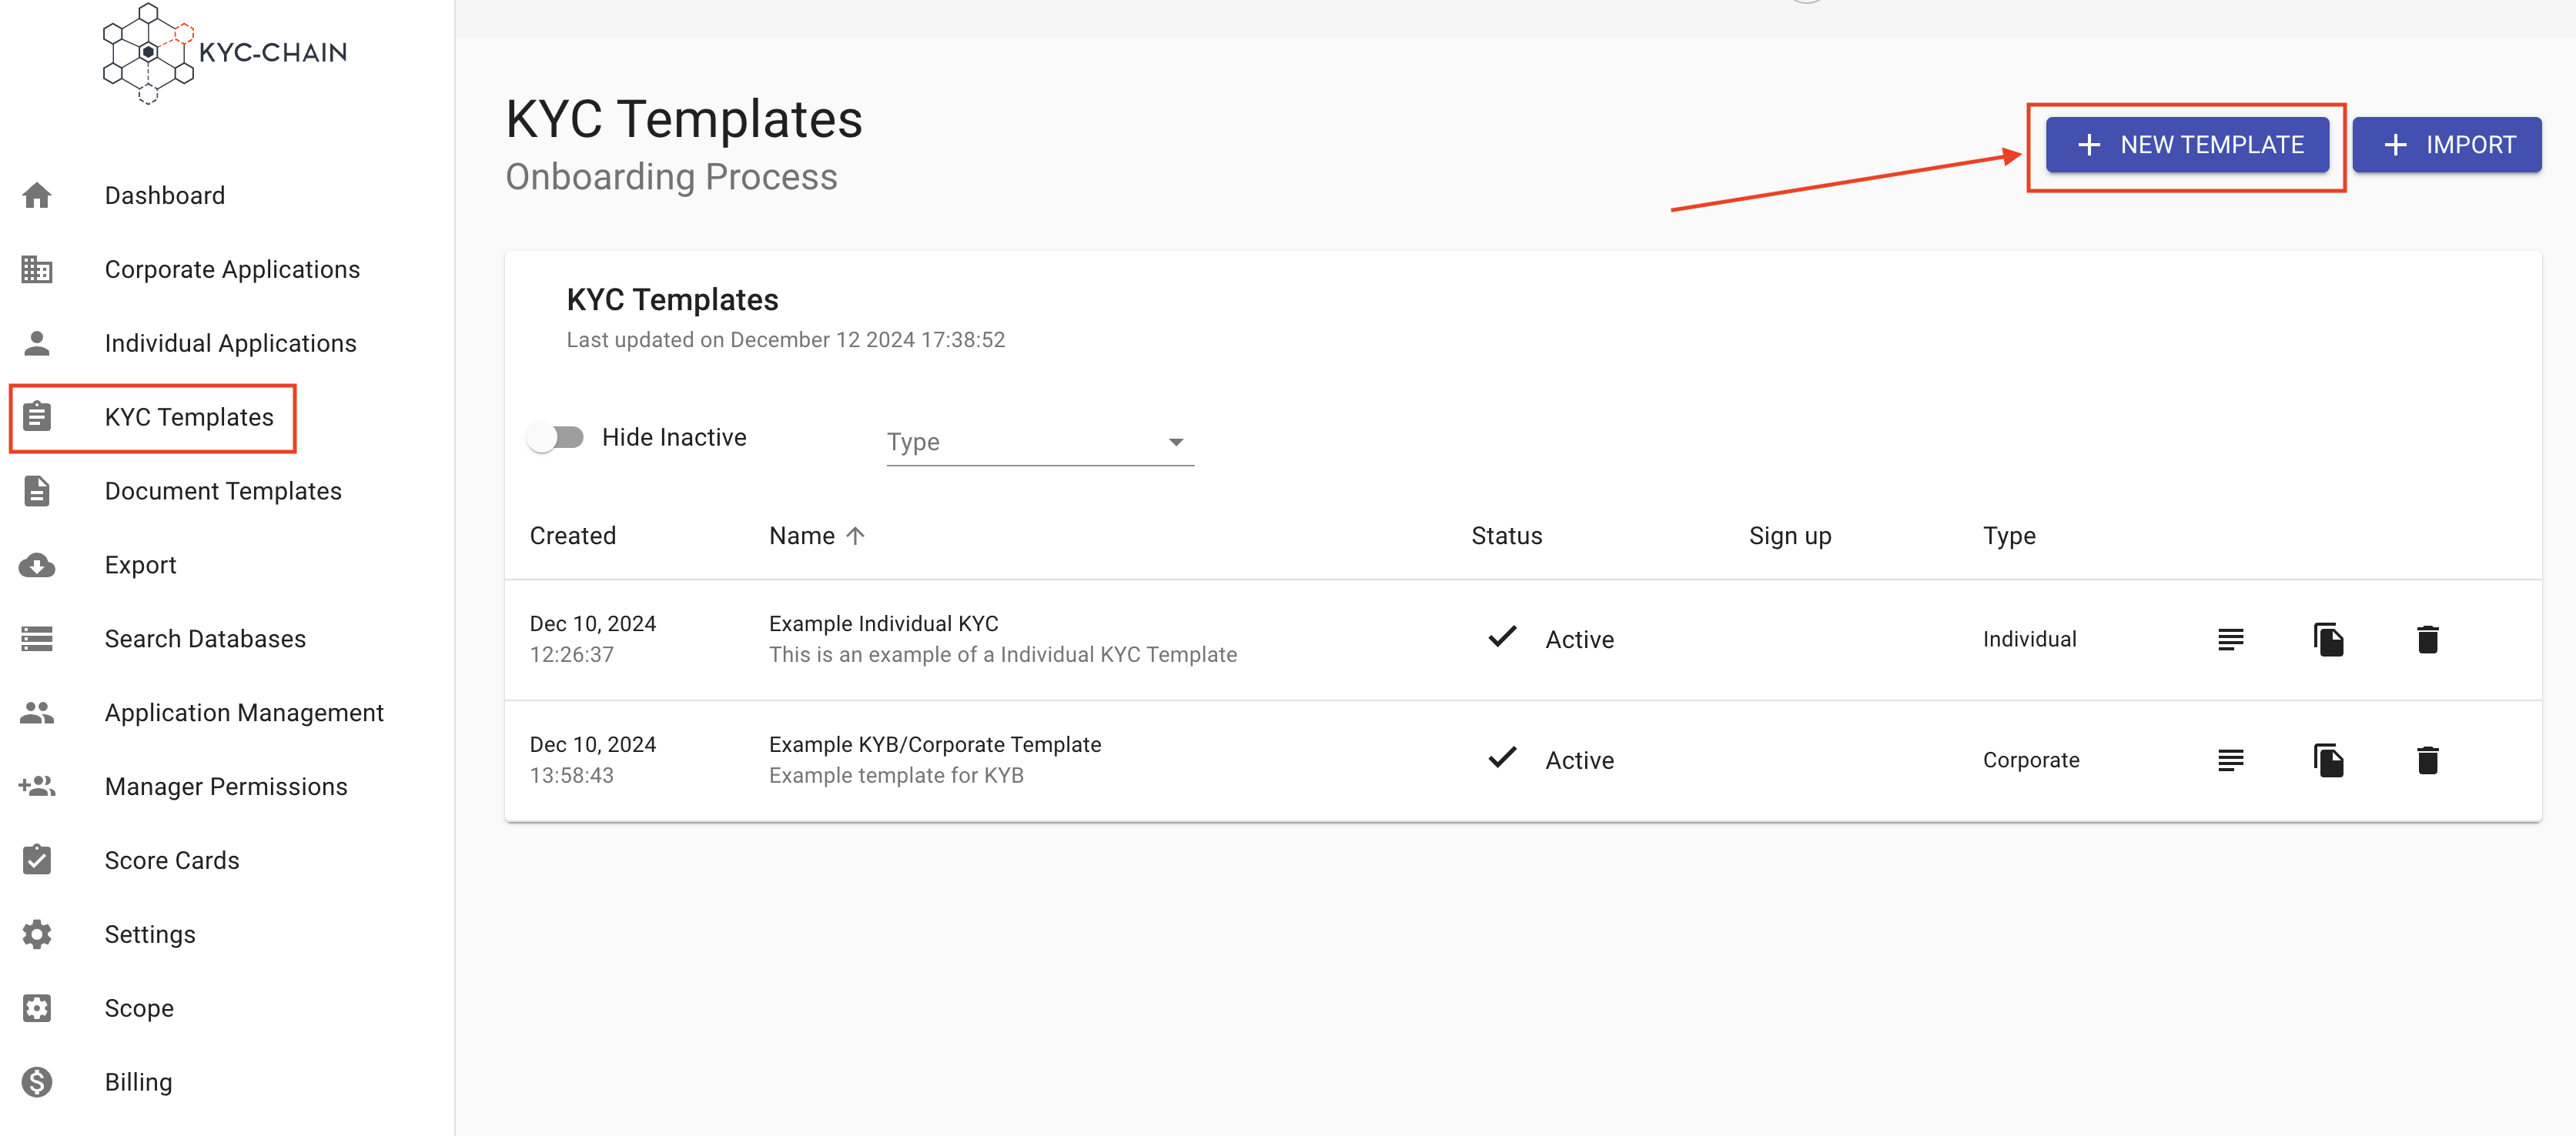
How to create a new template:
- Go to the KYC Templates tab (left-side menu)
- Click on New Template on the right side of the screen
- Fill out the initial fields and click "Create"

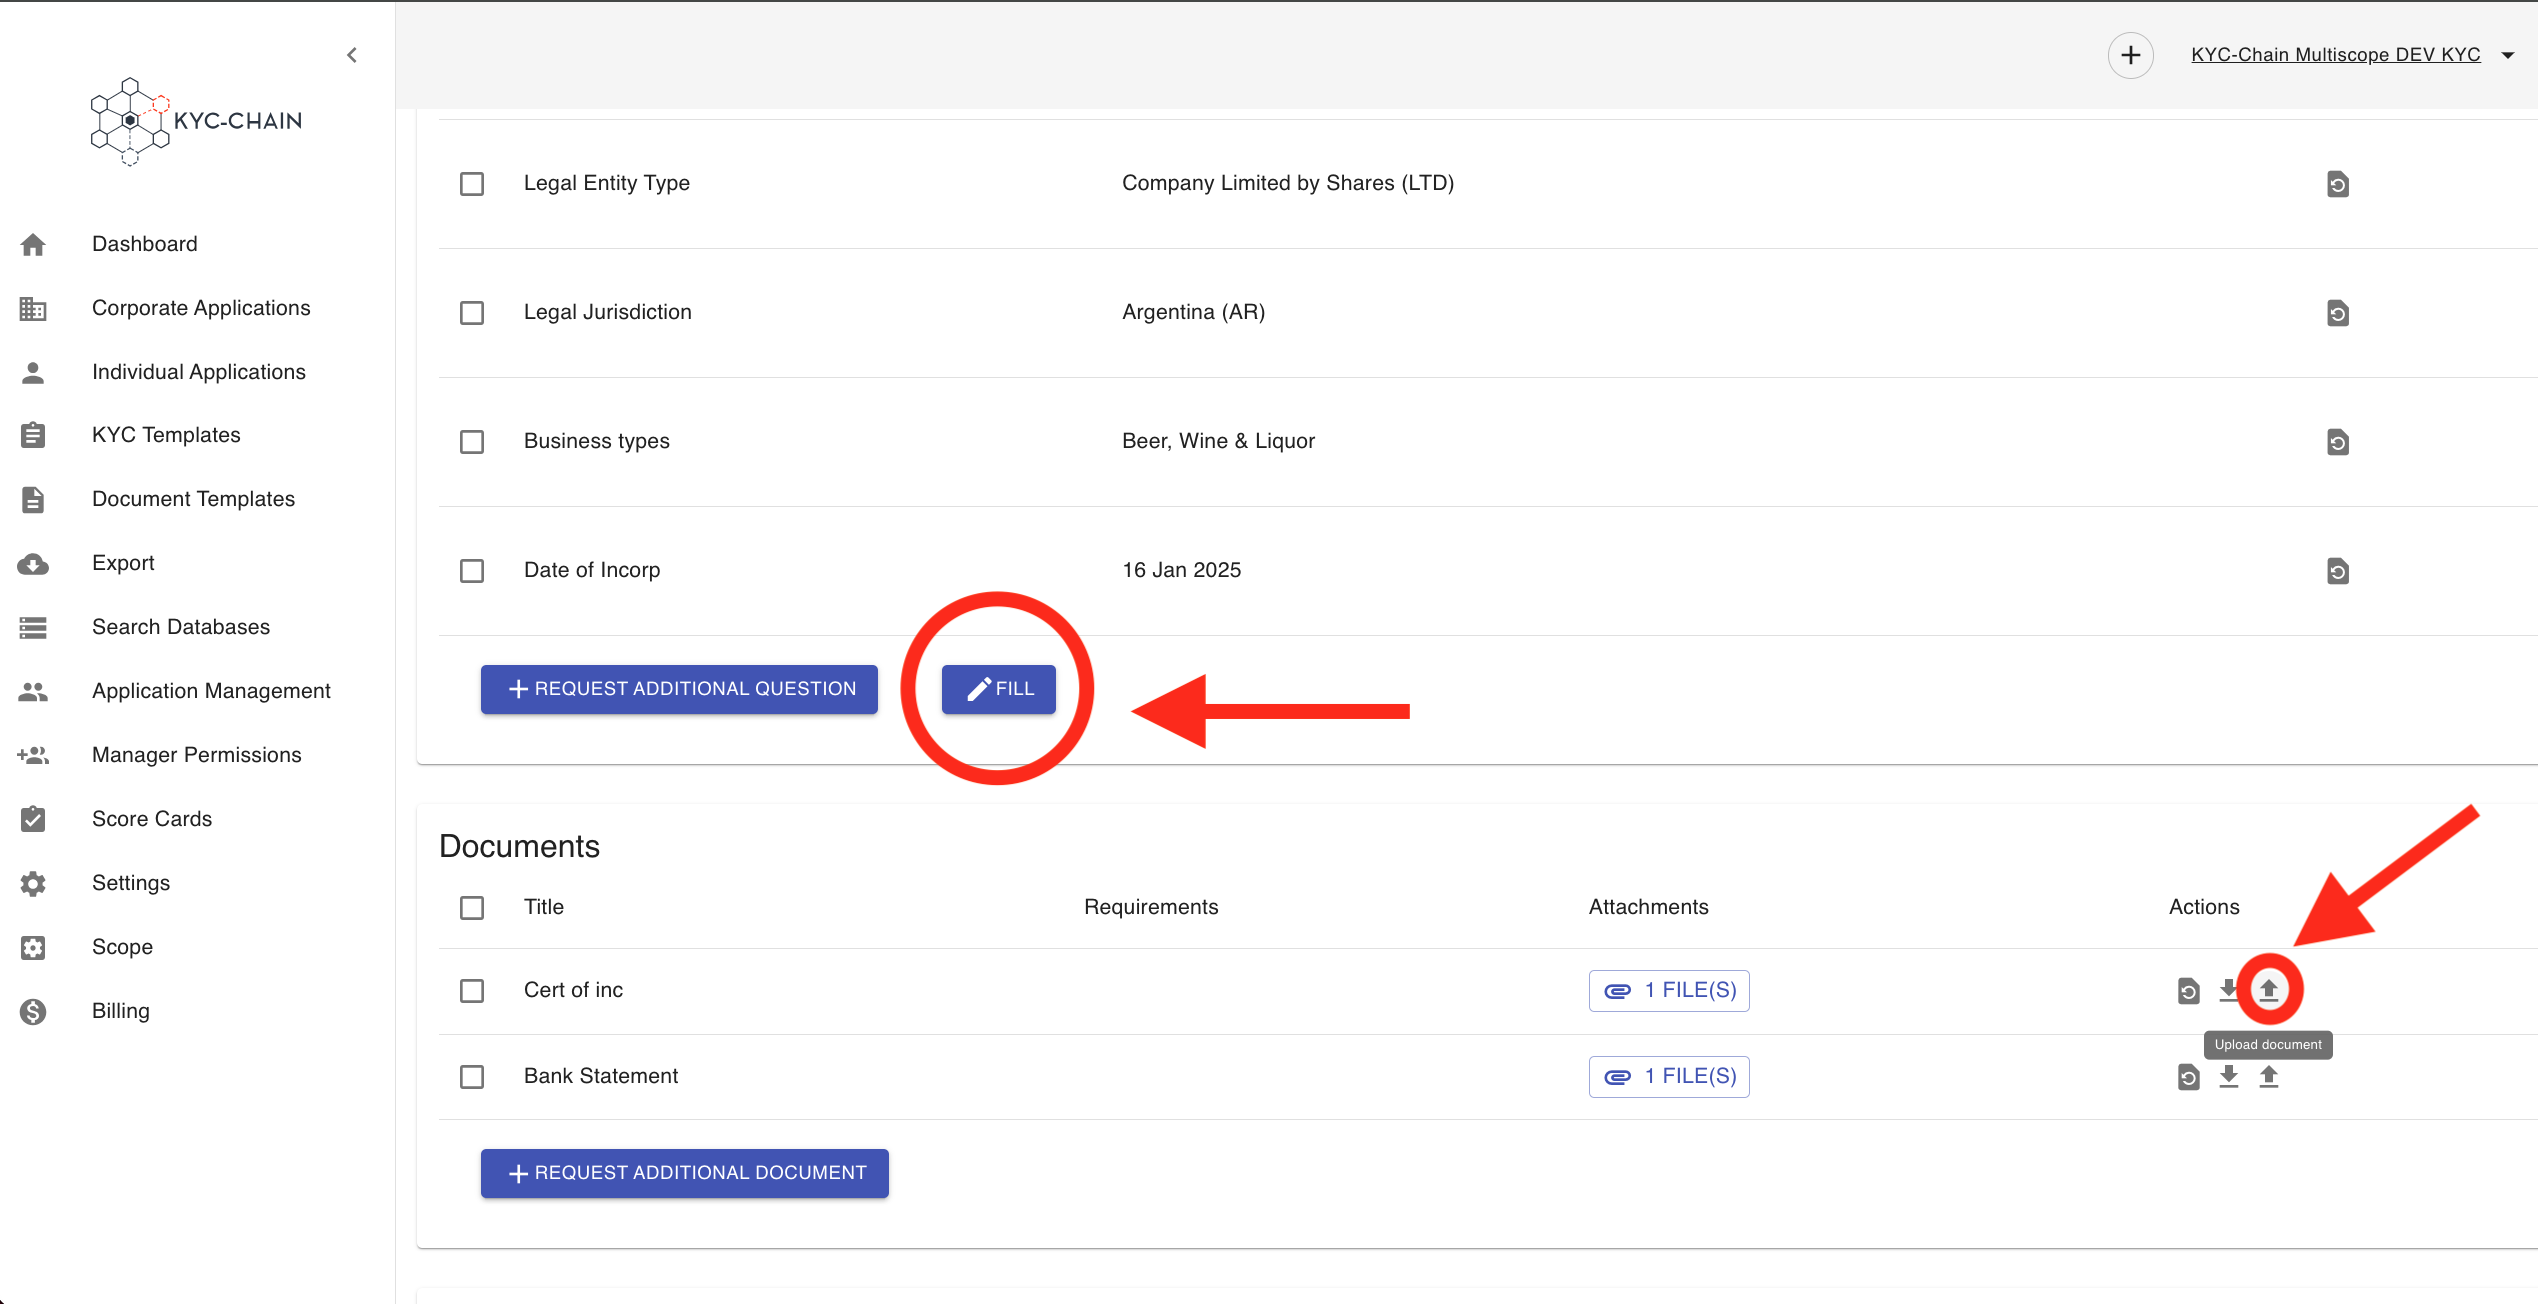
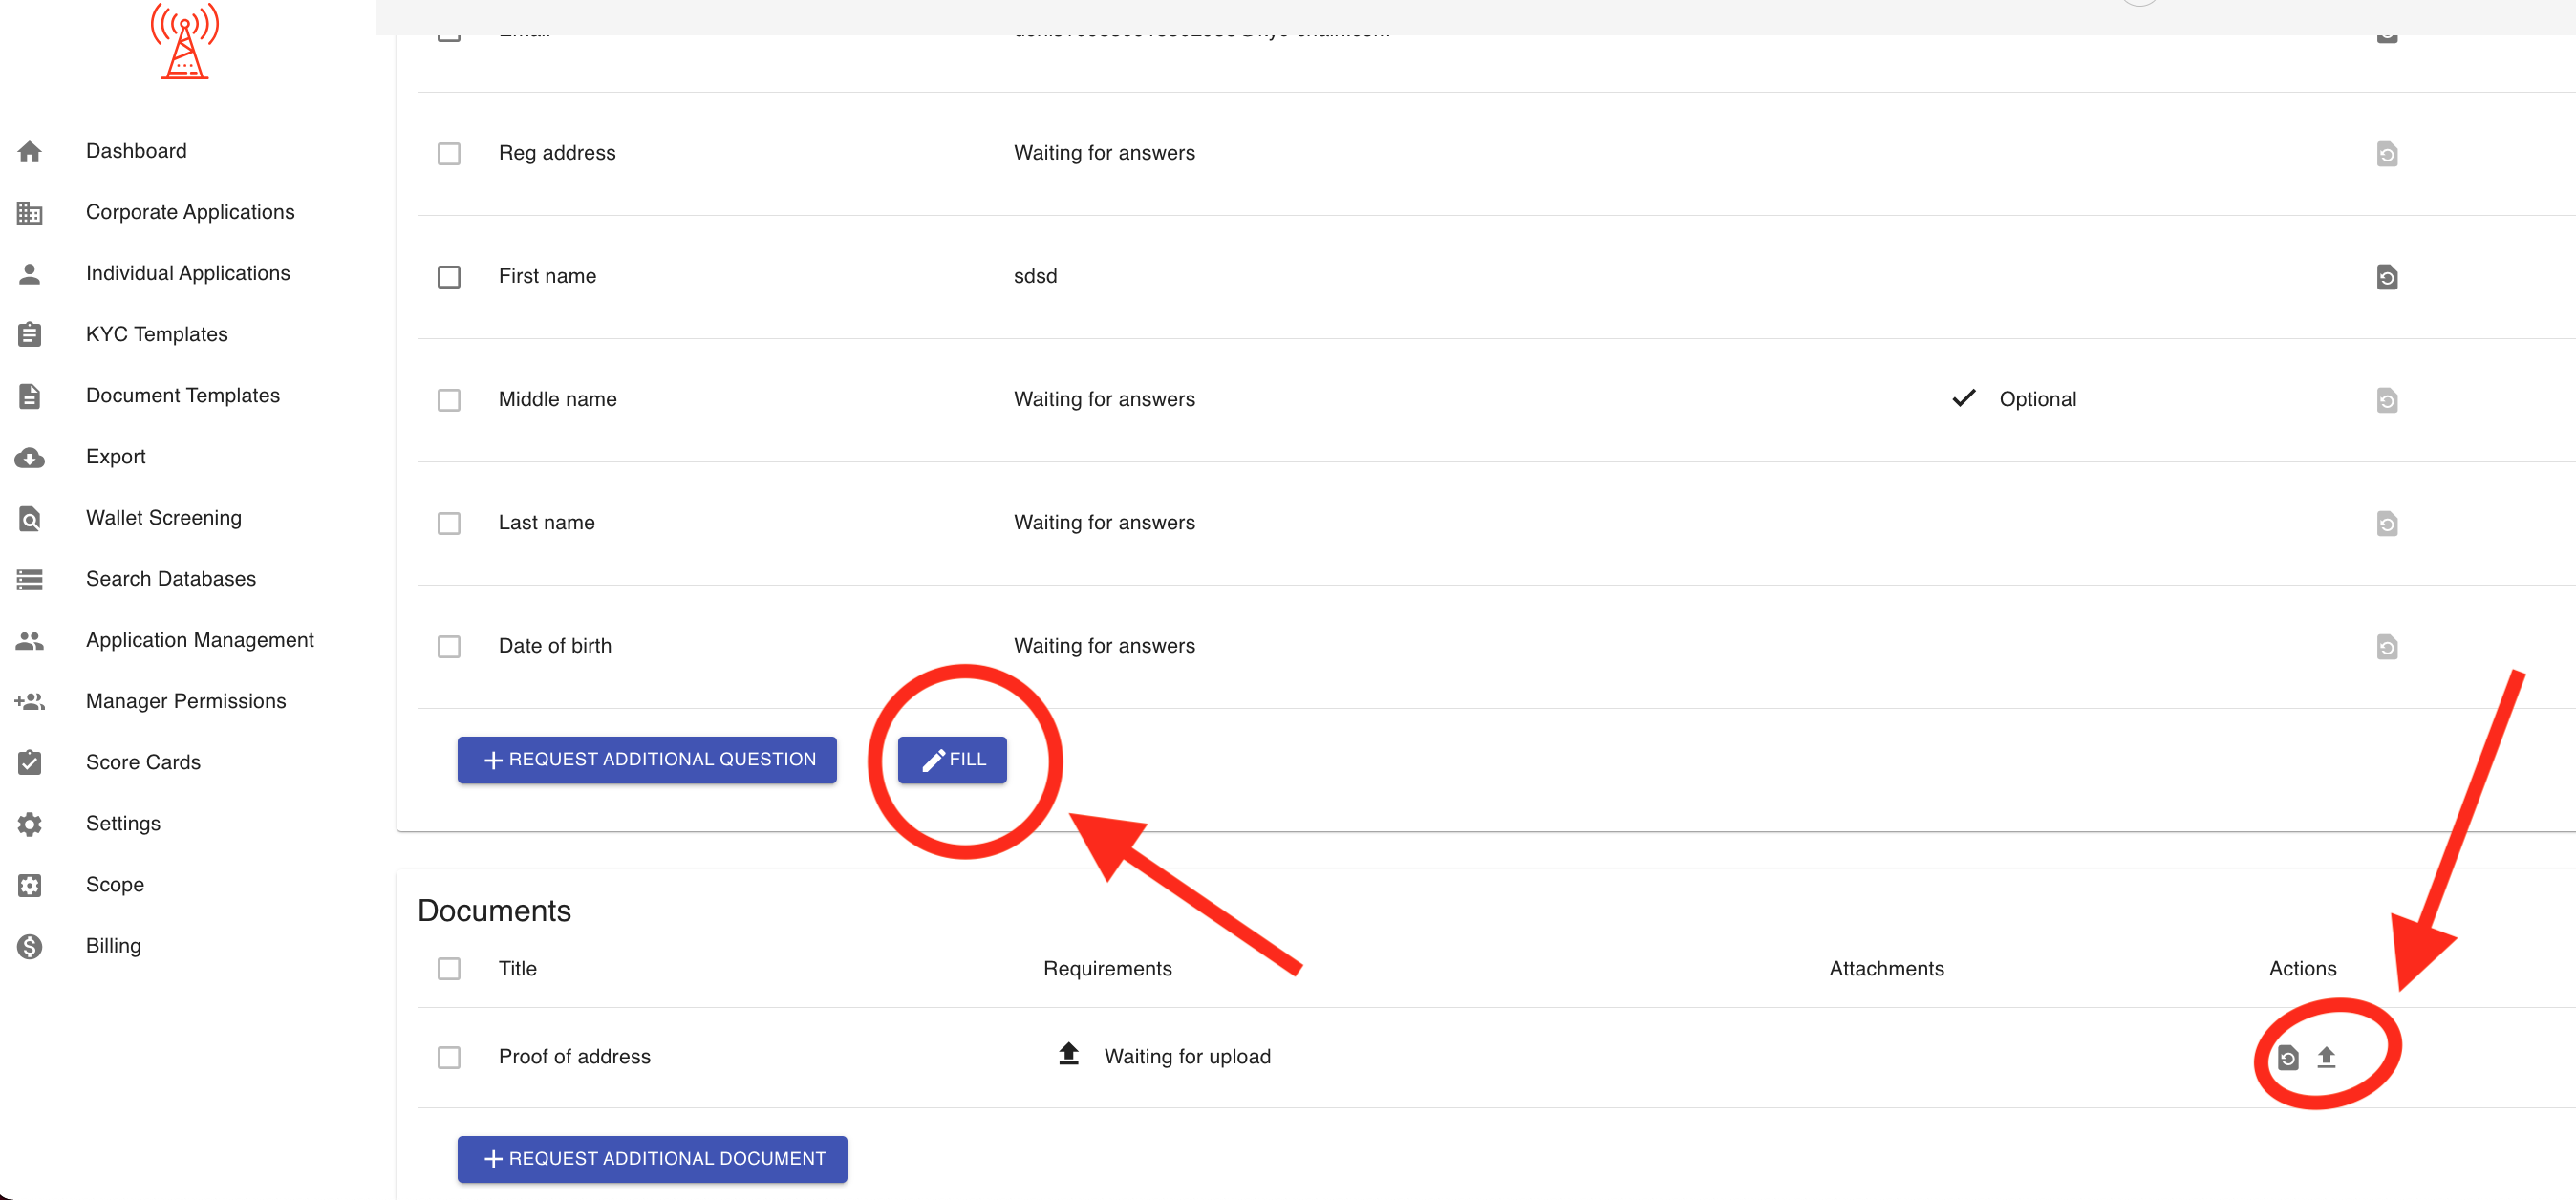
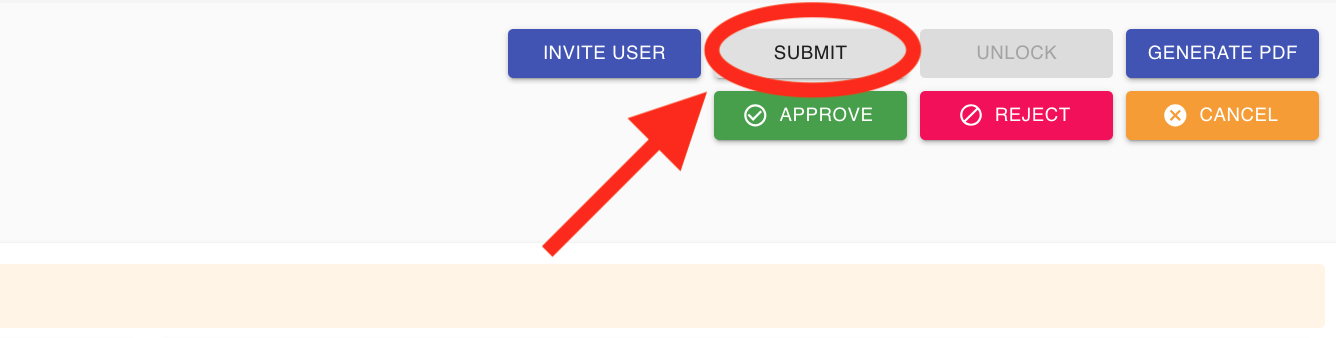
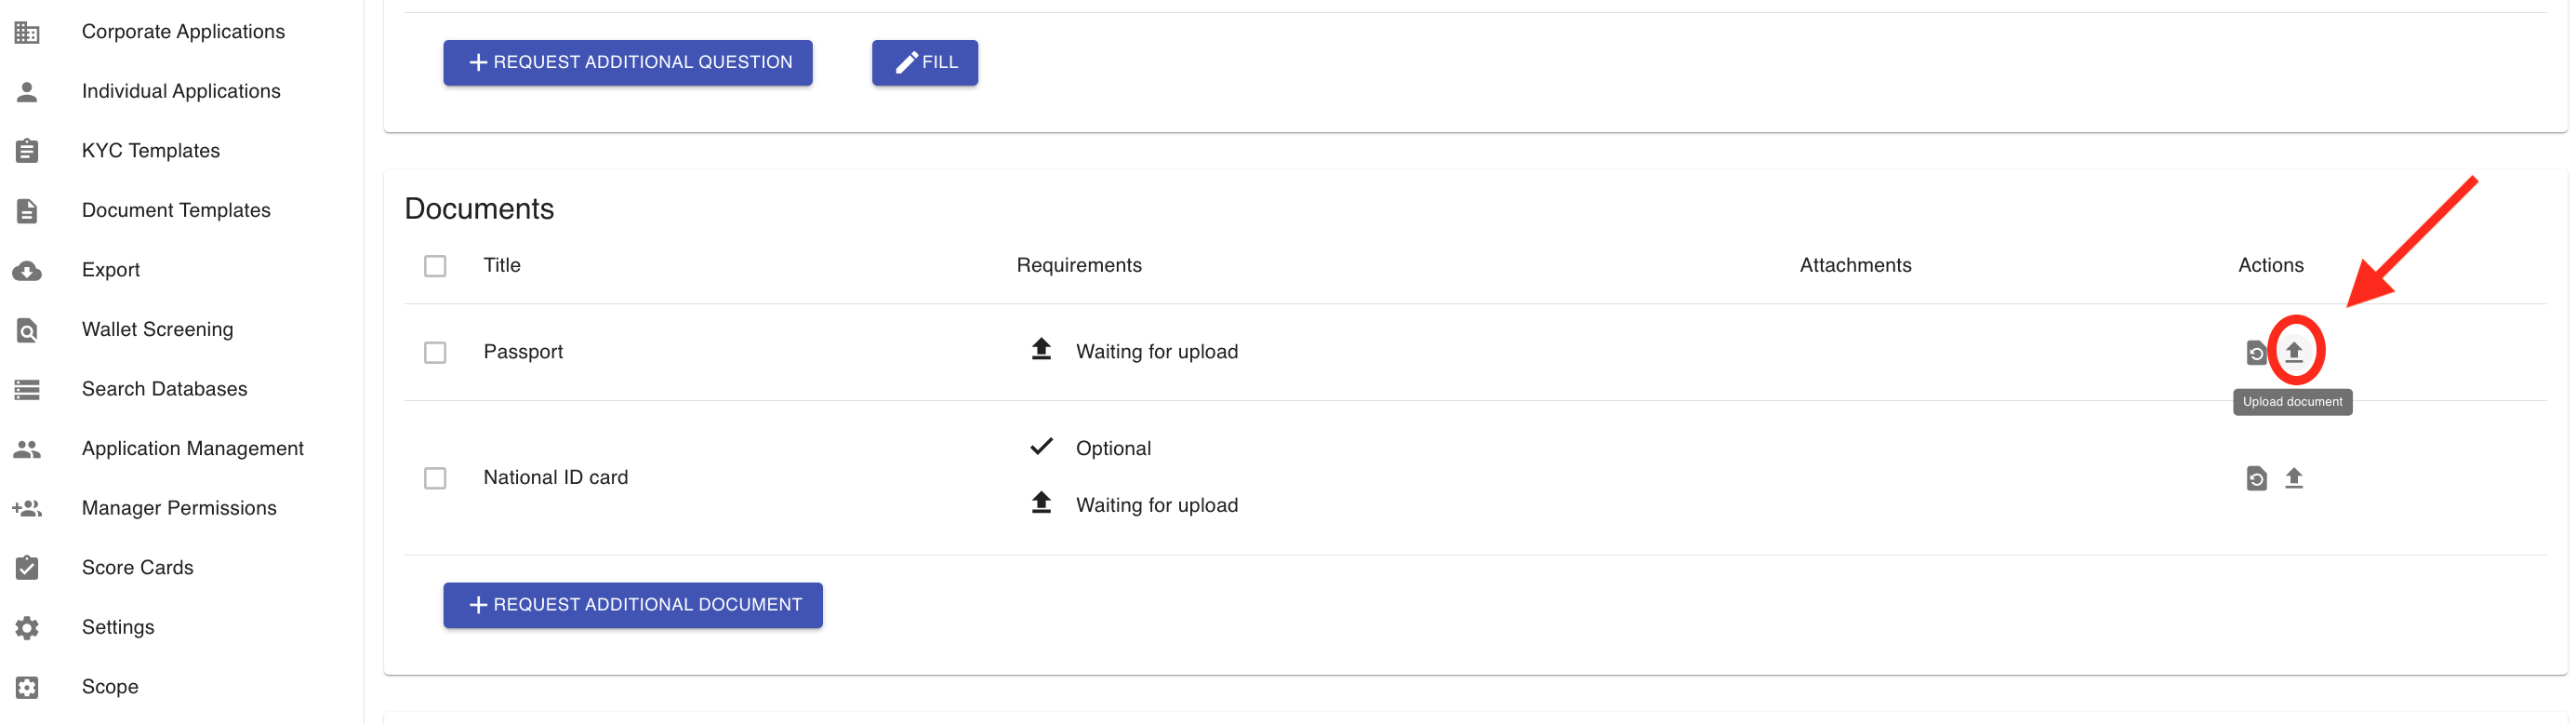
How to submit information and documents on behalf of applicant's using EasyFill:
The EasyFill feature makes updating application information simple and efficient. To use it, just click the FILL button highlighted in the screenshot. This will open an editing window where you can change or update any details, such as the name, date of birth, or other personal information.
You can also upload required documents by clicking the upload icon under the "Actions" column in the Documents section.
After you finish adjusting all the information and uploading any necessary files, be sure to click SUBMIT button in the top right corner. This step is important, as it allows the system to rerun all verification checks using the updated details.
How do I configure email sending from my custom domain in the KYC-Chain app?
The first step is to verify ownership of your domain. This is typically completed during client onboarding. If this step was not done, or if you would like to change the sending email address, please open a support ticket and provide the new email address or domain you wish to use for sending emails.
How to recall a sent message?
If your question concerns "External Notes," you can view all sent External Notes on the Overview page at the very bottom of an application. If your question is not about sent "External Notes" but other messages, please create a support ticket and provide details about which messages you are referring to so we can assist you more effectively.
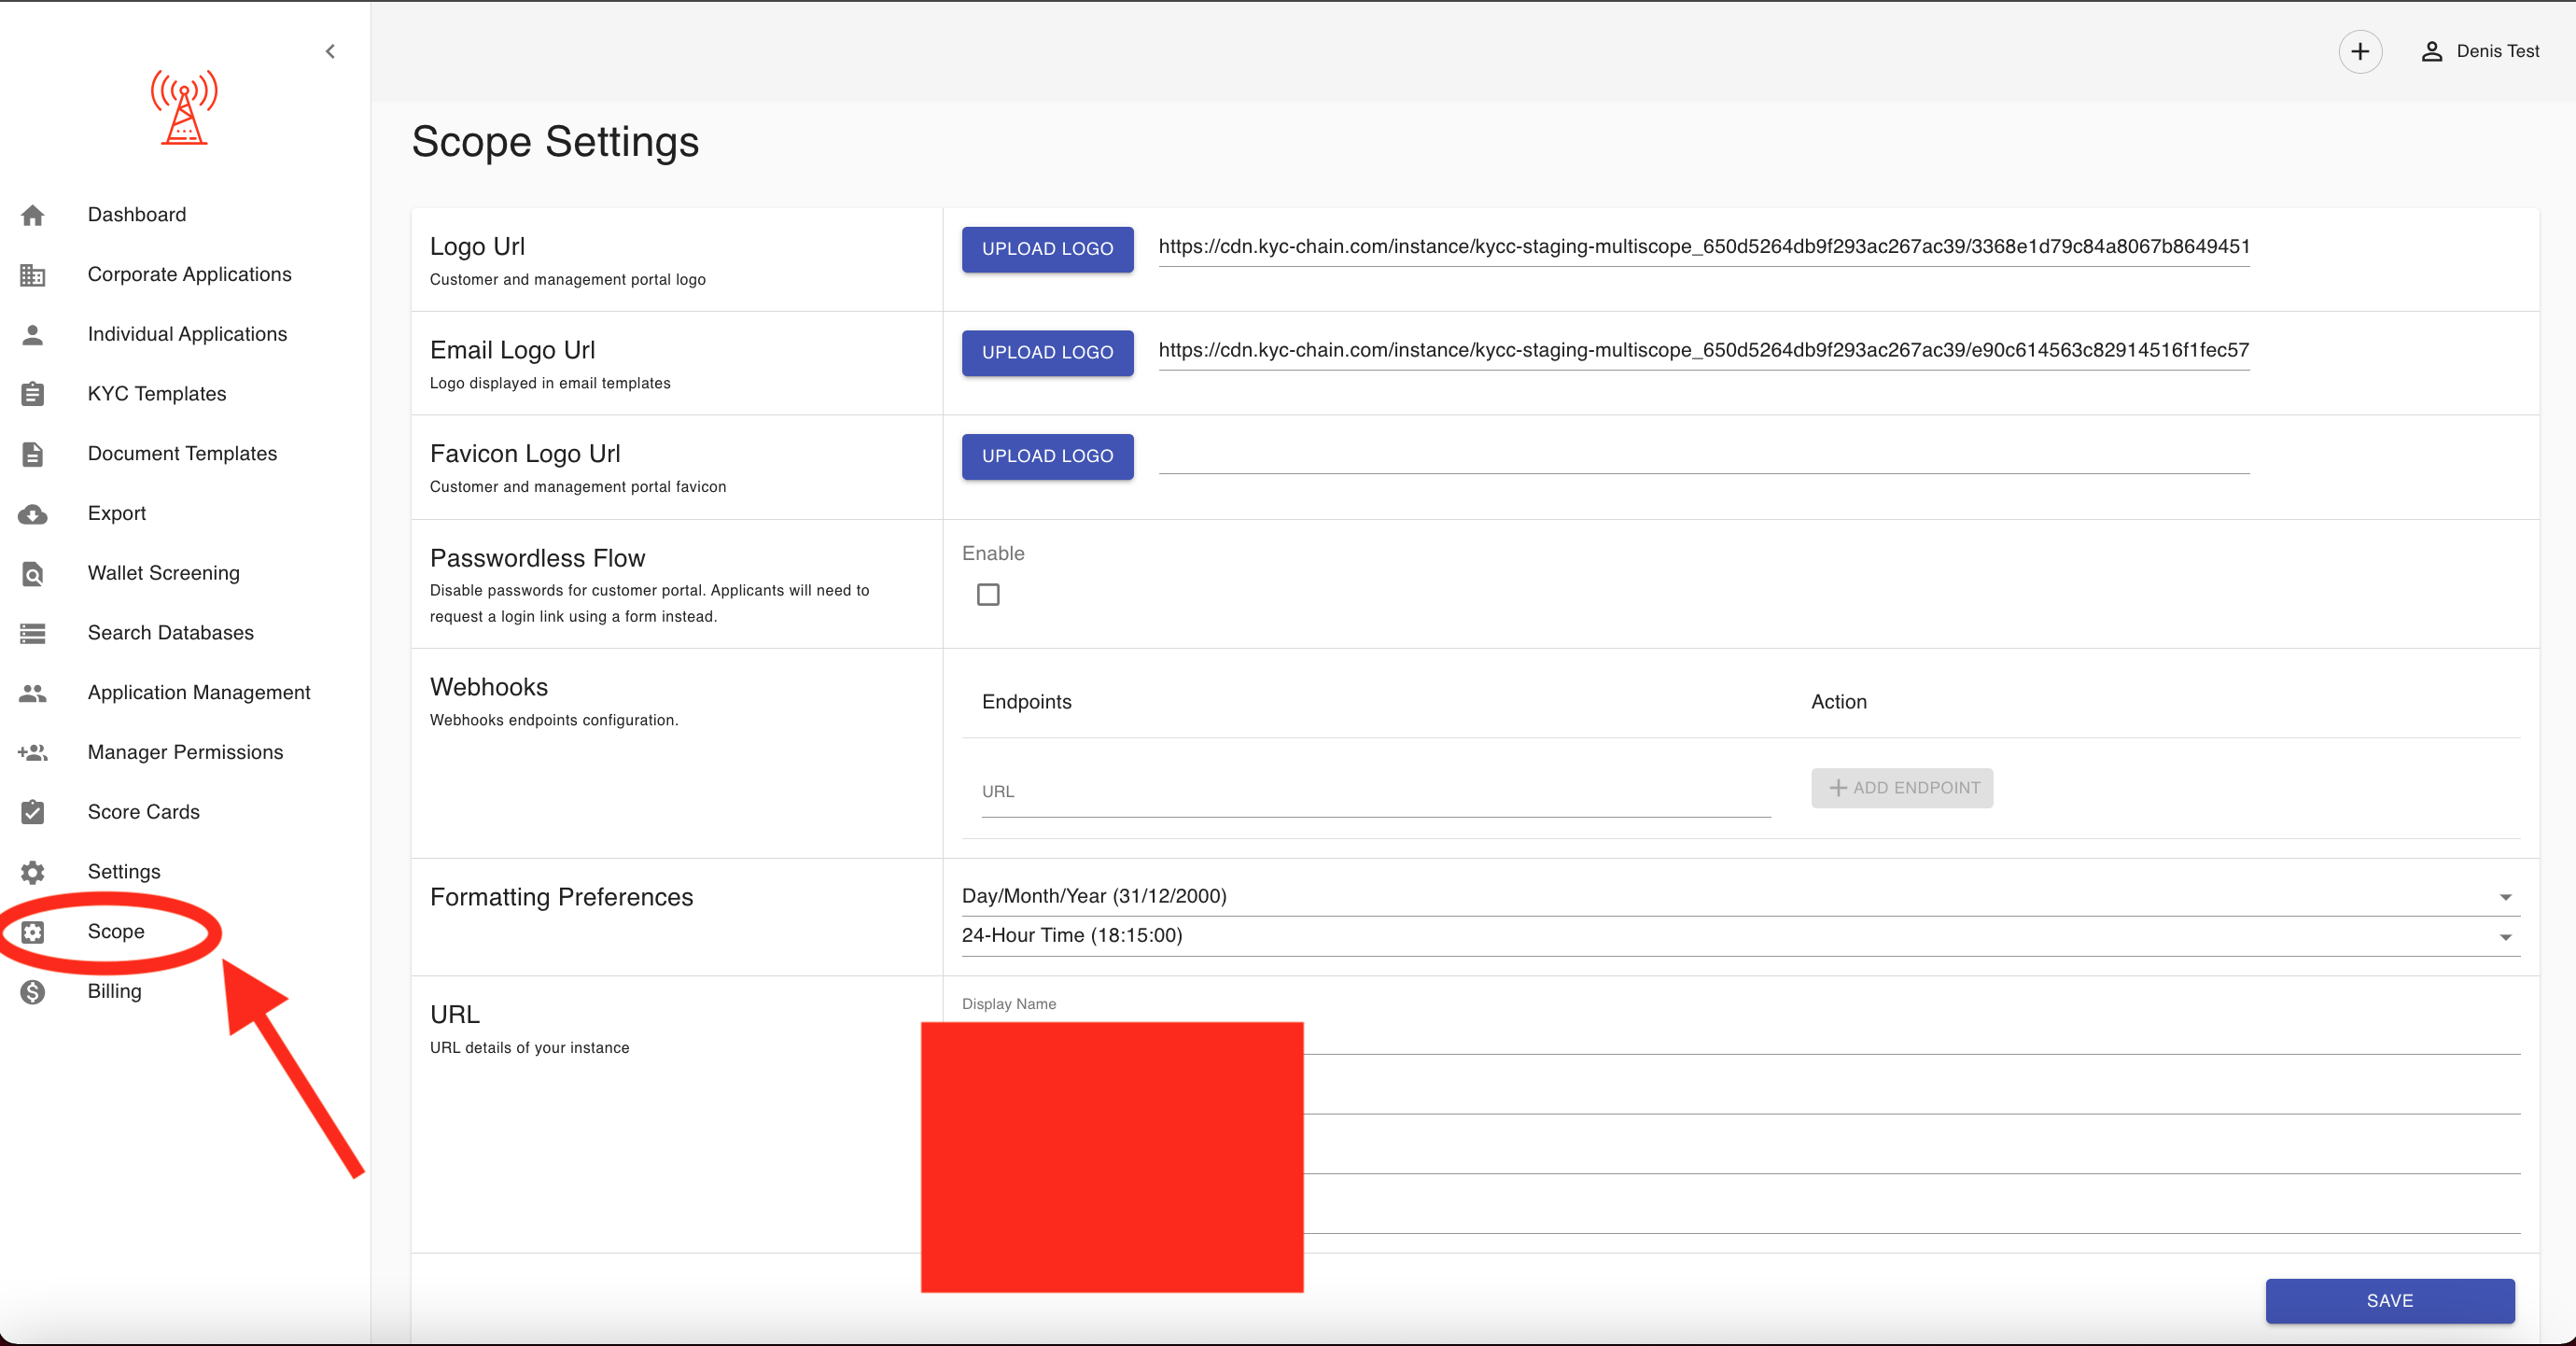
How do I update my organization's logo and name?
You can update your logo and organization name in the Scope Settings. Please refer to the screenshot for more information.
How can I obtain company registry information for British Virgin Islands (BVI) entities?
To request company registry information for a British Virgin Islands (BVI) entity, please open a support ticket and provide the following details: company name, legal entity type, company registration number, and date of incorporation. Our team will order all necessary documents on your behalf and notify you as soon as everything is ready. Please note that it may take a couple of days to obtain all the required documents.
How can I access the API documentation?
You can access our API documentation at the following link: https://apidocs.kyc-chain.com/#/. Please be sure to open a support ticket to request your login credentials.
How to disable sybil checks?
To enable or disable Sybil Checks, simply open the KYC Template where you want to manage these checks, then check or uncheck the desired verification options (One Application Per Applicant, Enforce Unique MRZ, or Enforce Unique Name + DOB). Make sure the "Active" checkbox is selected for your changes to take effect, save changes:

How to customize an existing template?
- Go to the KYC templates tab (left-side main menu)
- Choose the template you would like to edit and click on the View & Modify button (magnifying glass icon on the right side of the template)
- Edit the desired fields, scroll down and click Save

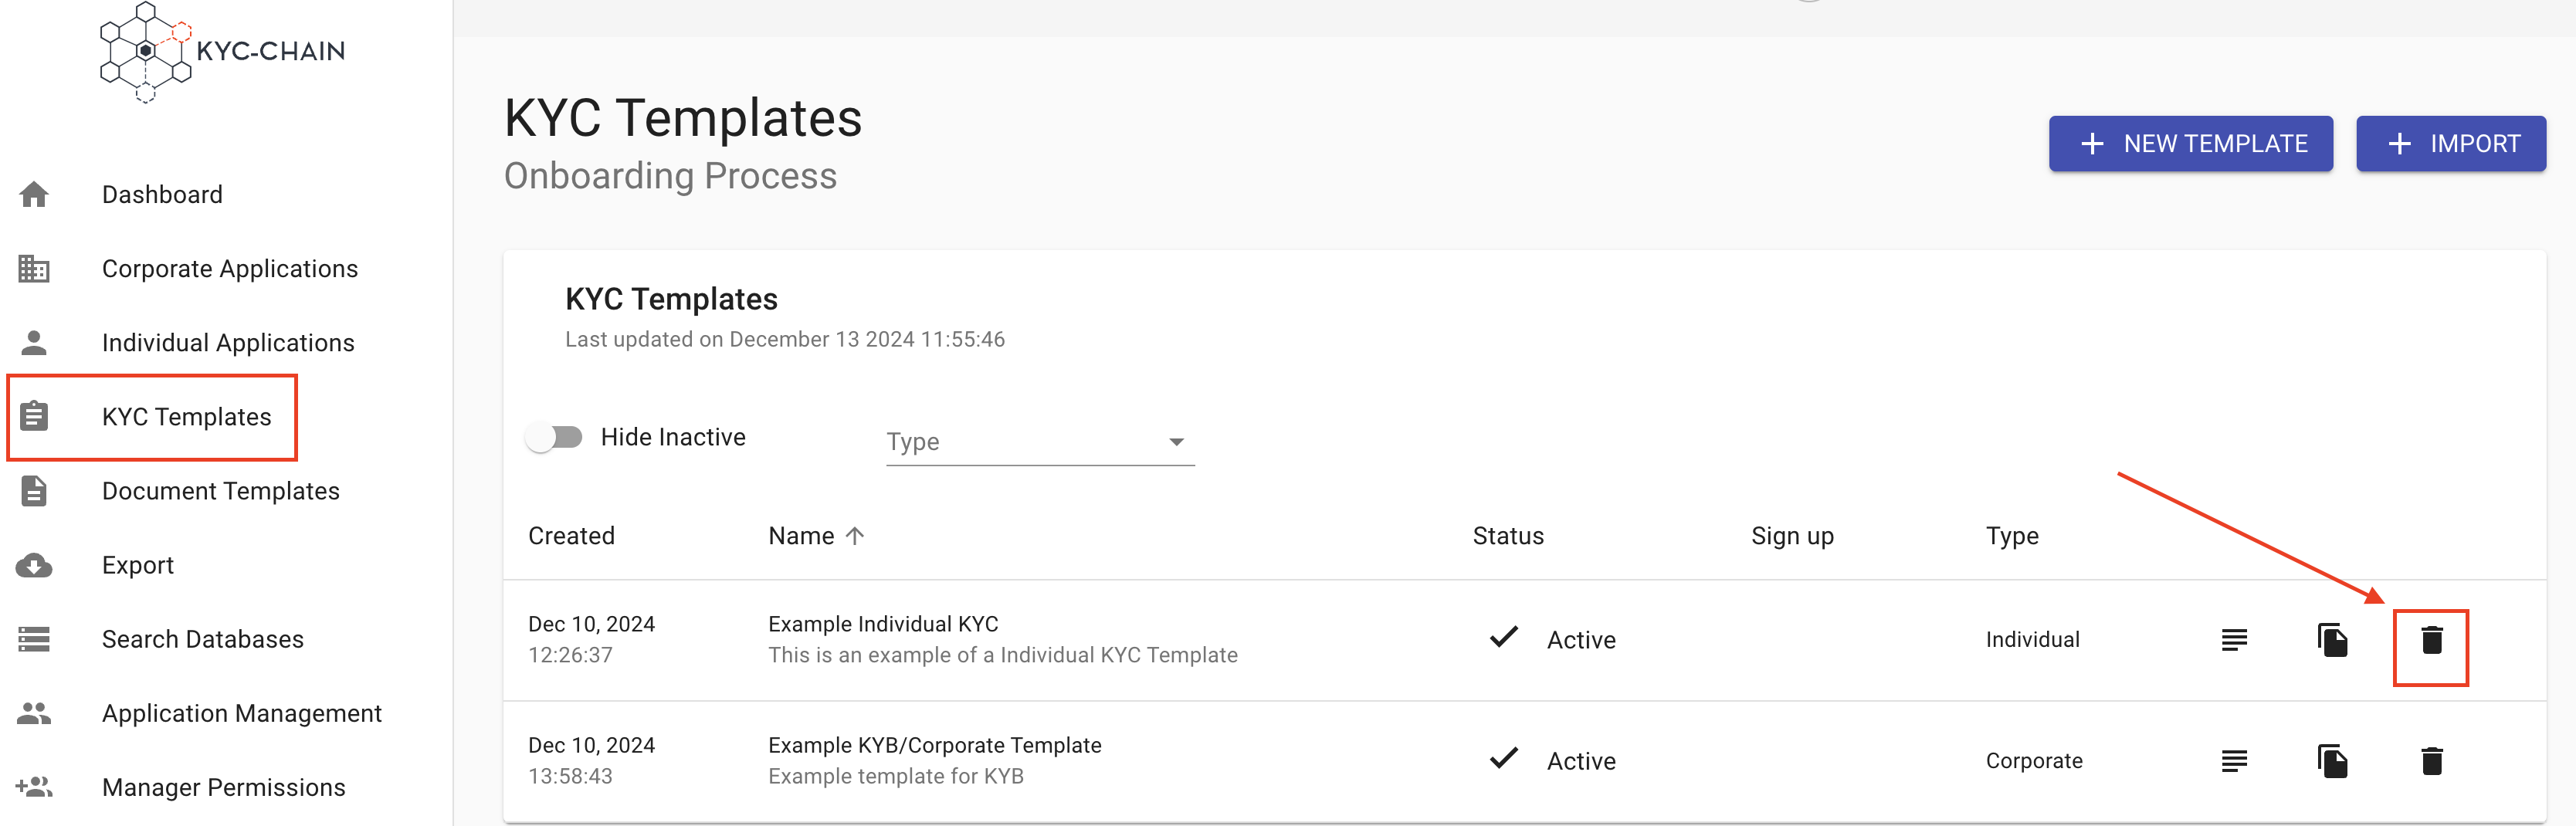
How to delete an existing template?
- Go to the KYC templates tab (left-side main menu)
- Choose the template you would like to delete and click on the Trash icon.
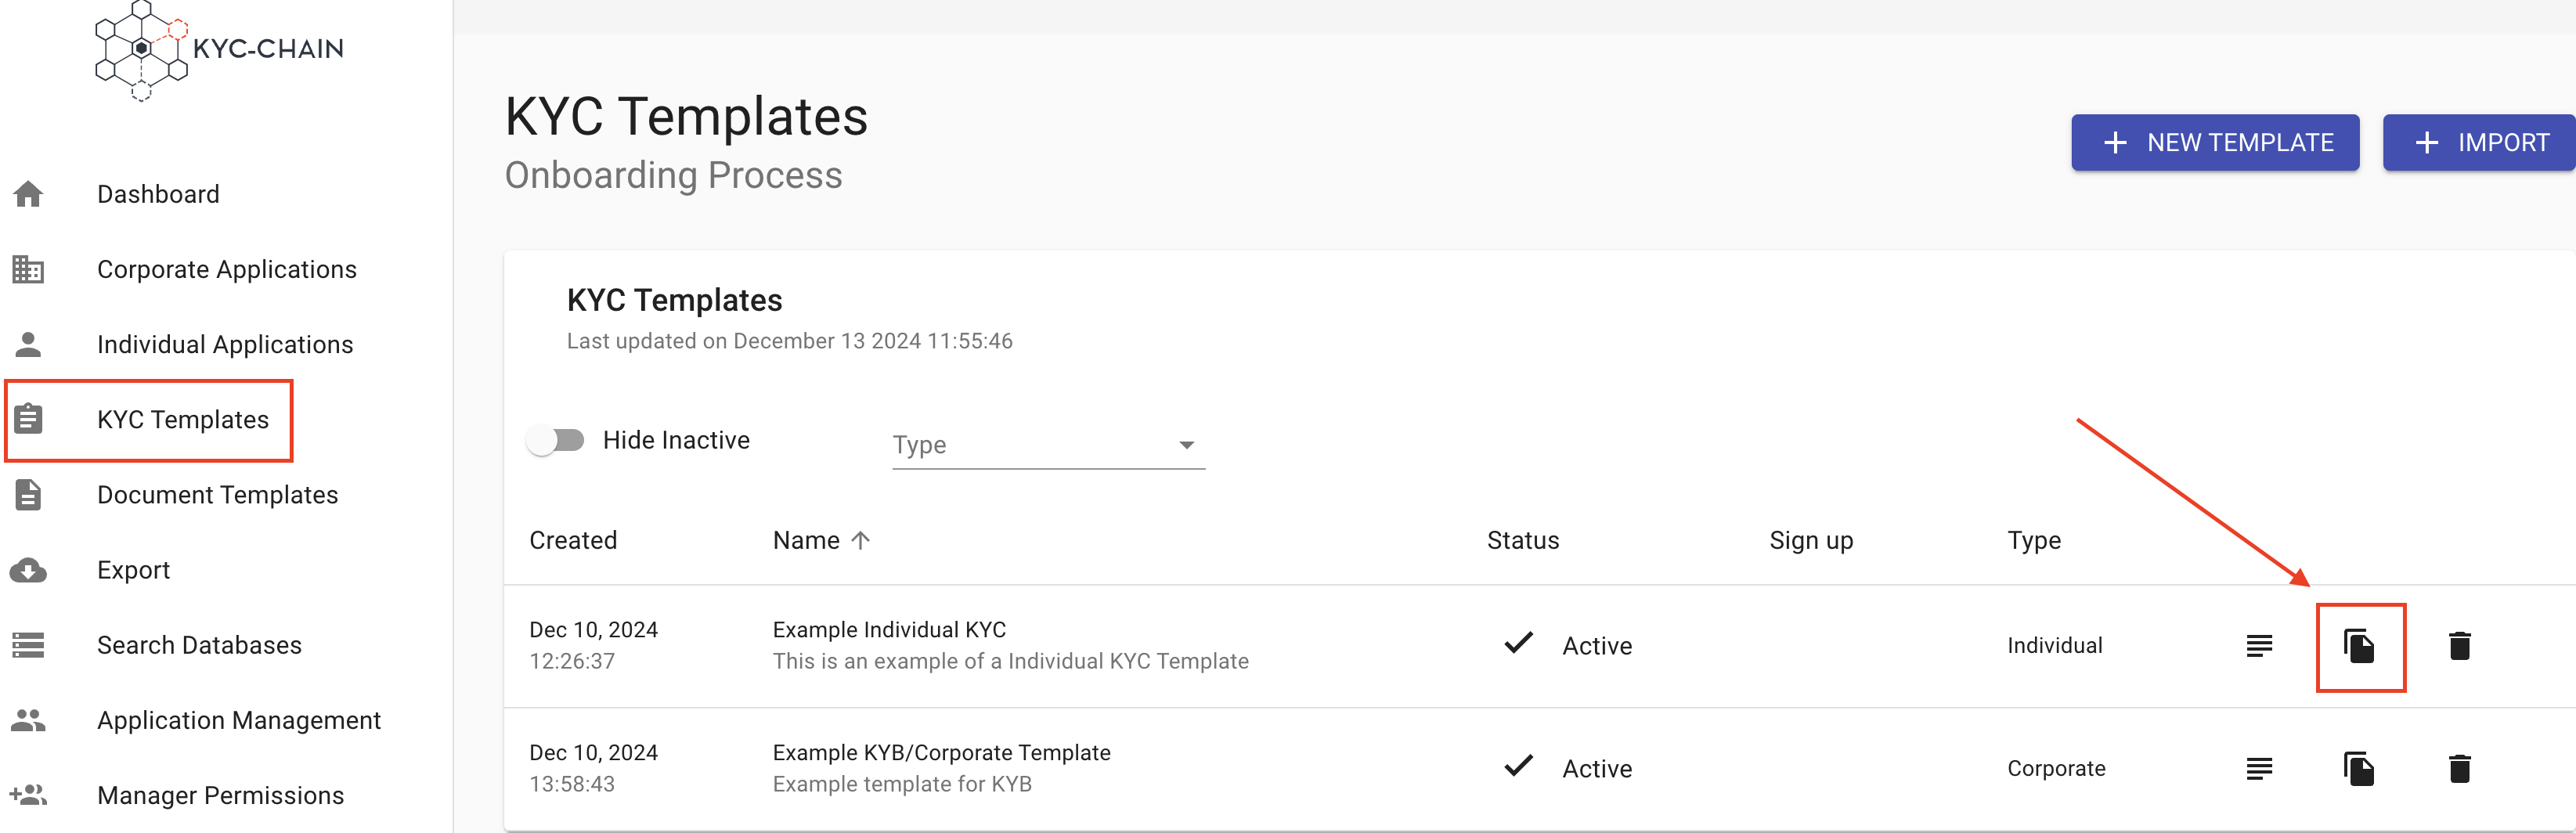
How to duplicate an existing template?
- Go to the KYC templates tab (left-side main menu)
- Choose the template you would like to duplicate and click on the Duplicate button (copy icon).
How to access the demo or sandbox environment?
When your KYC instance is deployed, it is set to demo mode by default, allowing you to begin running tests immediately. However, if you would like to perform real checks on actual data, please open a ticket to request that our team switch your instance to live mode. Please note that you will be charged for each real check completed.
If you need an additional sandbox environment separate from your live environment, please also open a ticket. Our support team will get back to you as soon as possible.
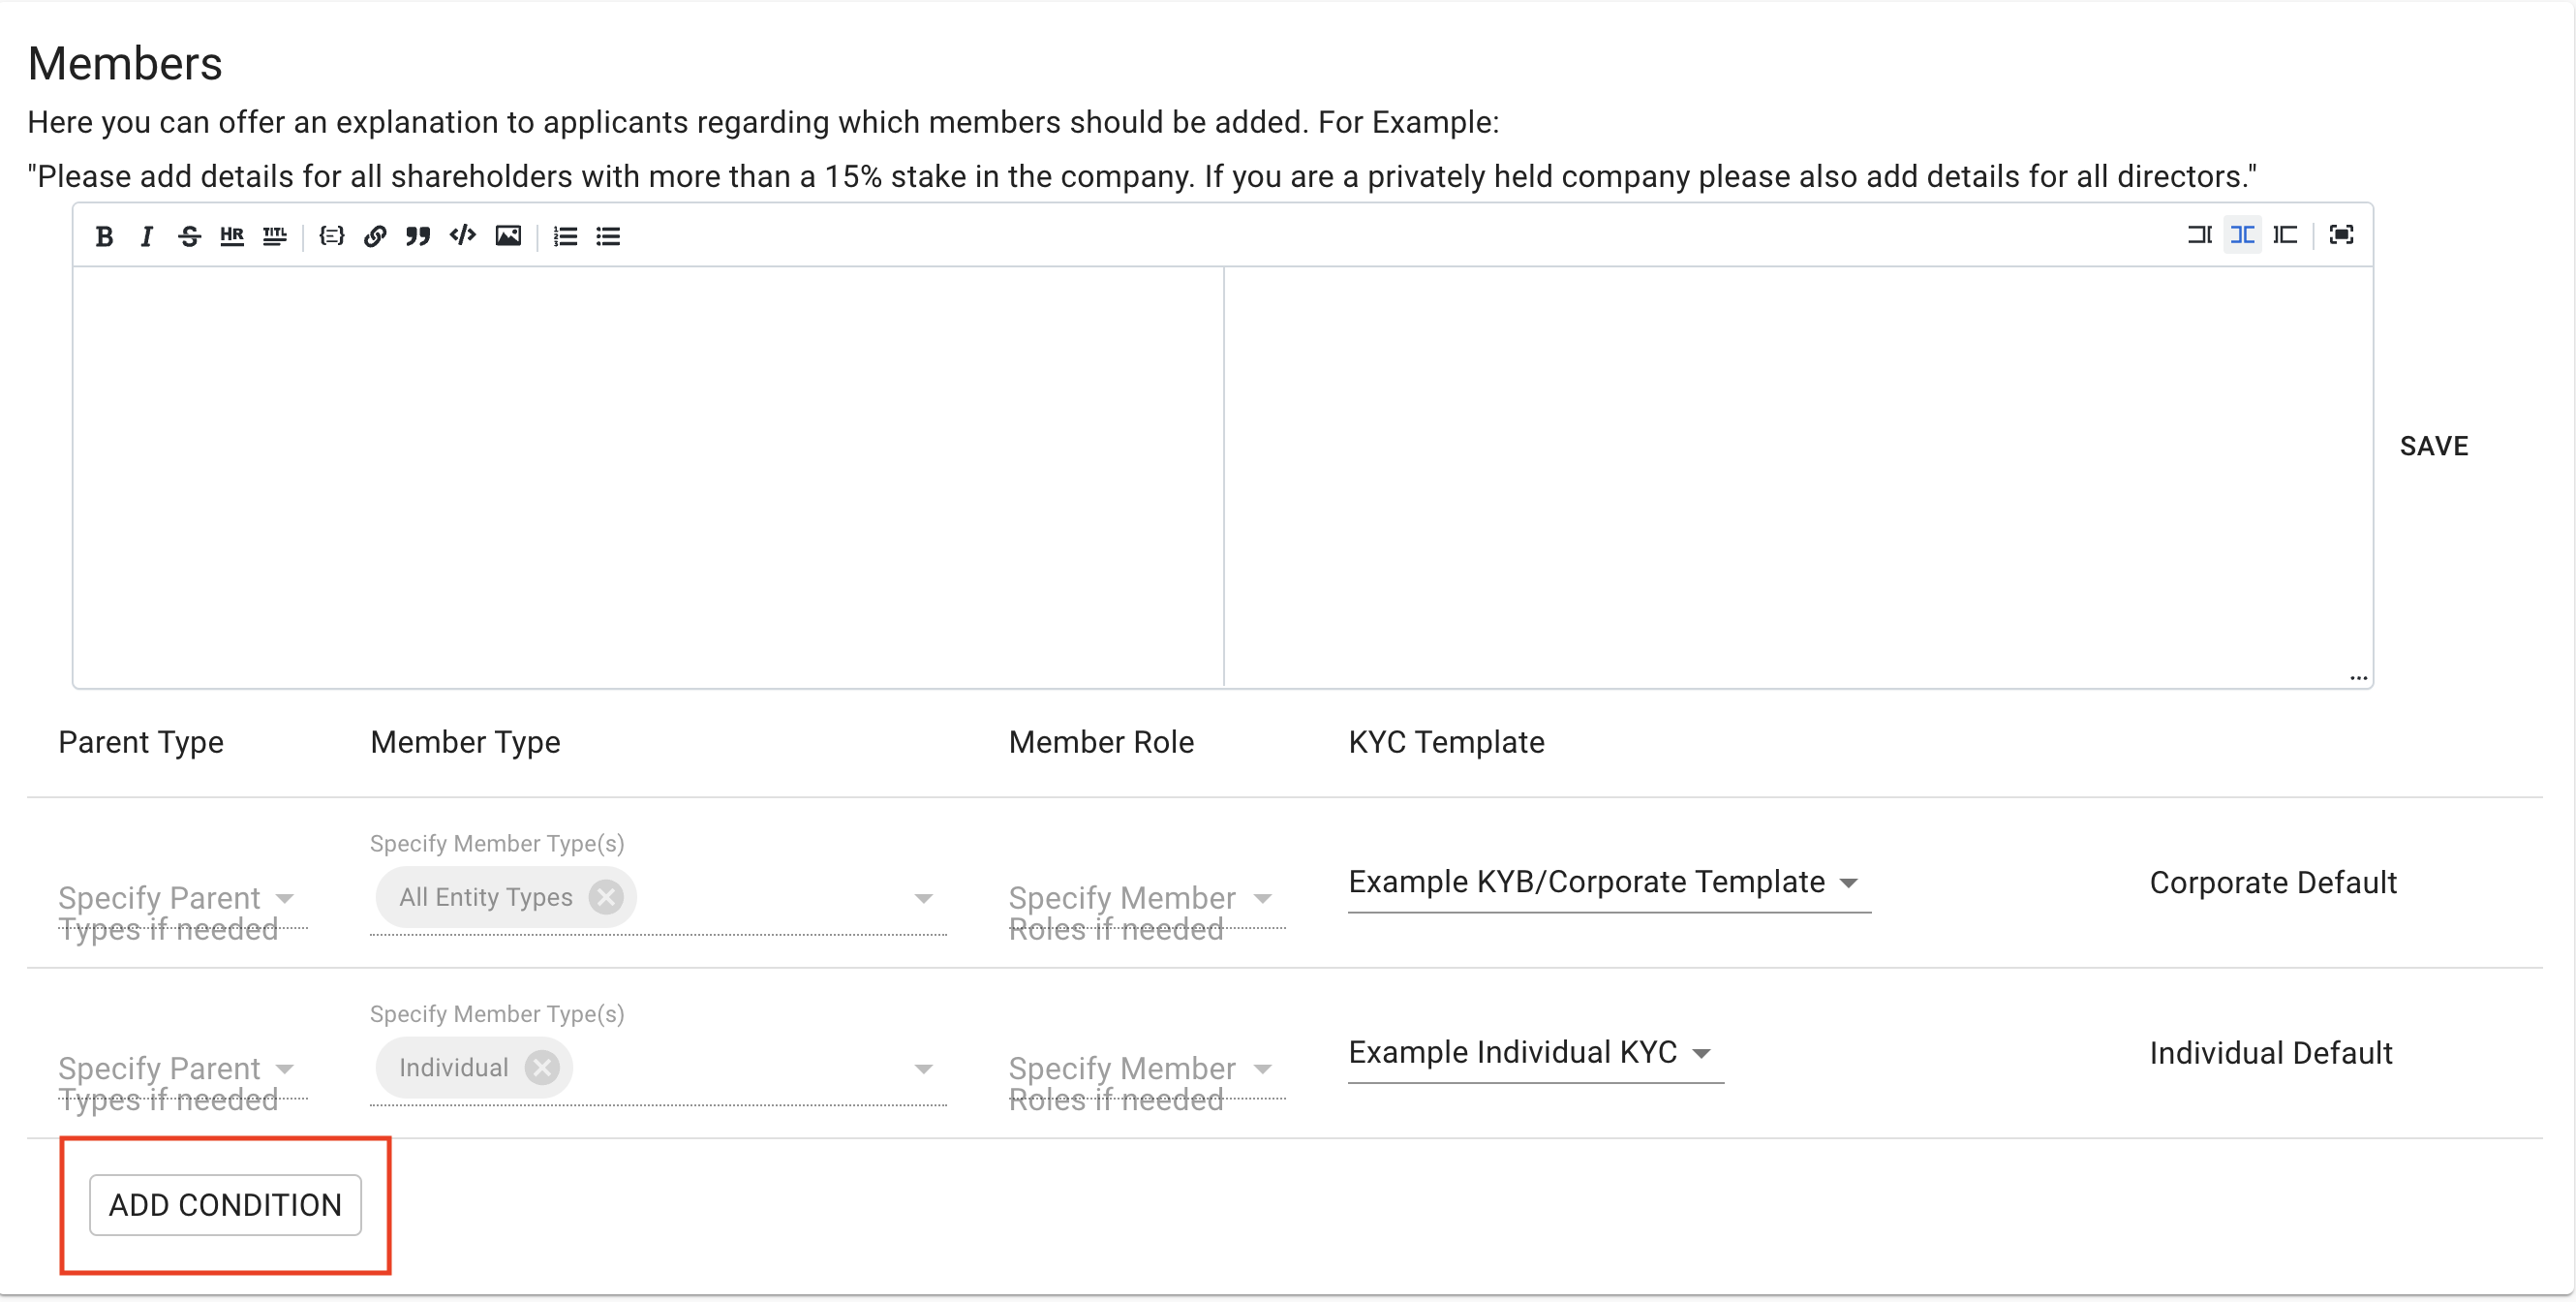
How to customize KYC requirements for members of a KYC Process?
The KYC-Chain application allows for members to be added to applications, and you can specify different requirements for them using the Member Templates section at the bottom of the KYC Template edit page.
- Go to the KYC Templates tab (left-side main menu)
- Choose a "corporate" template, and click "edit".
- Check the "Enable" checkbox in the Members section and then click "save".
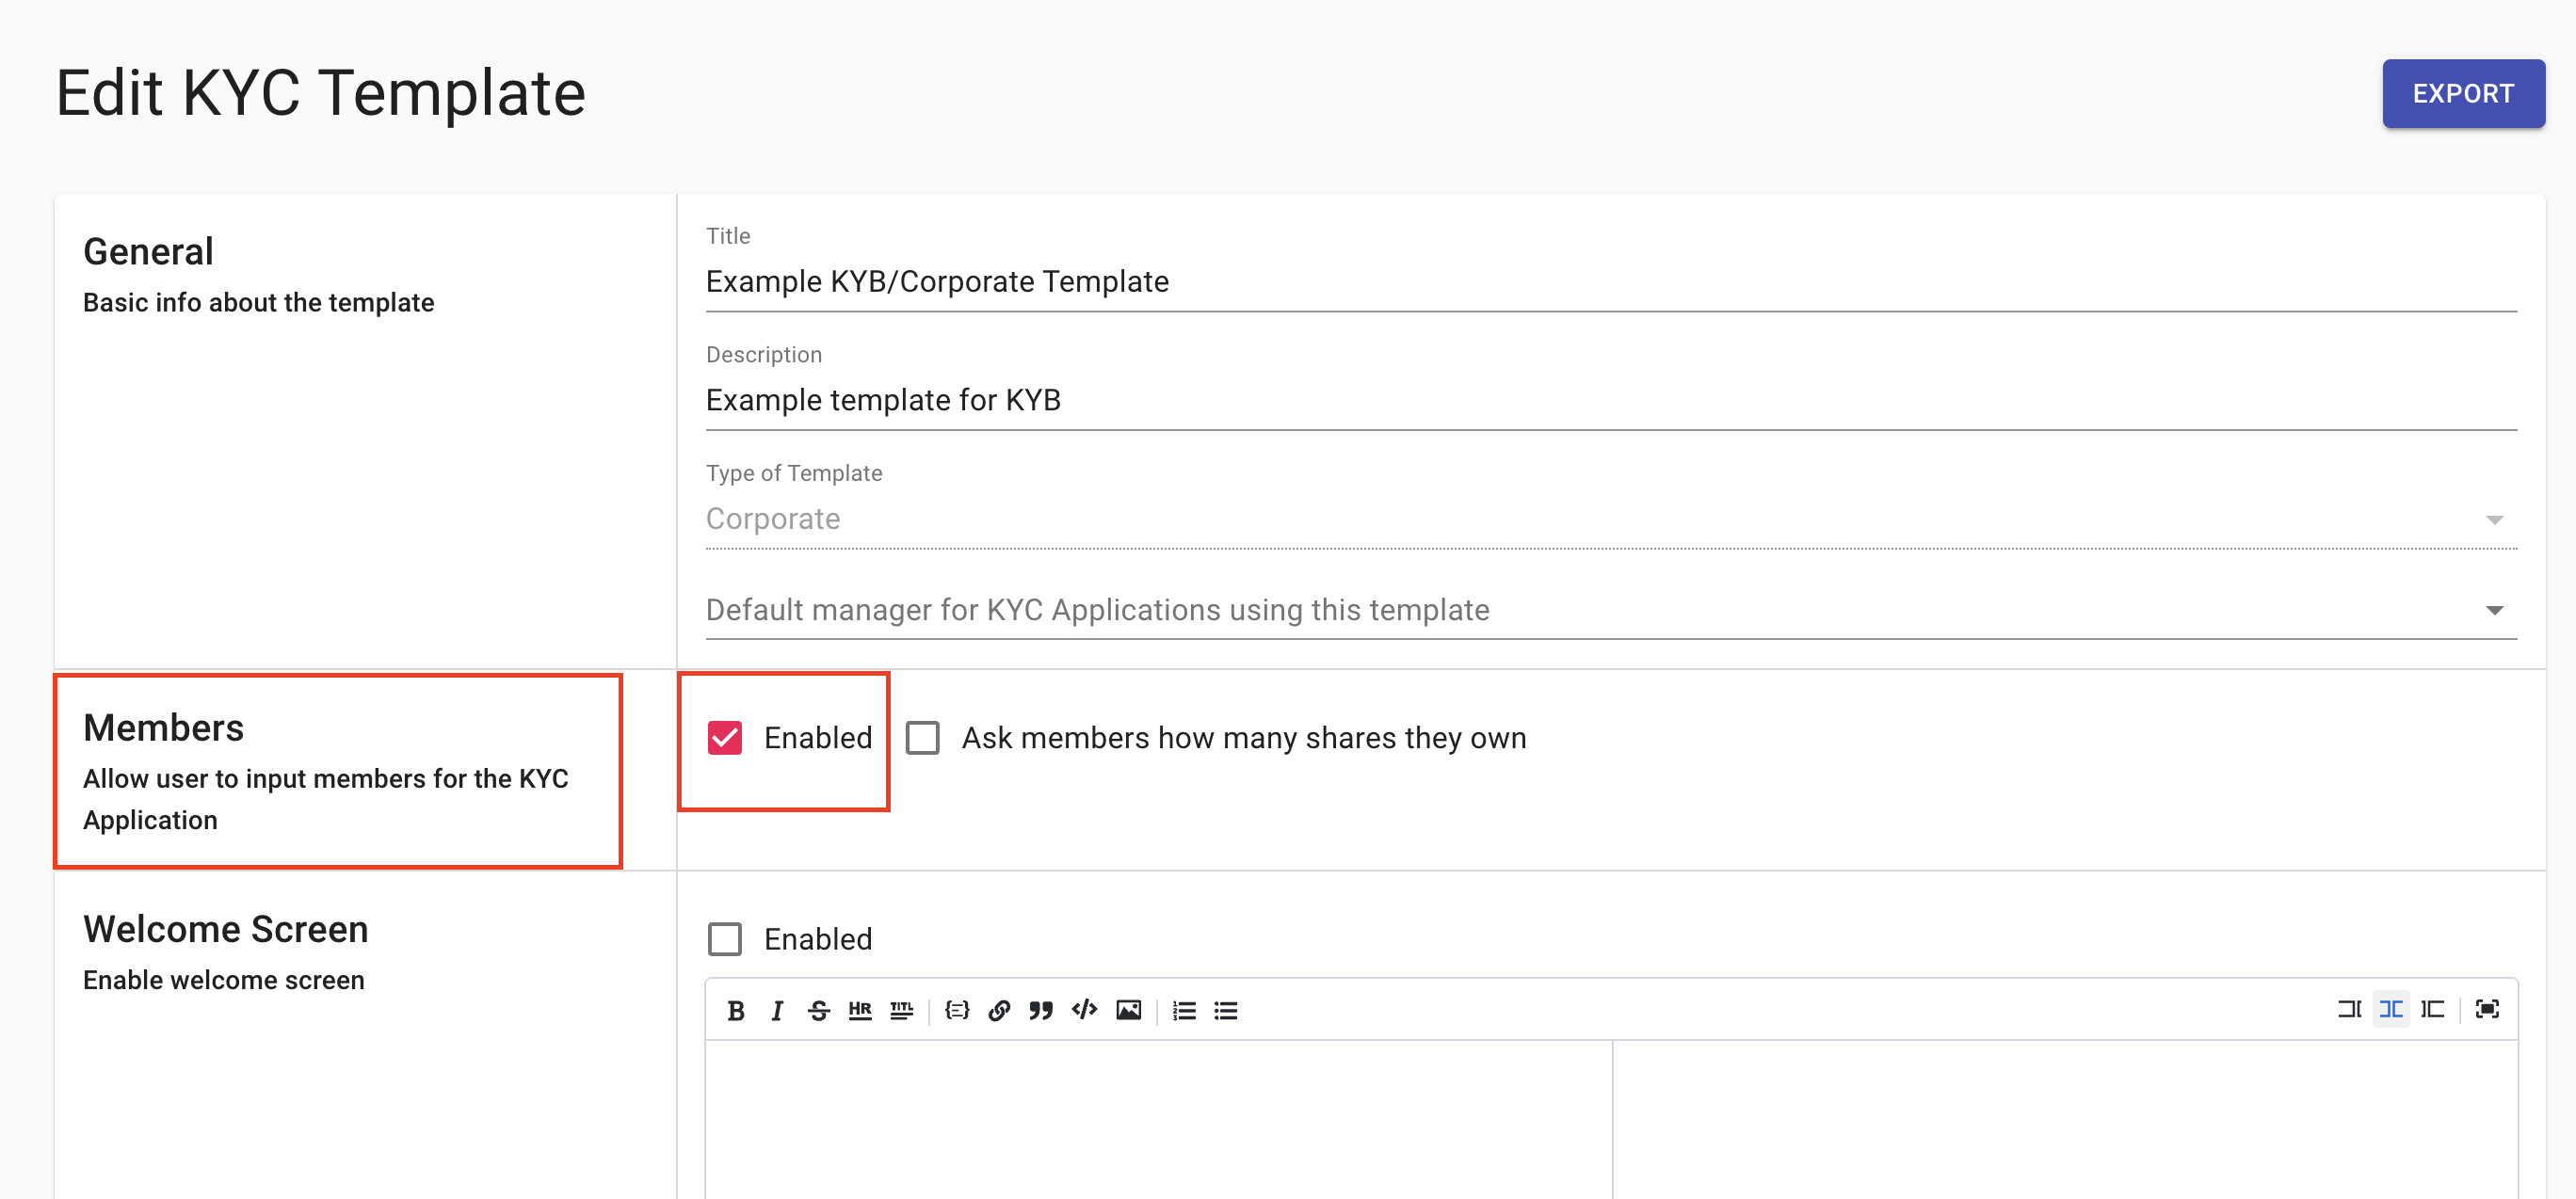
- Scroll to the "Member Templates" section and select your chosen default KYC templates for Individual and Corporate members.
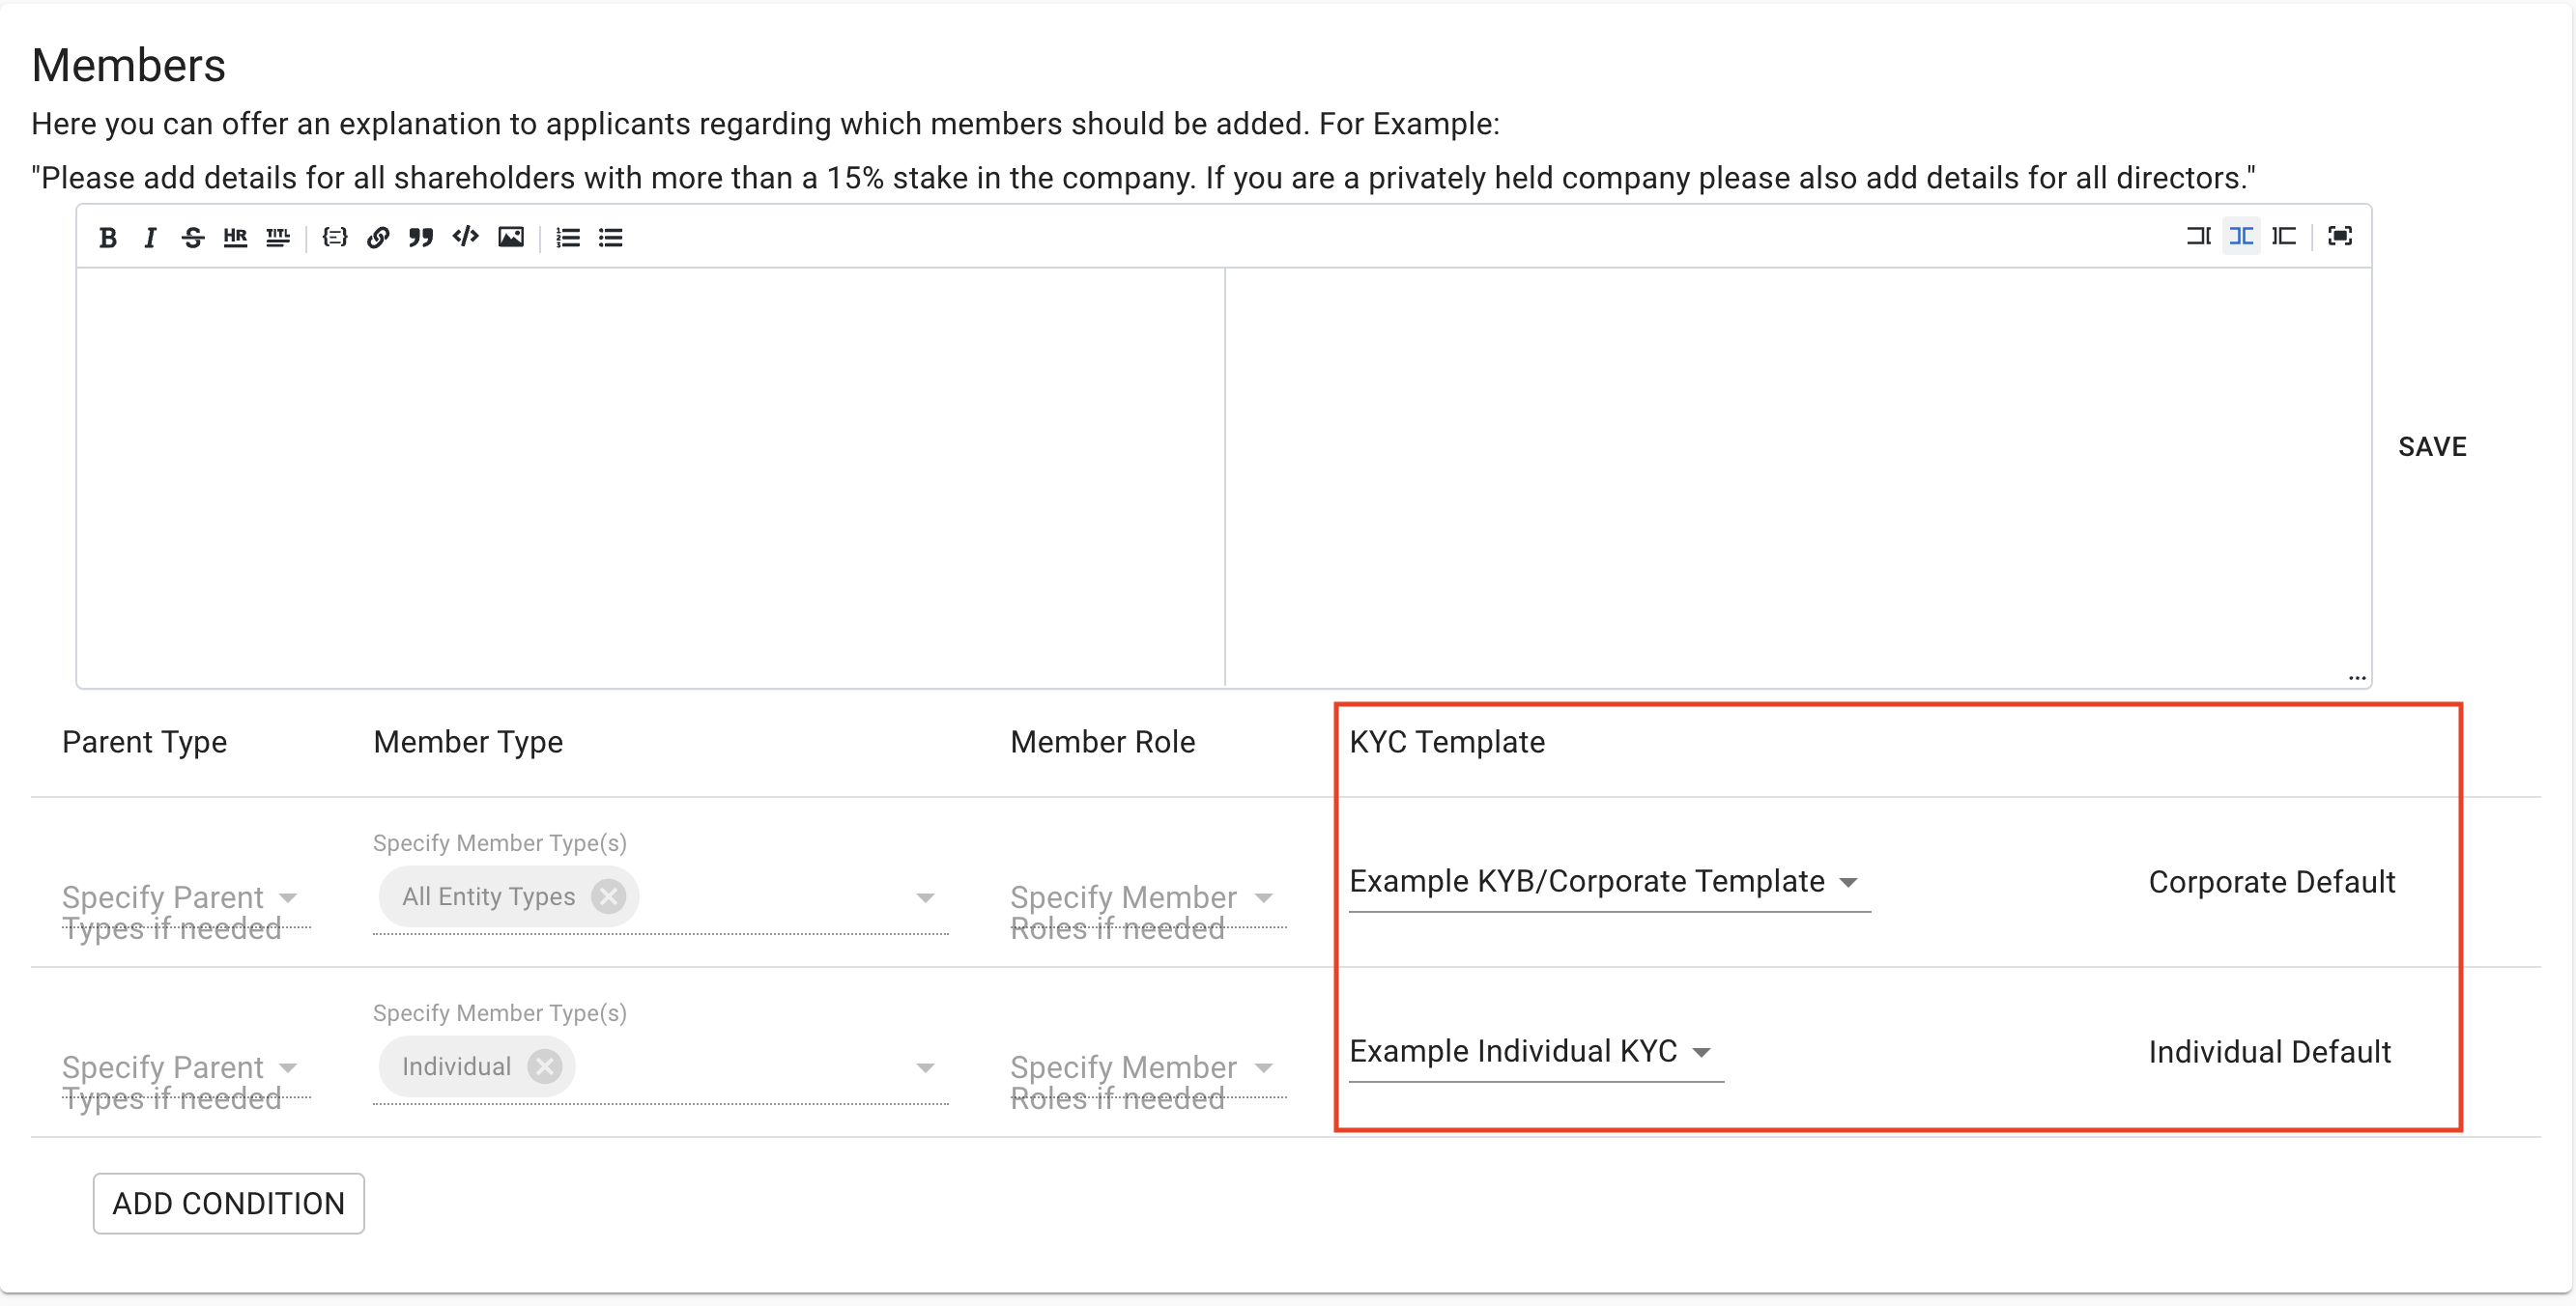
Note: If you'd like to set up your template so that a member's assigned KYC Template depends on the member's role and the parent company's legal entity type, then you can add more member template conditions to accomplish this:
- (Optional) Add a new condition and select any number of Legal Entity Type(s) and Member Role(s), along with the KYC template that you would like KYC-Chain to assign to new members who fit these criteria. Please note that each member template condition only works for either individual or corporate members, and this is determined by the type of the KYC Template you select. For example, a condition with "Foundation," "UBO," "Individual Template," etc... can only assign that template to individual UBOs of the foundation. To assign a similar corporate template to corporate UBOs, you can create a similar condition: "Foundation," "UBO," "Corporate Template," etc....
 (Image reference to Image1UD3.0.png seems like a duplicate or placeholder from original doc, using Image19UD4.1.png as primary)

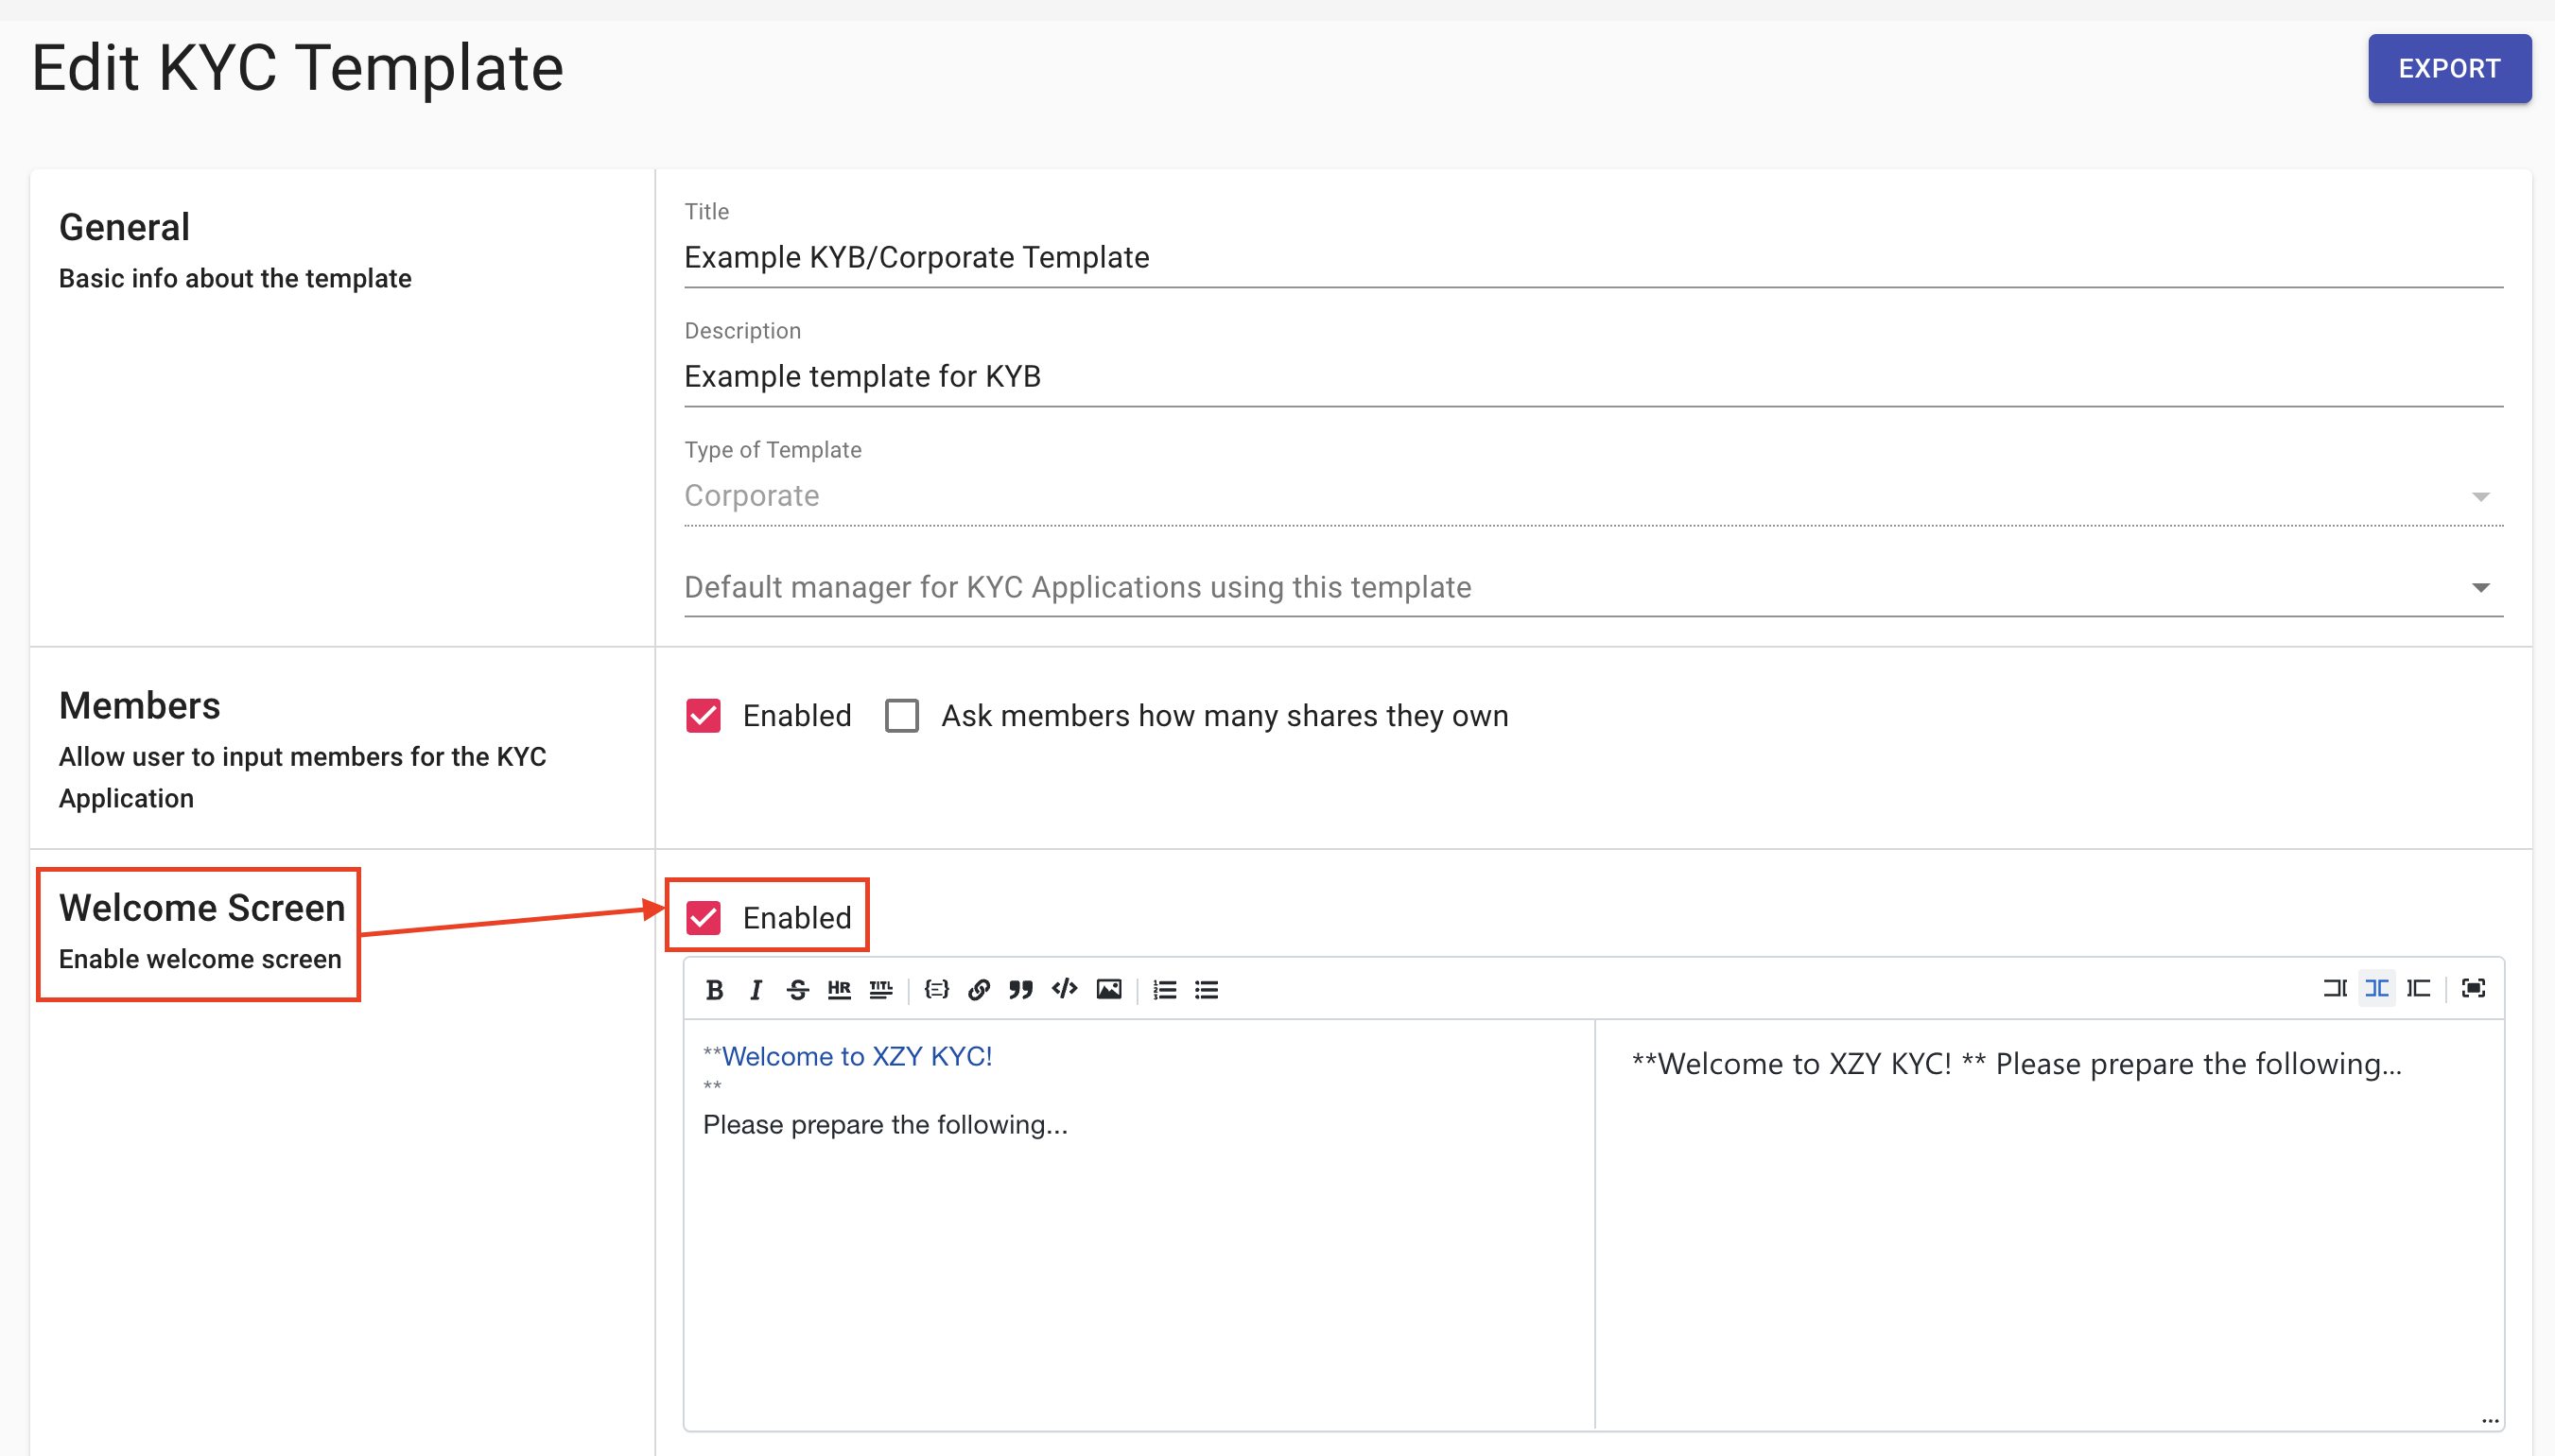
How to add and customize a welcome message?
If you add one, the welcome screen is the first screen your users will see when they start the on-boarding process. You can describe what information applicants will need to provide during the process, as well as your notarization/translation rules, and any other information you'd like to provide.
- Open a KYC template
- Scroll to the Welcome Screen section
- Check the Enable checkbox
- Add the text of the welcome screen and check the preview to confirm the styling
- Scroll down and click the Save button
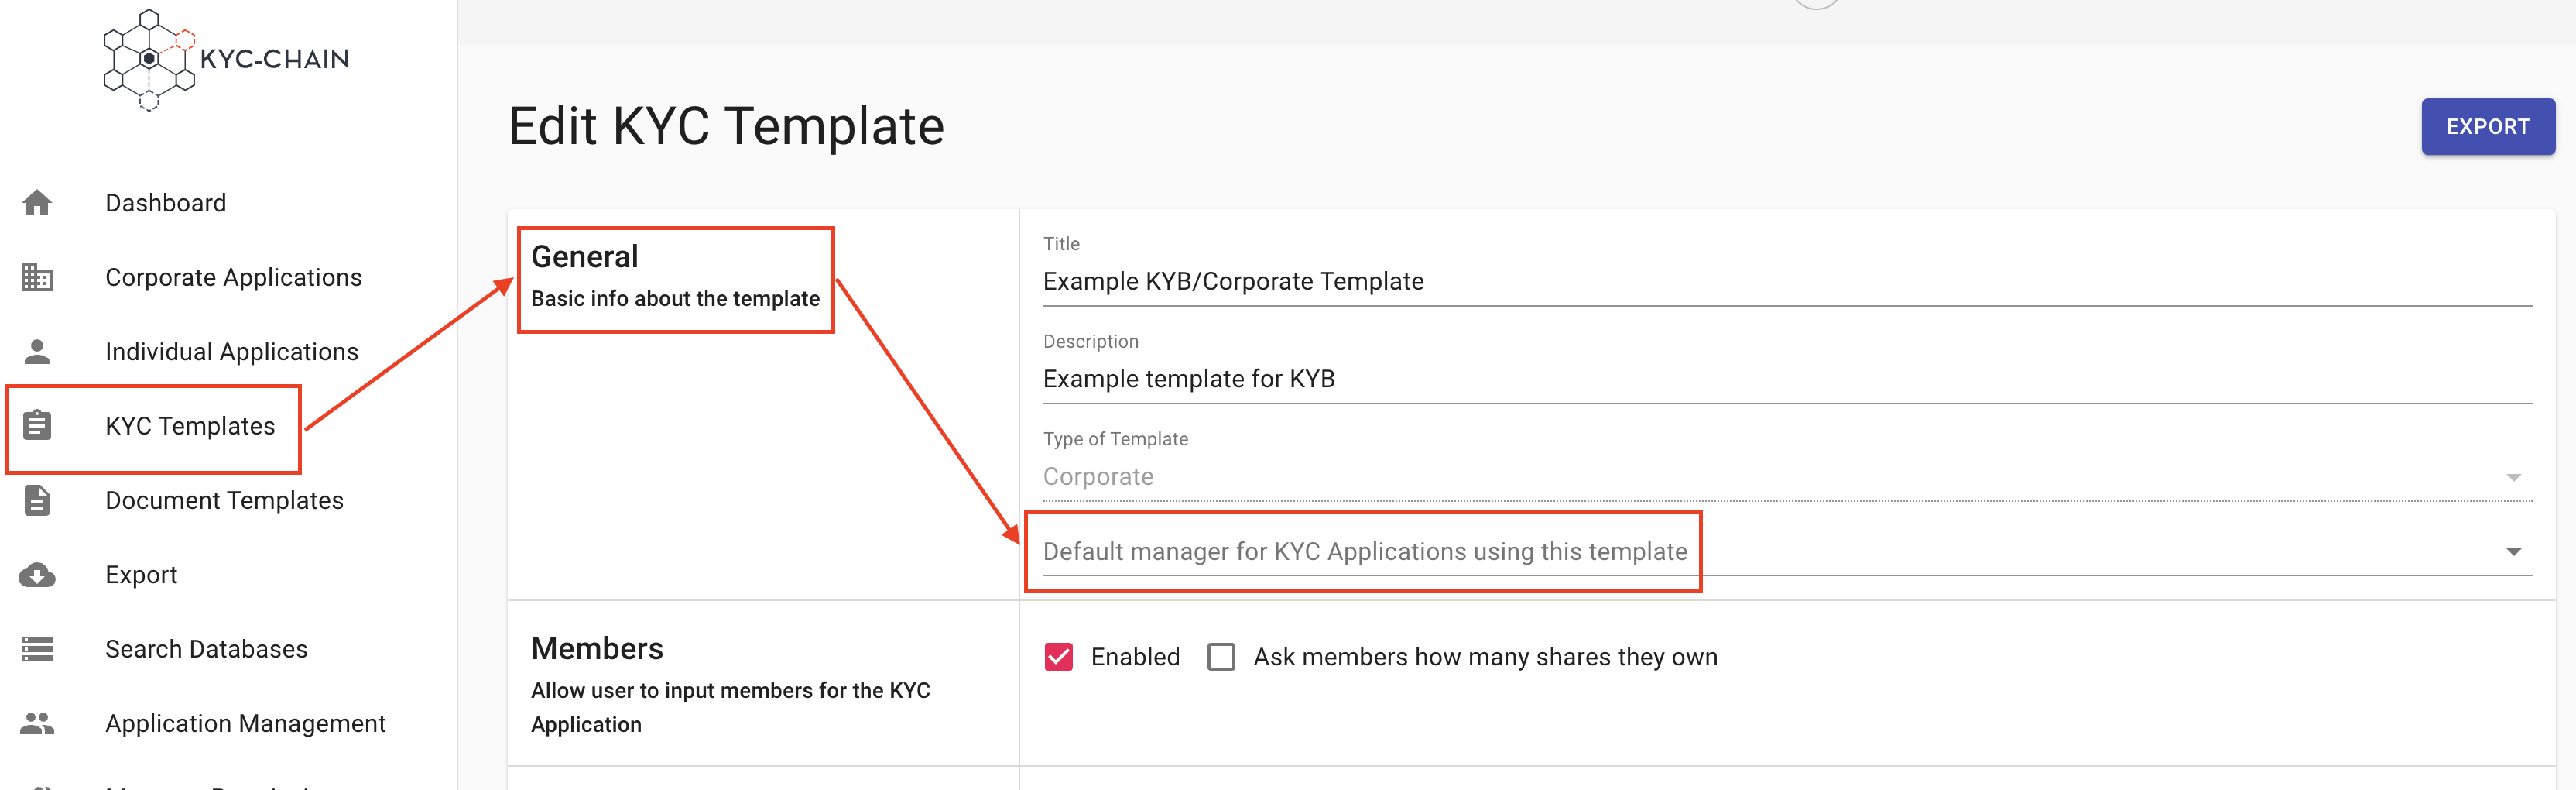
How to set a default manager for new KYC Processes?
You can add a default manager to KYC templates so that all new processes with this template will be automatically assigned to a specific manager as soon as they are initiated.
- Open a KYC template
- In the General section, select a default manager from the drop-down list
- Scroll down and click the Save button
How to add KYC requirements (documents, forms, and questions)?
You can fully customize a KYC Template's requirements to your needs. KYC-Chain provides three types of requirements: Documents, Forms, and Questions.
- Documents: Documents are requirements which the applicant will upload from their computer. They are most often used to request scans or photos of official documents (e.g. Passport, Utility Bill, Company Registry, etc.).
- Forms: Forms are requirements which come in the form of a PDF file that the applicant needs to add information to. The applicant will be prompted to download the pdf form, fill it out on their device, and then upload the filled copy. Forms can be created and configured in the Document Templates section of KYC-Chain.
- Questions: Questions are requirements that require text input from the applicant. They are used to request details in text format (e.g. Date of birth, Taxpayer Identification Number, Residence Address, etc.).
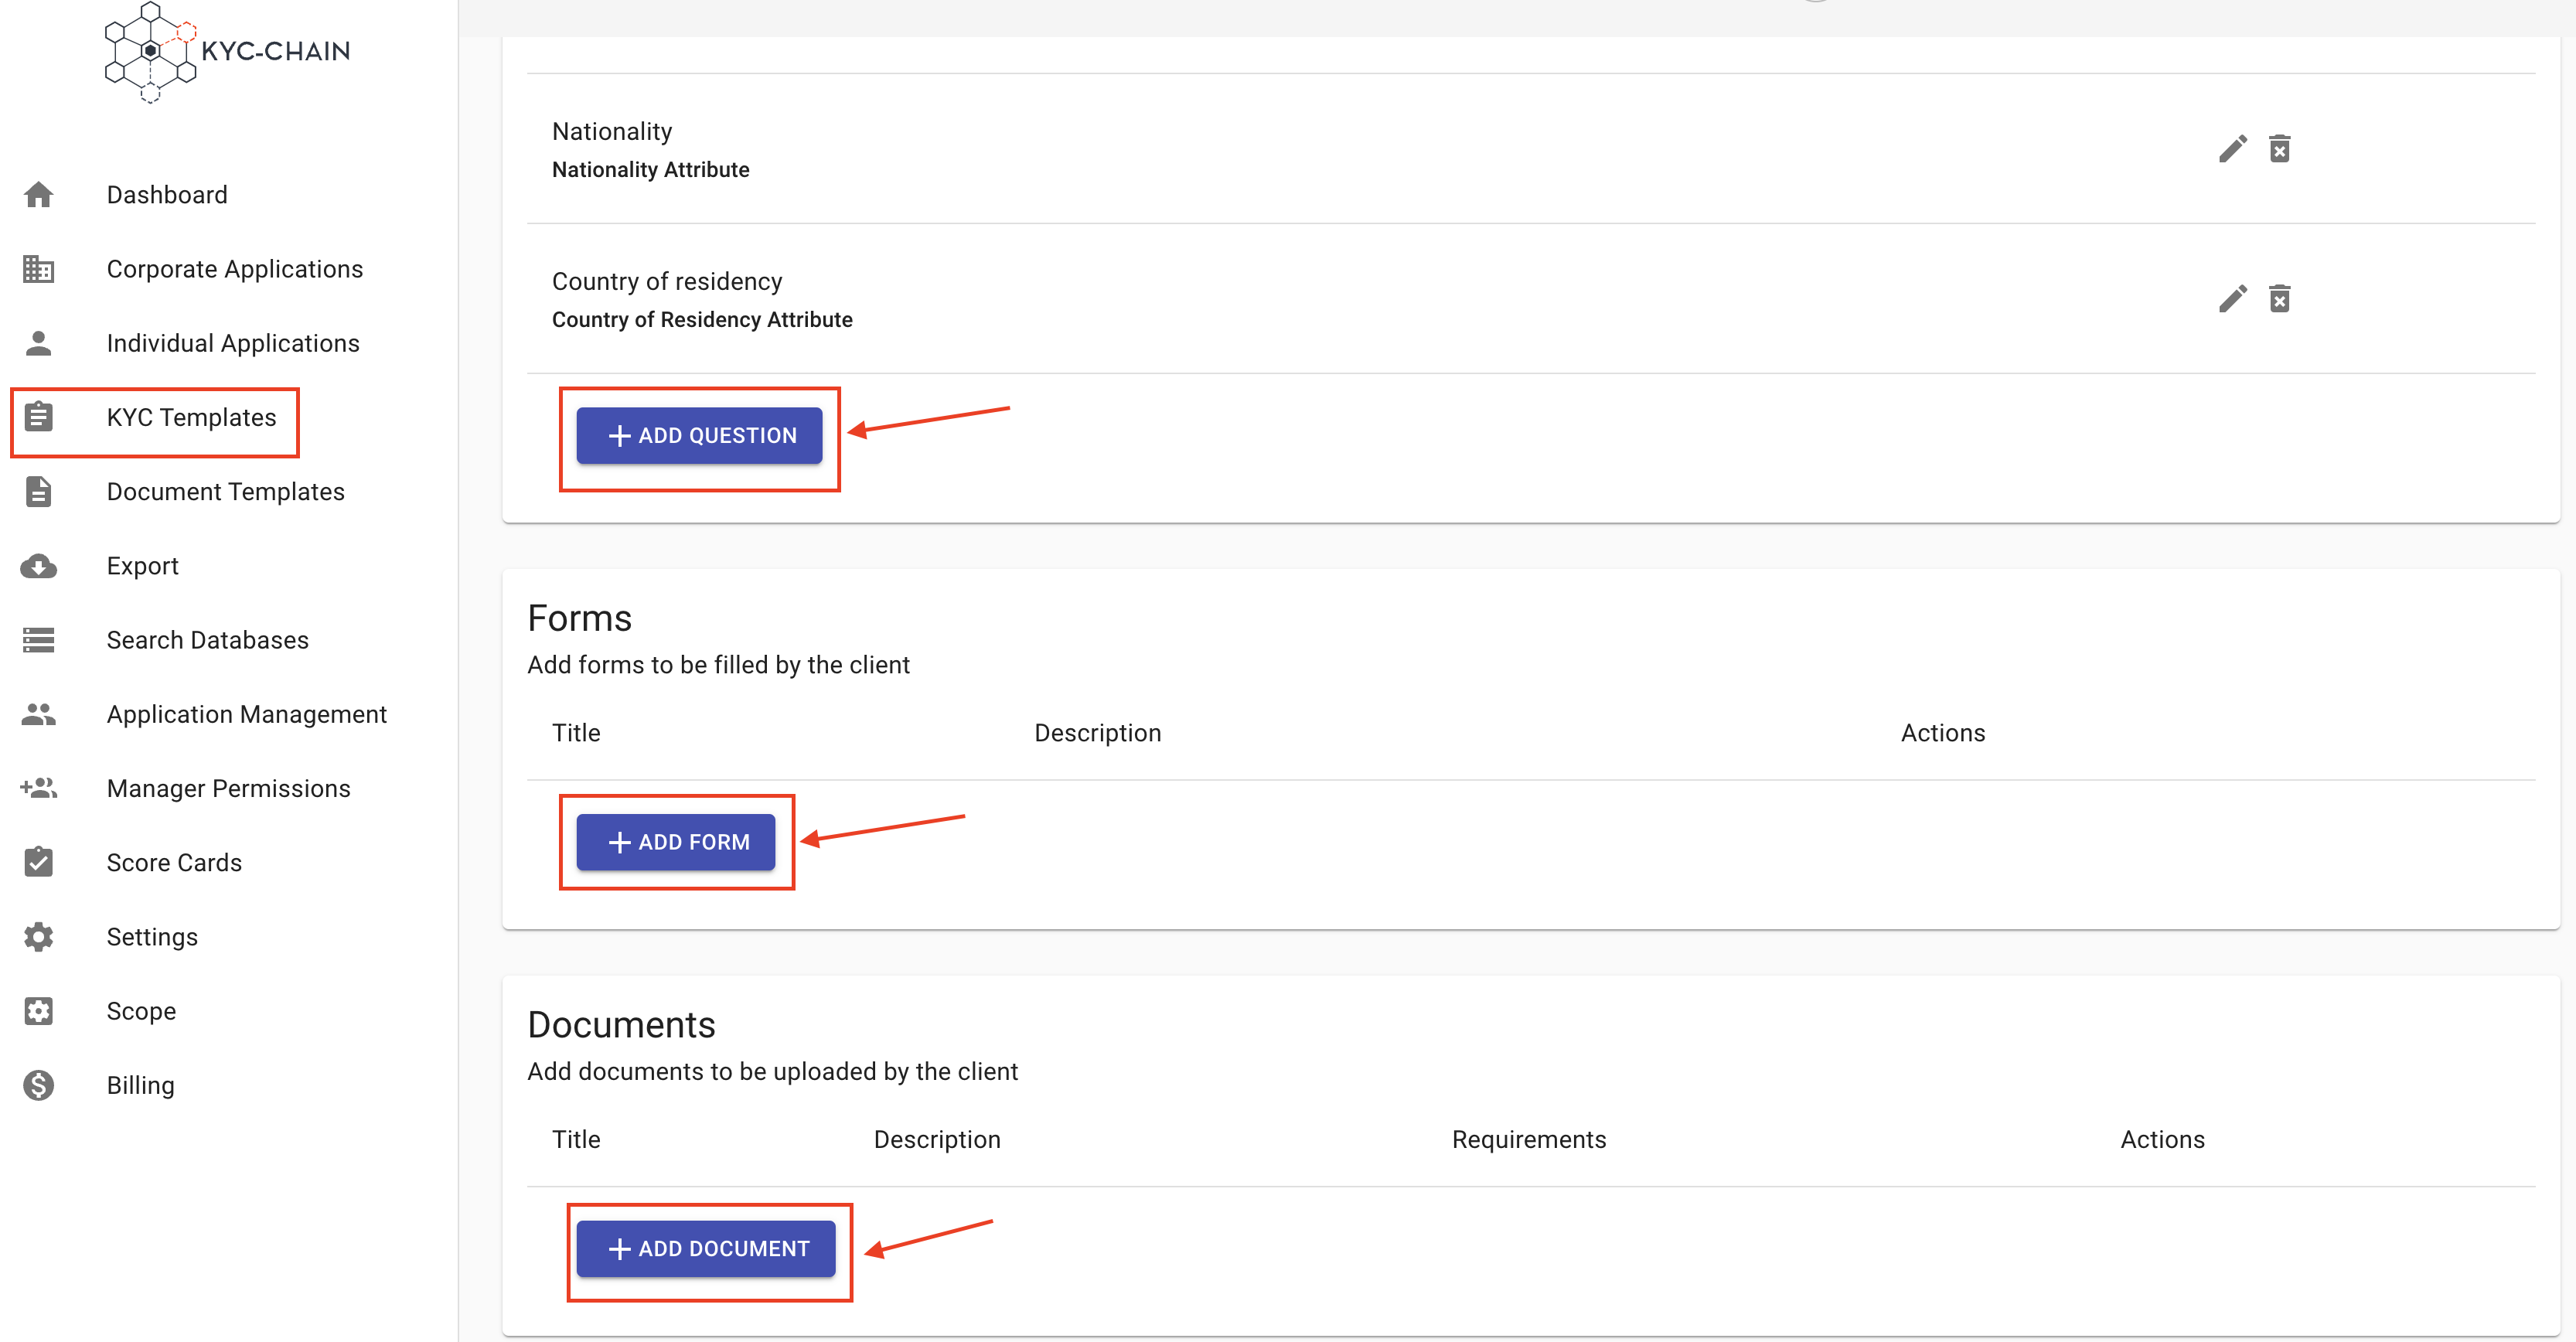
After you've created a KYC Template, you can add documents, forms, and questions by clicking on the respective buttons.
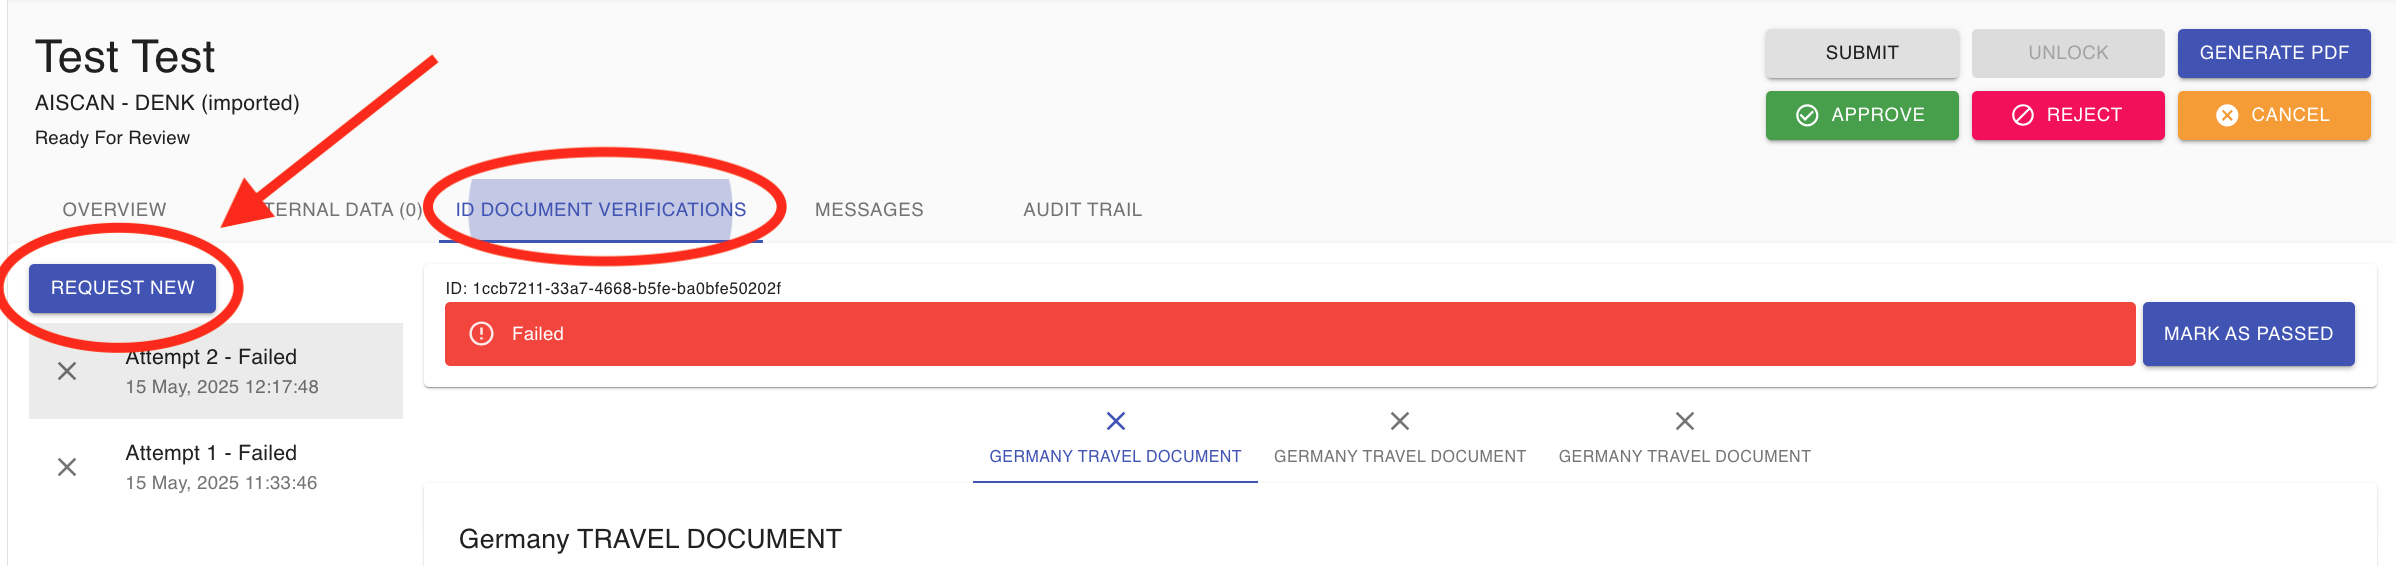
How do I troubleshoot issues with ID document verification, such as failures or delays?
1. Request a Re-upload
If an applicant’s ID document verification fails or returns an ‘Unknown’ status:
- Request Re-upload: You can ask the applicant to re-upload their ID document. To do so, navigate to the application’s ID document verification section and click the ‘Request New’ button.
2. Assisted Upload (Easy Fill)
- As a manager, you can re-upload a document on the applicant’s behalf using the Easy Fill feature. Simply click the ‘FILL’ button within the application, upload the new document, and then click ‘SUBMIT’ to initiate the verification checks. This feature is especially useful for Member KYC scenarios—such as when an applicant submits an ID document for a corporate member that fails validation. In such cases, the manager has the option to upload a new image and complete the process on the member’s behalf.

Common Reasons for Document Scan Failure and How to Address Them
- Expired Document: The ID document is no longer valid.
- Manipulated Document: The ID document appears to have been altered or tampered with.
- Poor Quality Copy: This is a frequent cause of failure. Advise the applicant to provide a high-resolution, uncropped, and clear photo of the physical ID document. Avoid using scanned copies, images with noticeable enhancements (such as altered brightness), or low-quality submissions.
Tips for Taking the Perfect Photo:
-
Capture the entire document; partial images are not sufficient.
-
Ensure the image is in focus. Using a mobile camera with at least 5 megapixels is recommended.
-
Only the ID should be visible in the image—remove any background clutter.
-
Avoid glare, shadows, or using the flash, which can obscure details.
-
For passports, only upload the data page; other sides or pages will not be accepted.
-
Data Extraction Issues: If the system cannot properly extract data from the ID document, a clearer or alternative document may be required.
-
Alternative Document: If quality issues persist, ask the applicant to provide a different form of ID if available.
For Delays or If Verification Is Not Progressing
- Application Submission: Ensure the applicant has fully completed and submitted their application. Verification checks, including ID document verification, are automatically triggered once the application is submitted and the status is ‘Documentation Ready For Review.’
- Browser Optimization: For best performance, make sure your browser is up-to-date, clear your browser cache, and use Google Chrome.
If you have any questions or encounter issues, please contact our support team for further assistance.
Add & Edit Documents:
- General: In the "Document Title" and "Description (optional)" fields, enter general information about the document. The title and description will be visible in the customer portal.
- Select a document type: You can pick the appropriate type for the requirement, or select “External Document” type if none of the other options are appropriate. To be given the option of enabling ID Document Verification functionality, select the "Driver's License," "Passport," or "National ID" document type.
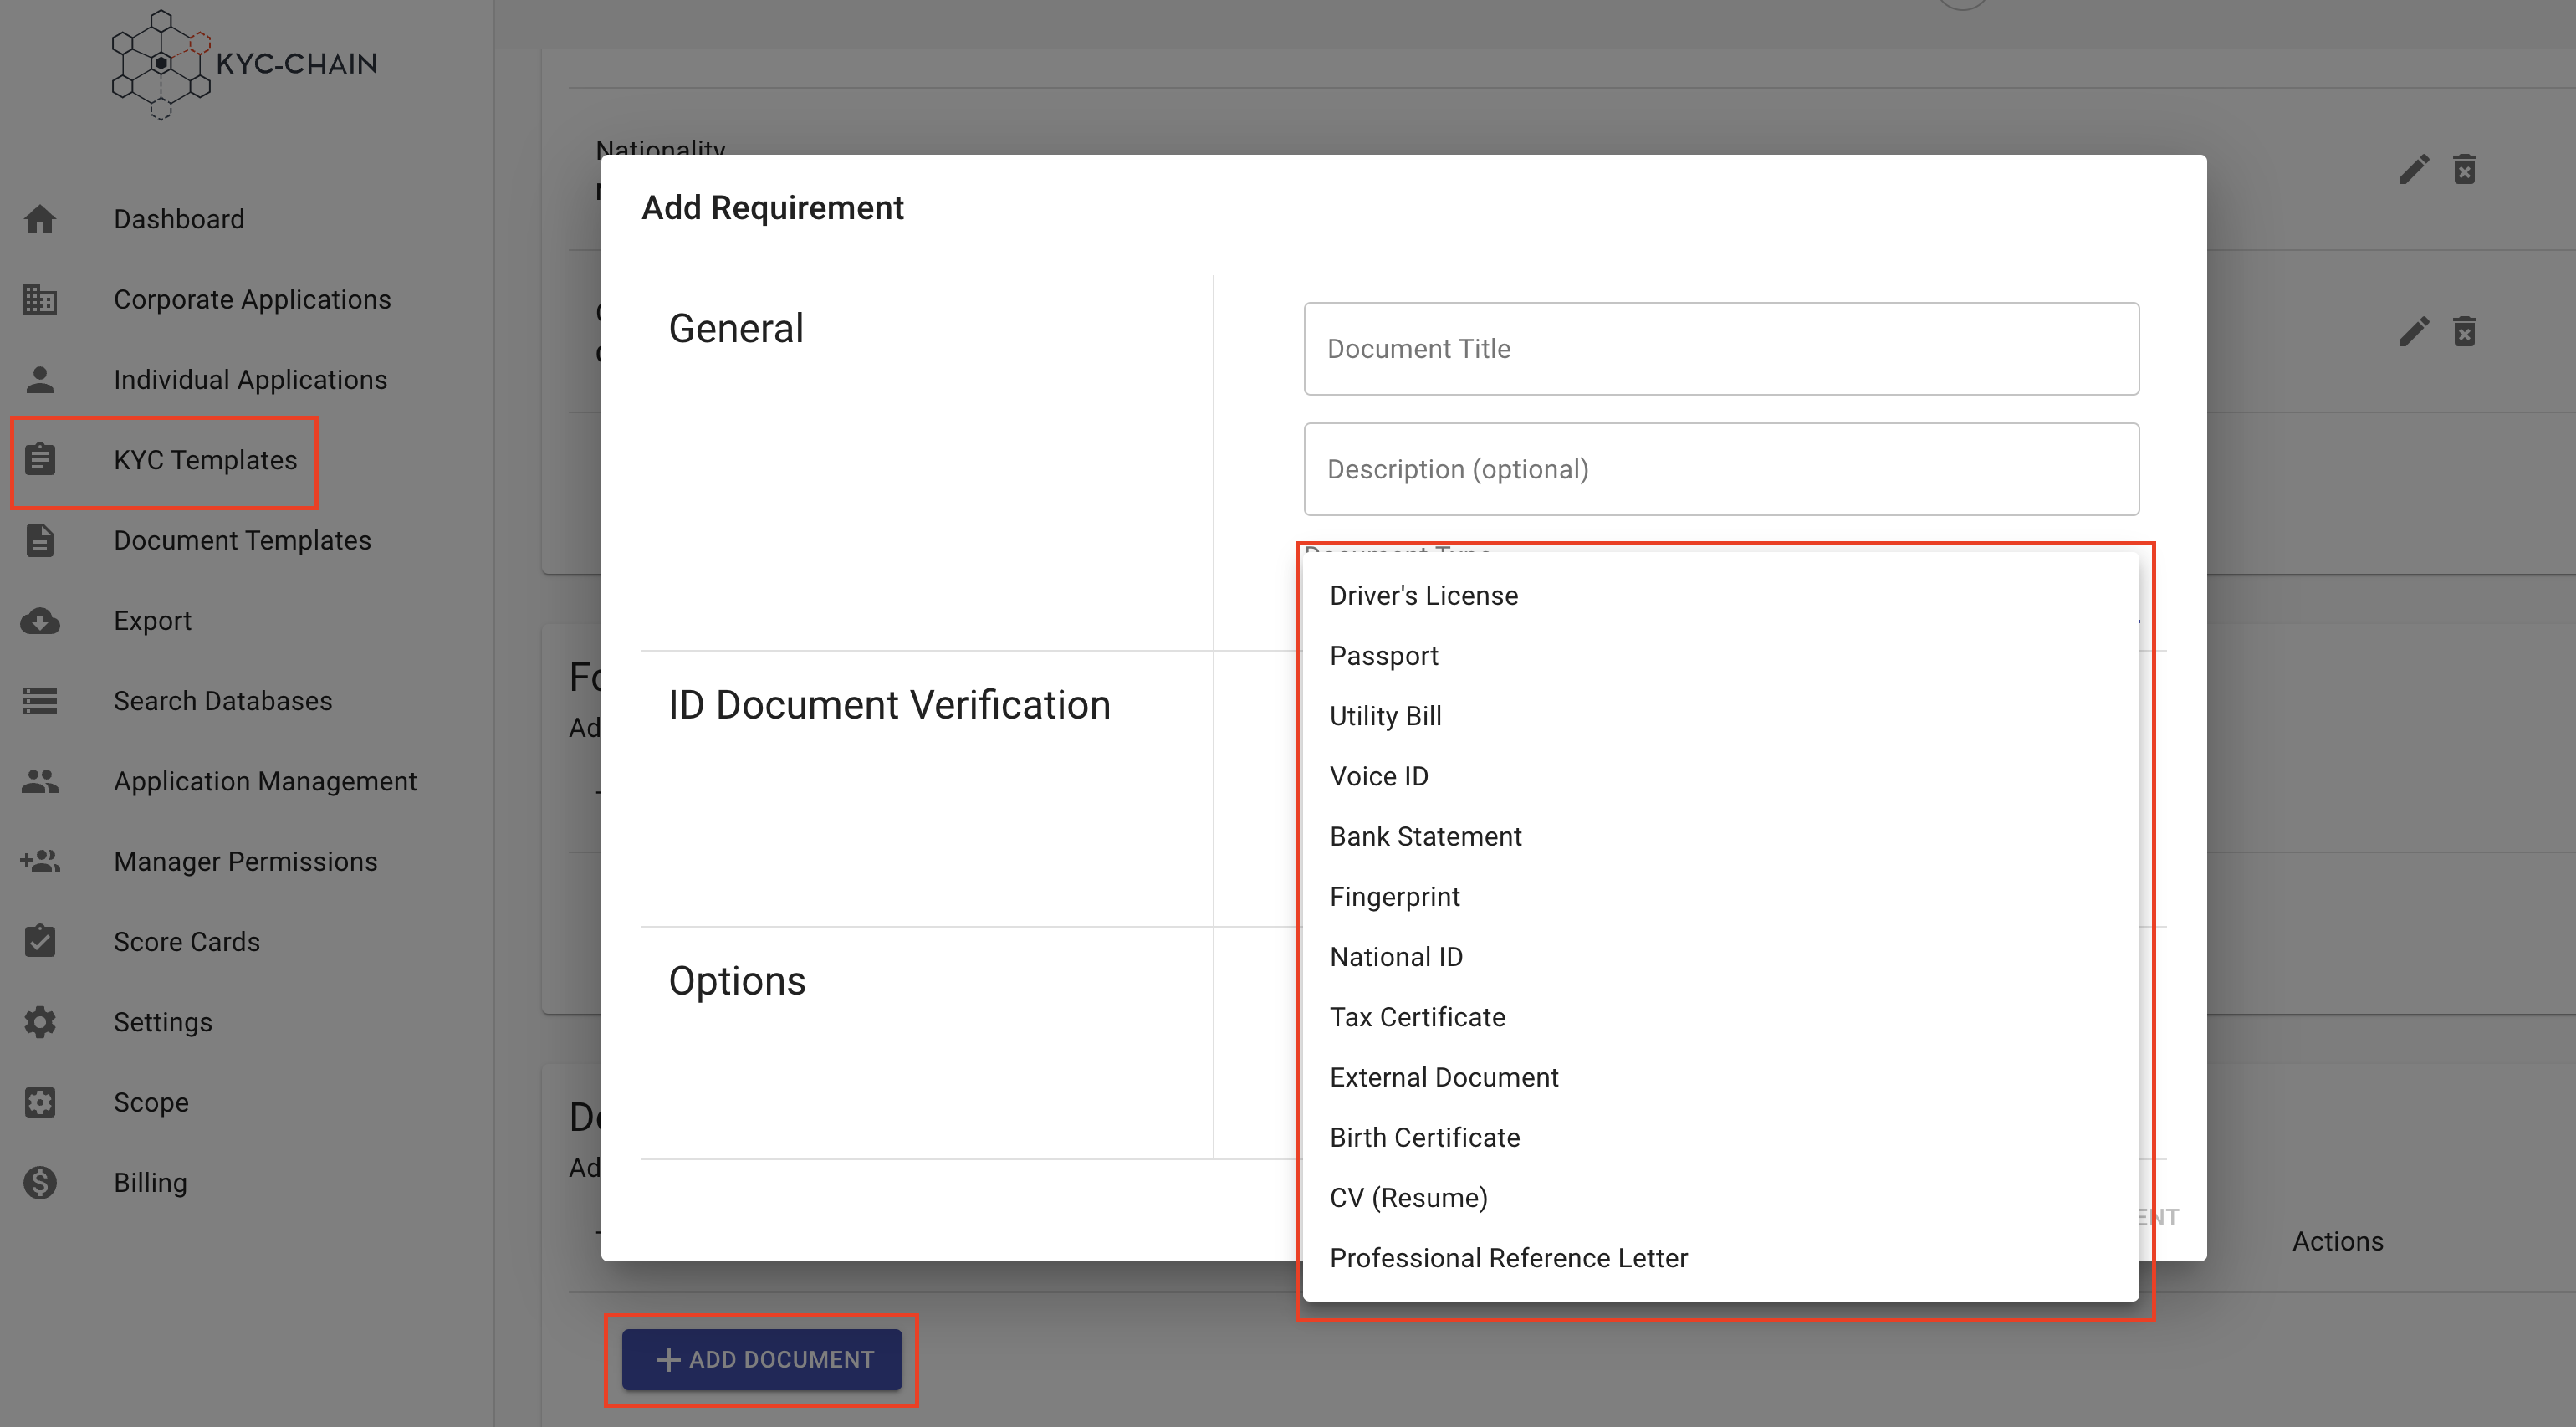
- ID Document Verification: If you have selected either "Driver's License," "Passport," or "National ID" document type, you will enable the following options:
- ID Document Verification - Select this option if you want to trigger ID Document Verification.
- Send Backside of ID document (for Driver's License and National ID) - Select this option if you want the end user to take a photo or send an upload of the backside of the Identification card for additional document verification purposes.
- Send Selfie with Document (for Passport and National ID) - Select this option if you require the end user to send a selfie for additional verification.
- Monitor Document Expiry - If this feature is enabled in your KYC-Chain package, you can select this option to have the system send an alert when the client ID documents are set to expire.
- Options: If you'd like to change the ordering of your documents, you can add a numeric weight to the document. The customer portal will display documents in weighted order (from lowest to highest weight).
- If you want the applicant to be able to skip the upload of this document, you can check the "Optional" box.
- Properties: Select the properties you'd like the user to provide. Each document type has specific properties that pertain to it. At least one property must be selected.
- For Passport Documents you can enable up to 2 Identity Verification checks
- ID Document Verification: Perform a verification check on the passport image
- Compare selfie with Passport image: If the selfie property is enabled, you can compare this image with the applicant's picture in their passport.
- Click the Save button.

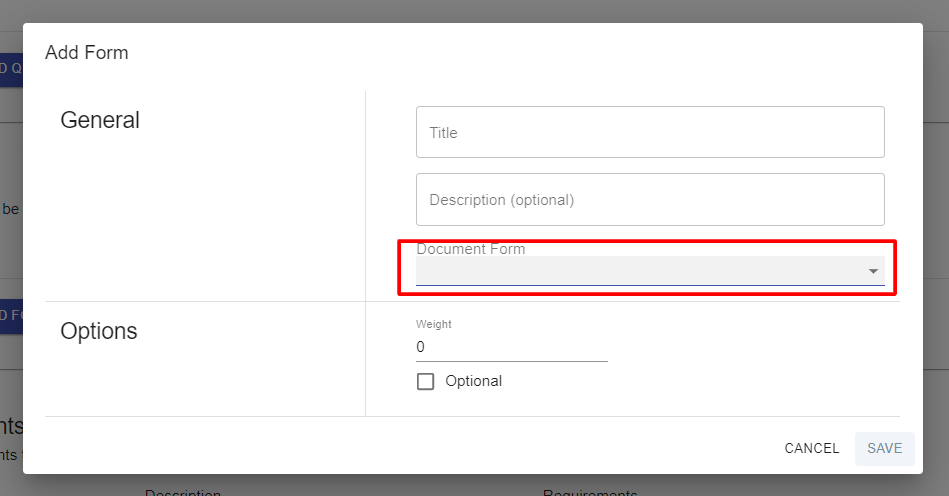
Add & Edit Forms:
- General: Enter general information about the form. The title and description will be visible in the customer portal.
- Select a document form from the dropdown. This list shows all of the active KYC Document Templates in your instance.
- Options: If you'd like to change the ordering of your forms, you can add a weight. The customer portal will display forms in weighted order (from lowest to highest weight).
- If you want the applicant to be able to skip the upload of this form, you can check the "Optional" box.
- Click the Save button.
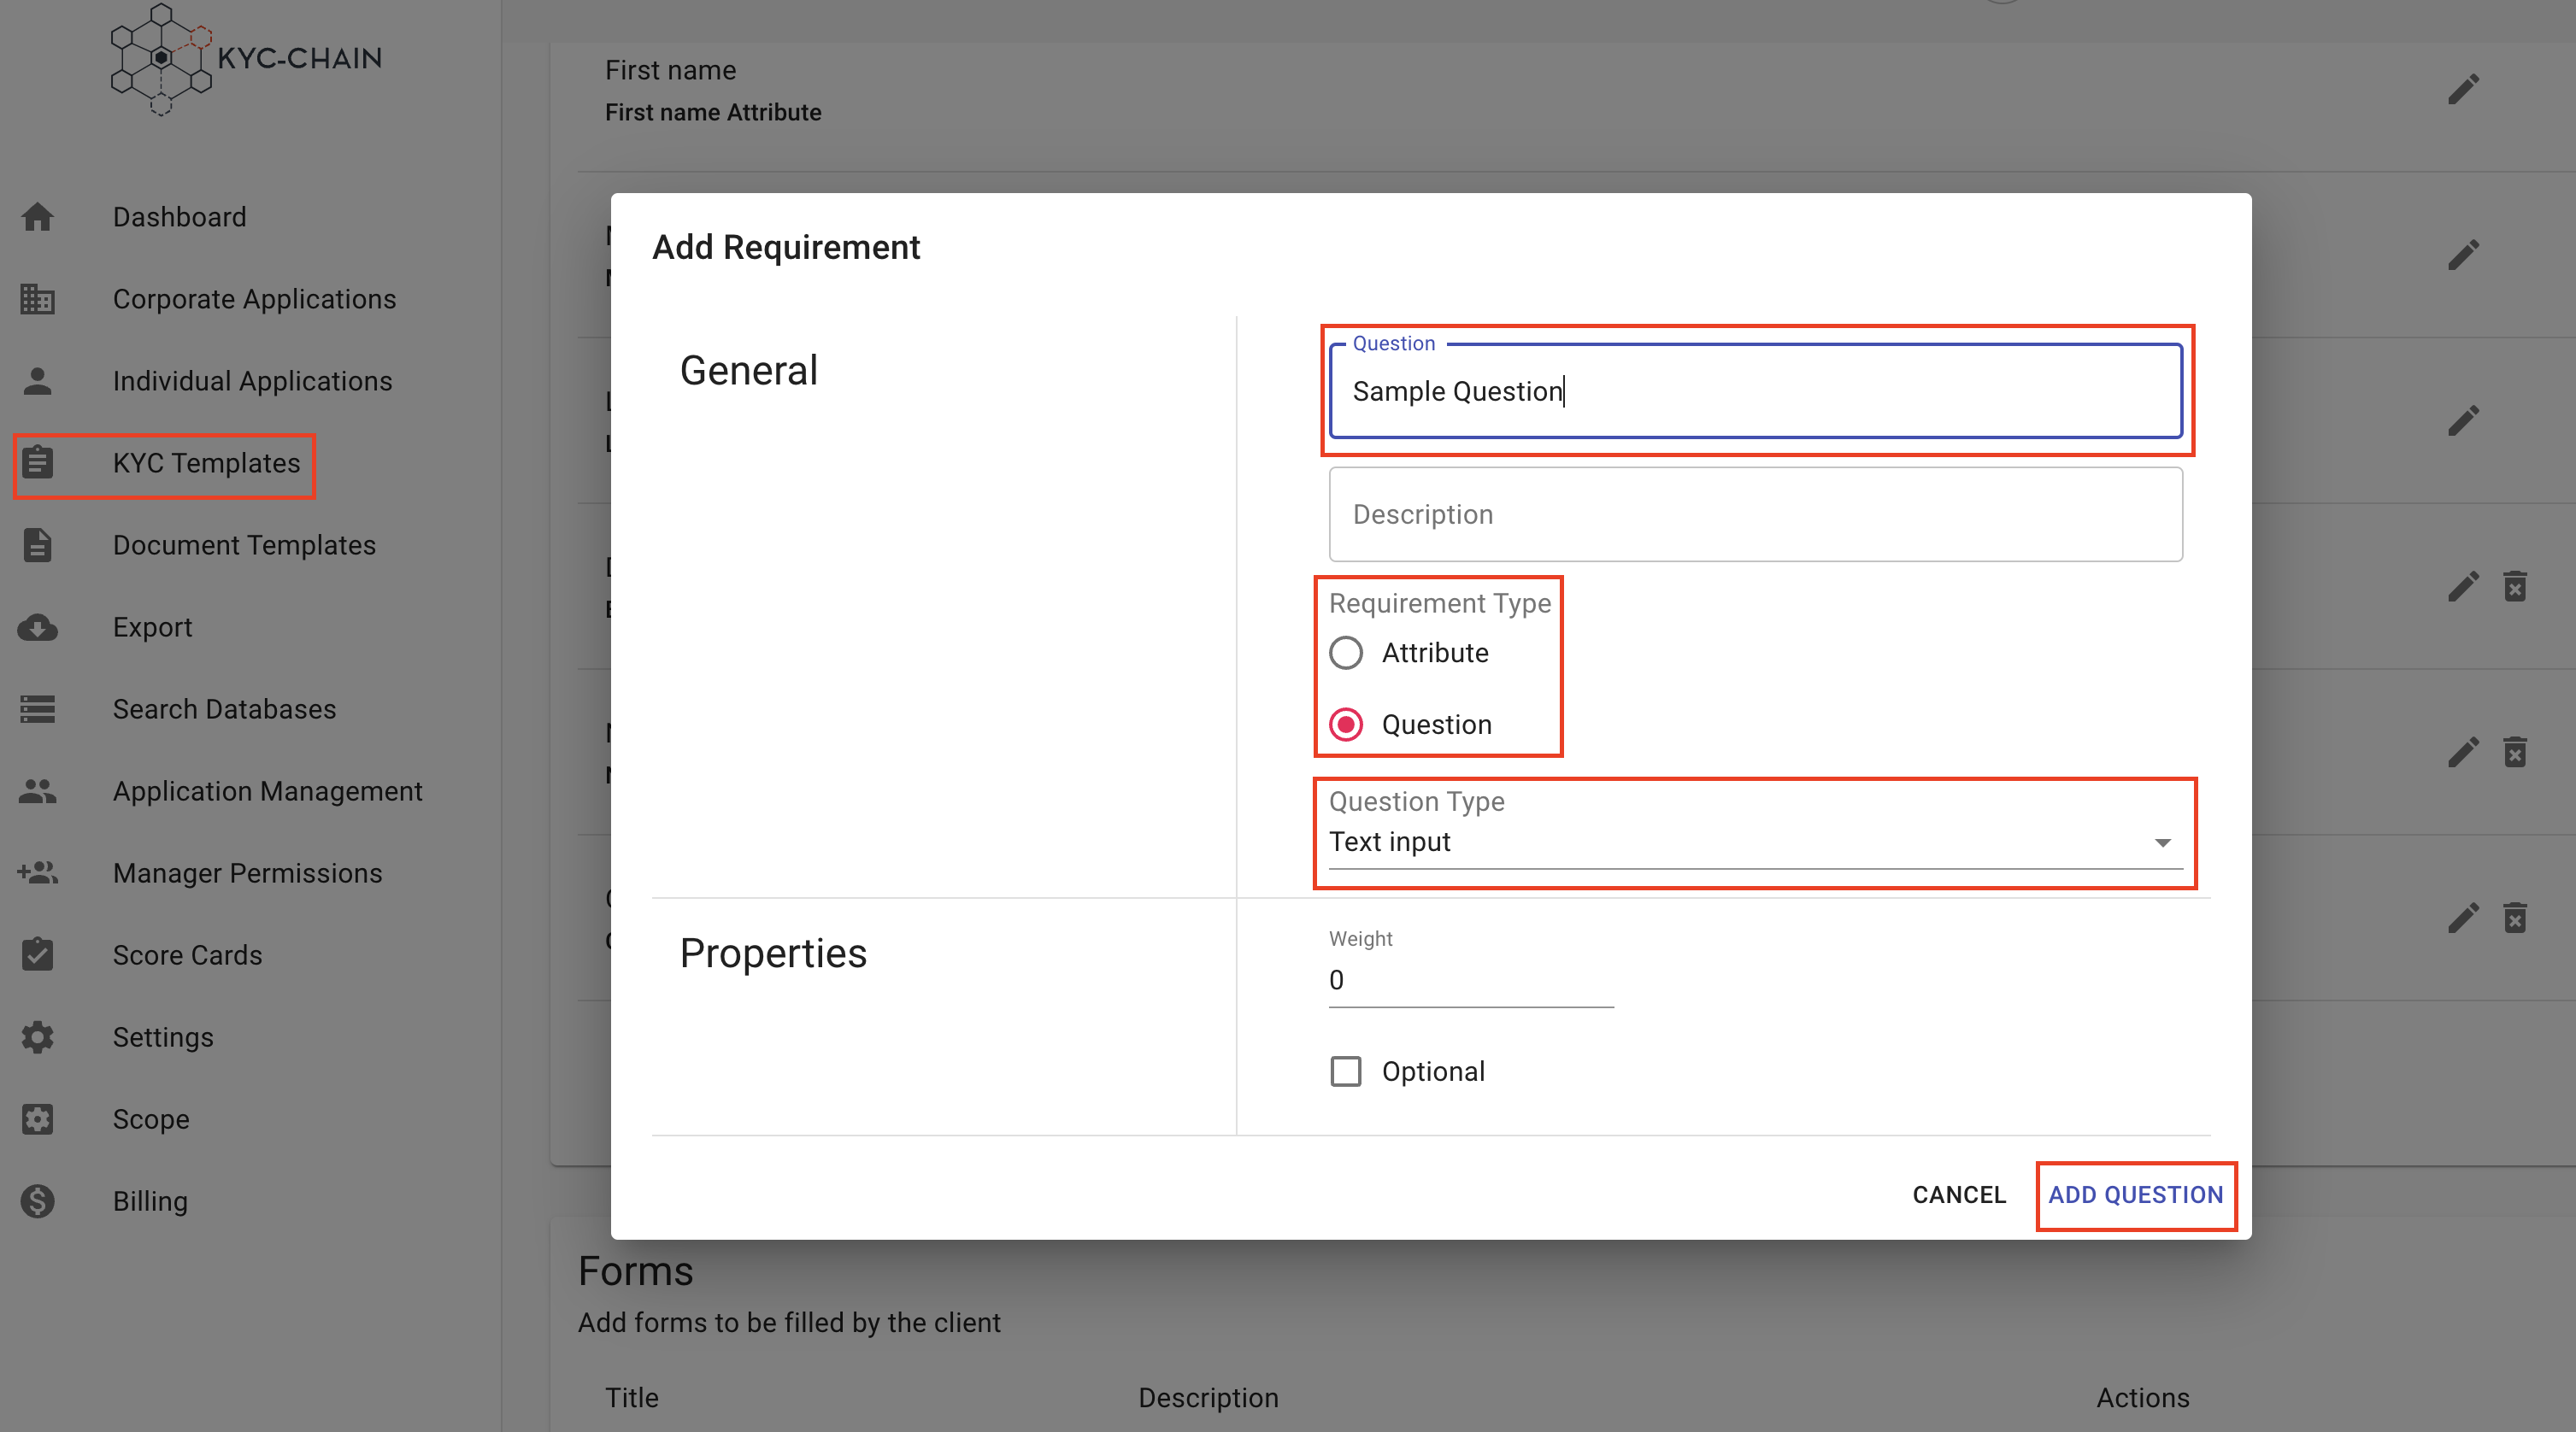
Add & Edit Questions:
- General: Enter general information about the question. The question and description will be visible in the customer portal.
- Select either a question type, or an attribute type. Please see more about the difference between these choices below this list.
- Properties: If you'd like to change the ordering of your questions, you can edit the numeric weight of the question. The customer portal will display questions in weighted order (from lowest to highest weight).
- If you want the applicant to be able to skip this question, you can check the "Optional" box.
- Click the Save button.
- Question types allow you to enforce a format for the applicant's answer, even if the question is not a common one in our list of attribute types. For example, the question "What is your favorite color?" can be left as a text input, whereas the question "What is your favorite country" can be given the "Country" question type so that the applicant will be given a list of countries to pick from.
- Attributes are specific, common pieces of information that you might require from an applicant. Not only do these attributes sometimes enforce the format of an answer (phone number, BTC address, Date of Birth, etc.), but they also allow our software to take actions with the answer that's provided. For example, the response given to a Nationality attribute can be used automatically for sanctions checks or risk scoring because our system knows that the answer is the applicant's nationality. If the "country" question type had been used instead, our system would not know that the response is the user's nationality.
- With this in mind, it is often best to use an attribute unless your question doesn't appear on the list of attributes, or if you have already used that specific attribute in this KYC Template. For example, if you need the primary and secondary address of an applicant, you can add the "Address" attribute for the primary address, and add a question with the "Address" type for the secondary address. This will avoid confusion about which value should be treated as the applicant's address by our system when cross-referencing it.
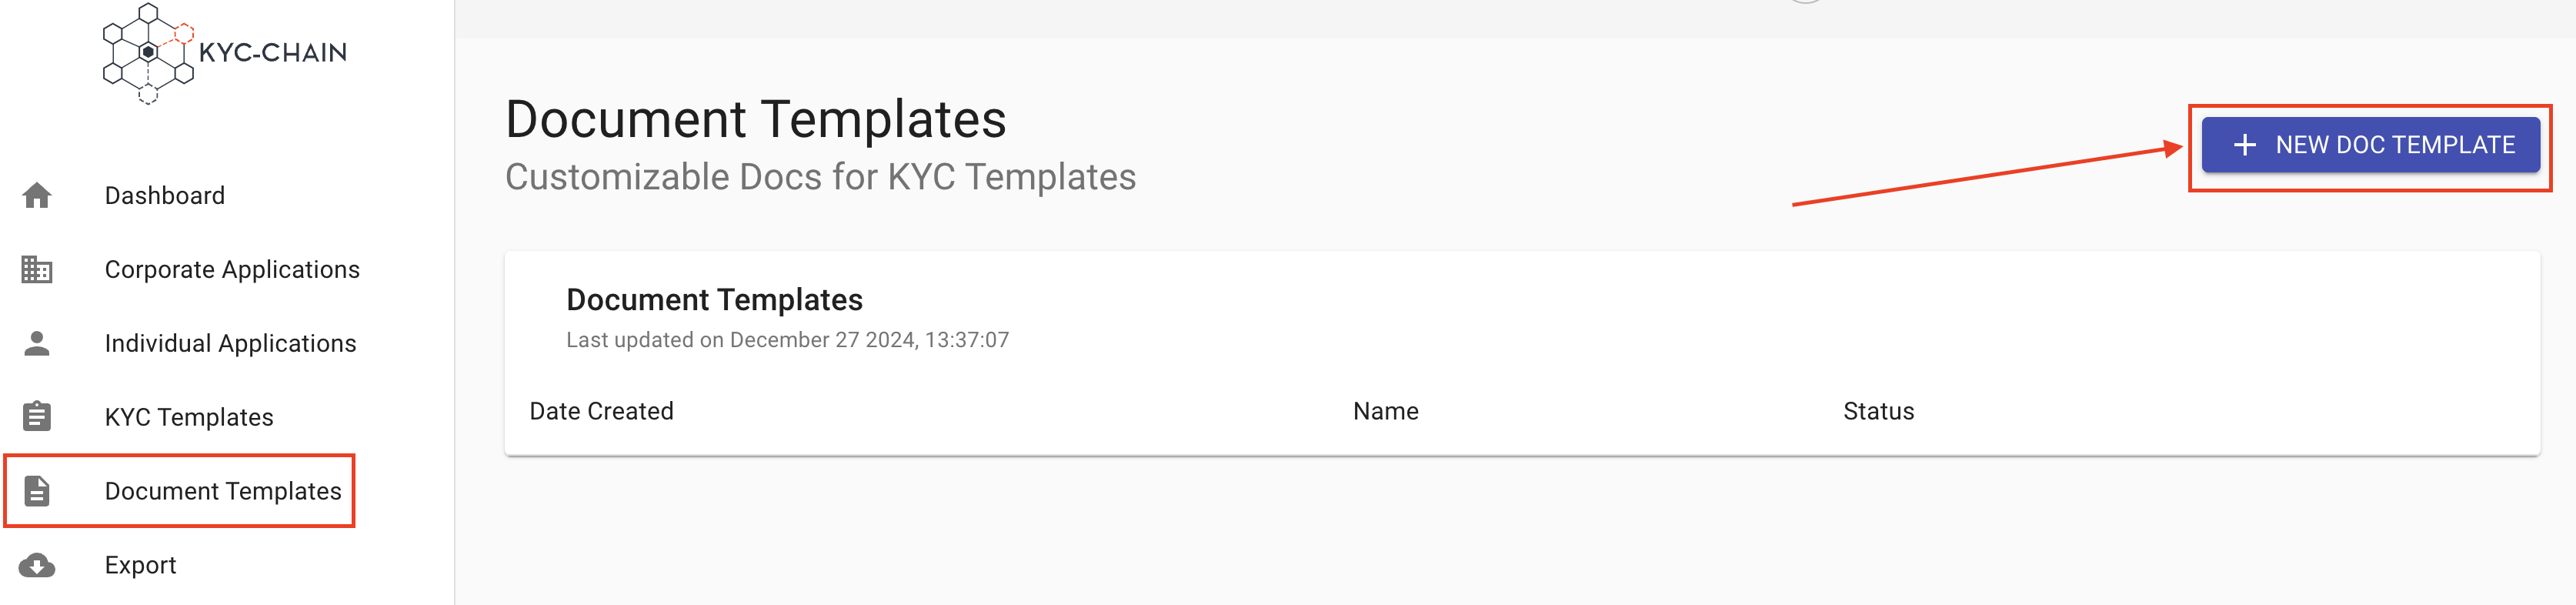
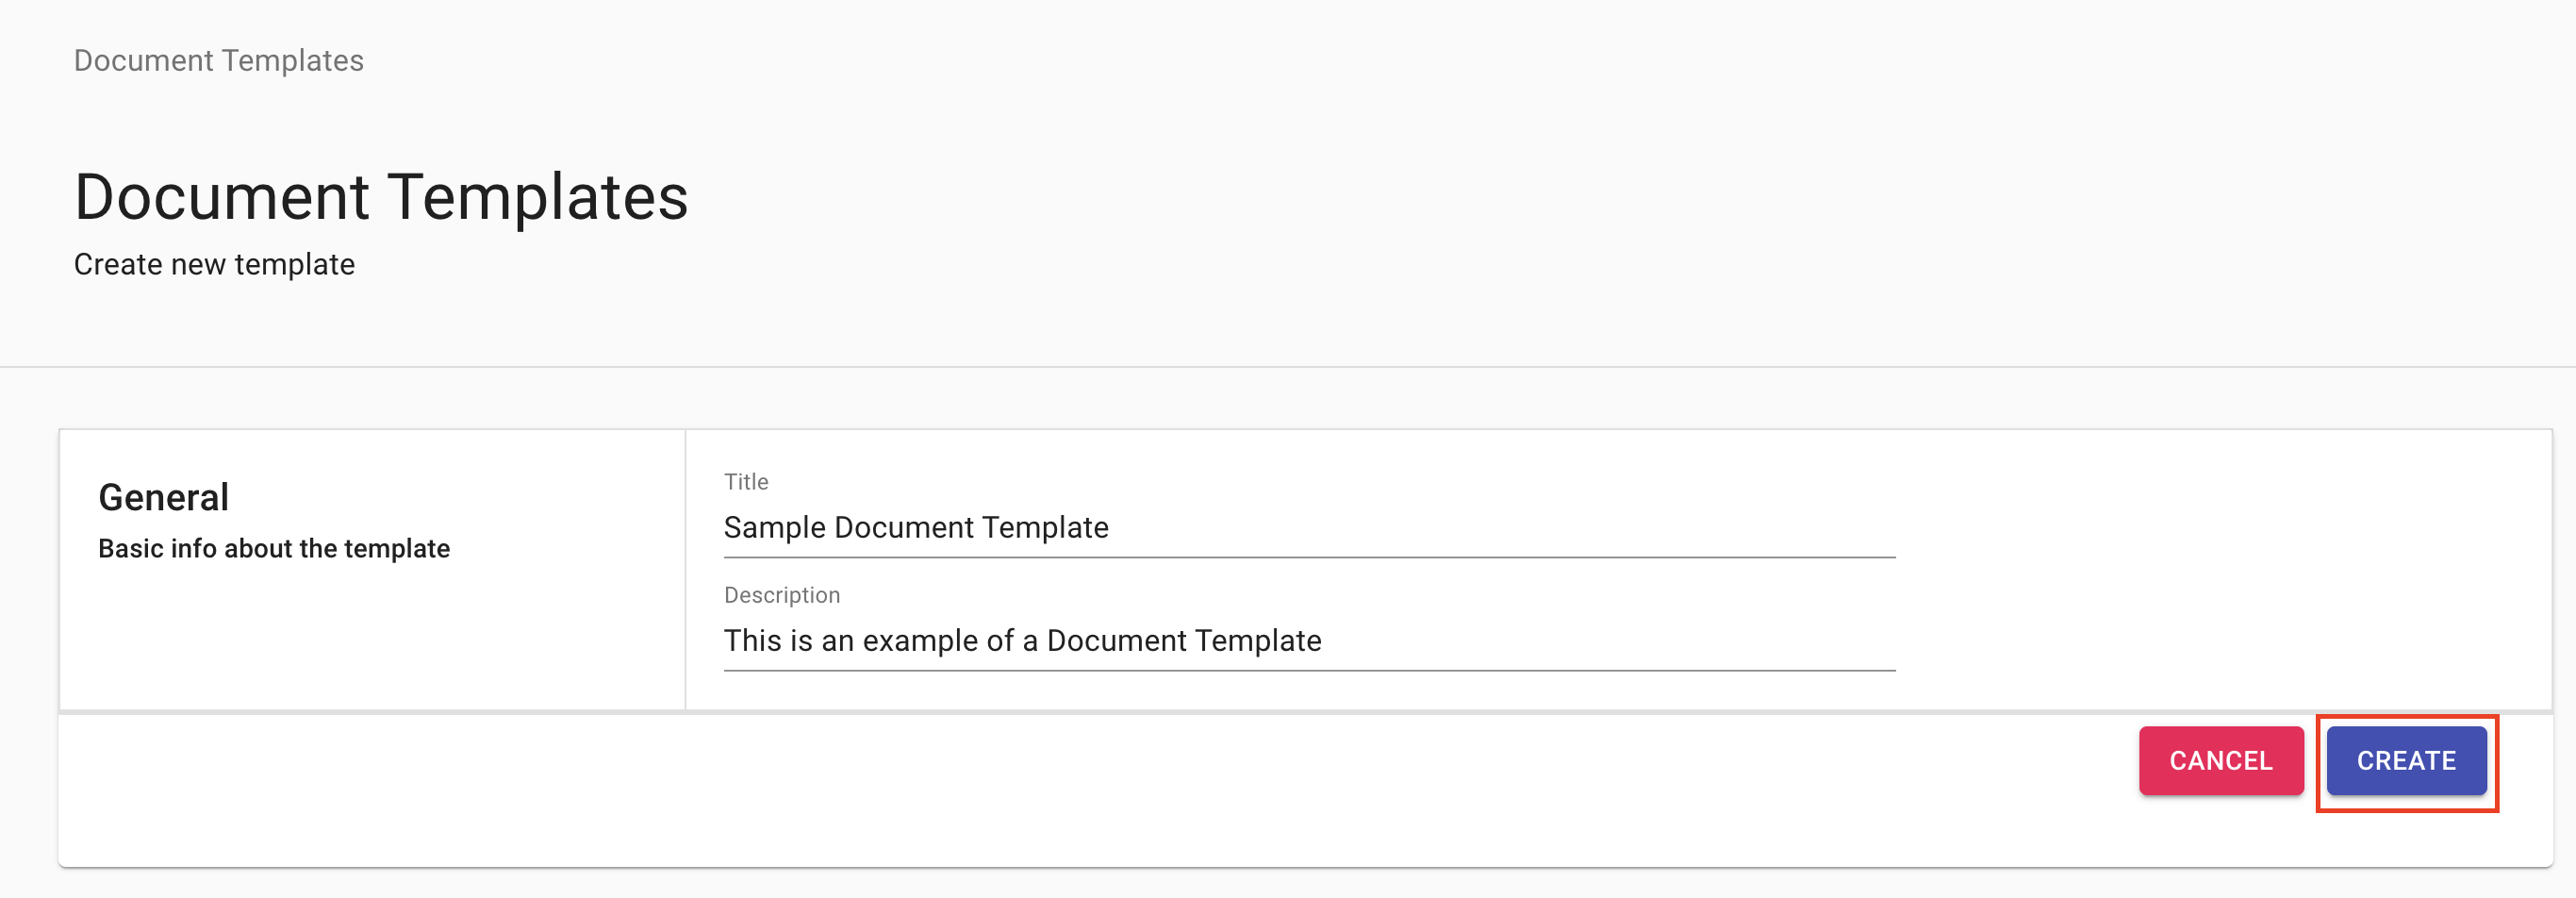
4.2 How To Create a Document Template:
Managers can customize the documents used in the KYC-Chain templates and create a form to fill out online, fully adapted to a specific process:
- Click on "+ New Doc Template".
- Fill out the basic information and click "Create".
- Choose the PDF file you'd like to upload.
- Activate the document template so that it can be added to KYC Templates as the Legal Document or as a form.
How to add a signature field to the document using KYC-Chain’s online form editor?
The manager can add a signature field to the document which the applicant will be able to sign if the document template is added as the Legal Document for a KYC Template. If this doc template will be added as a form then the user will download it as a PDF and the signature field will not be visible.
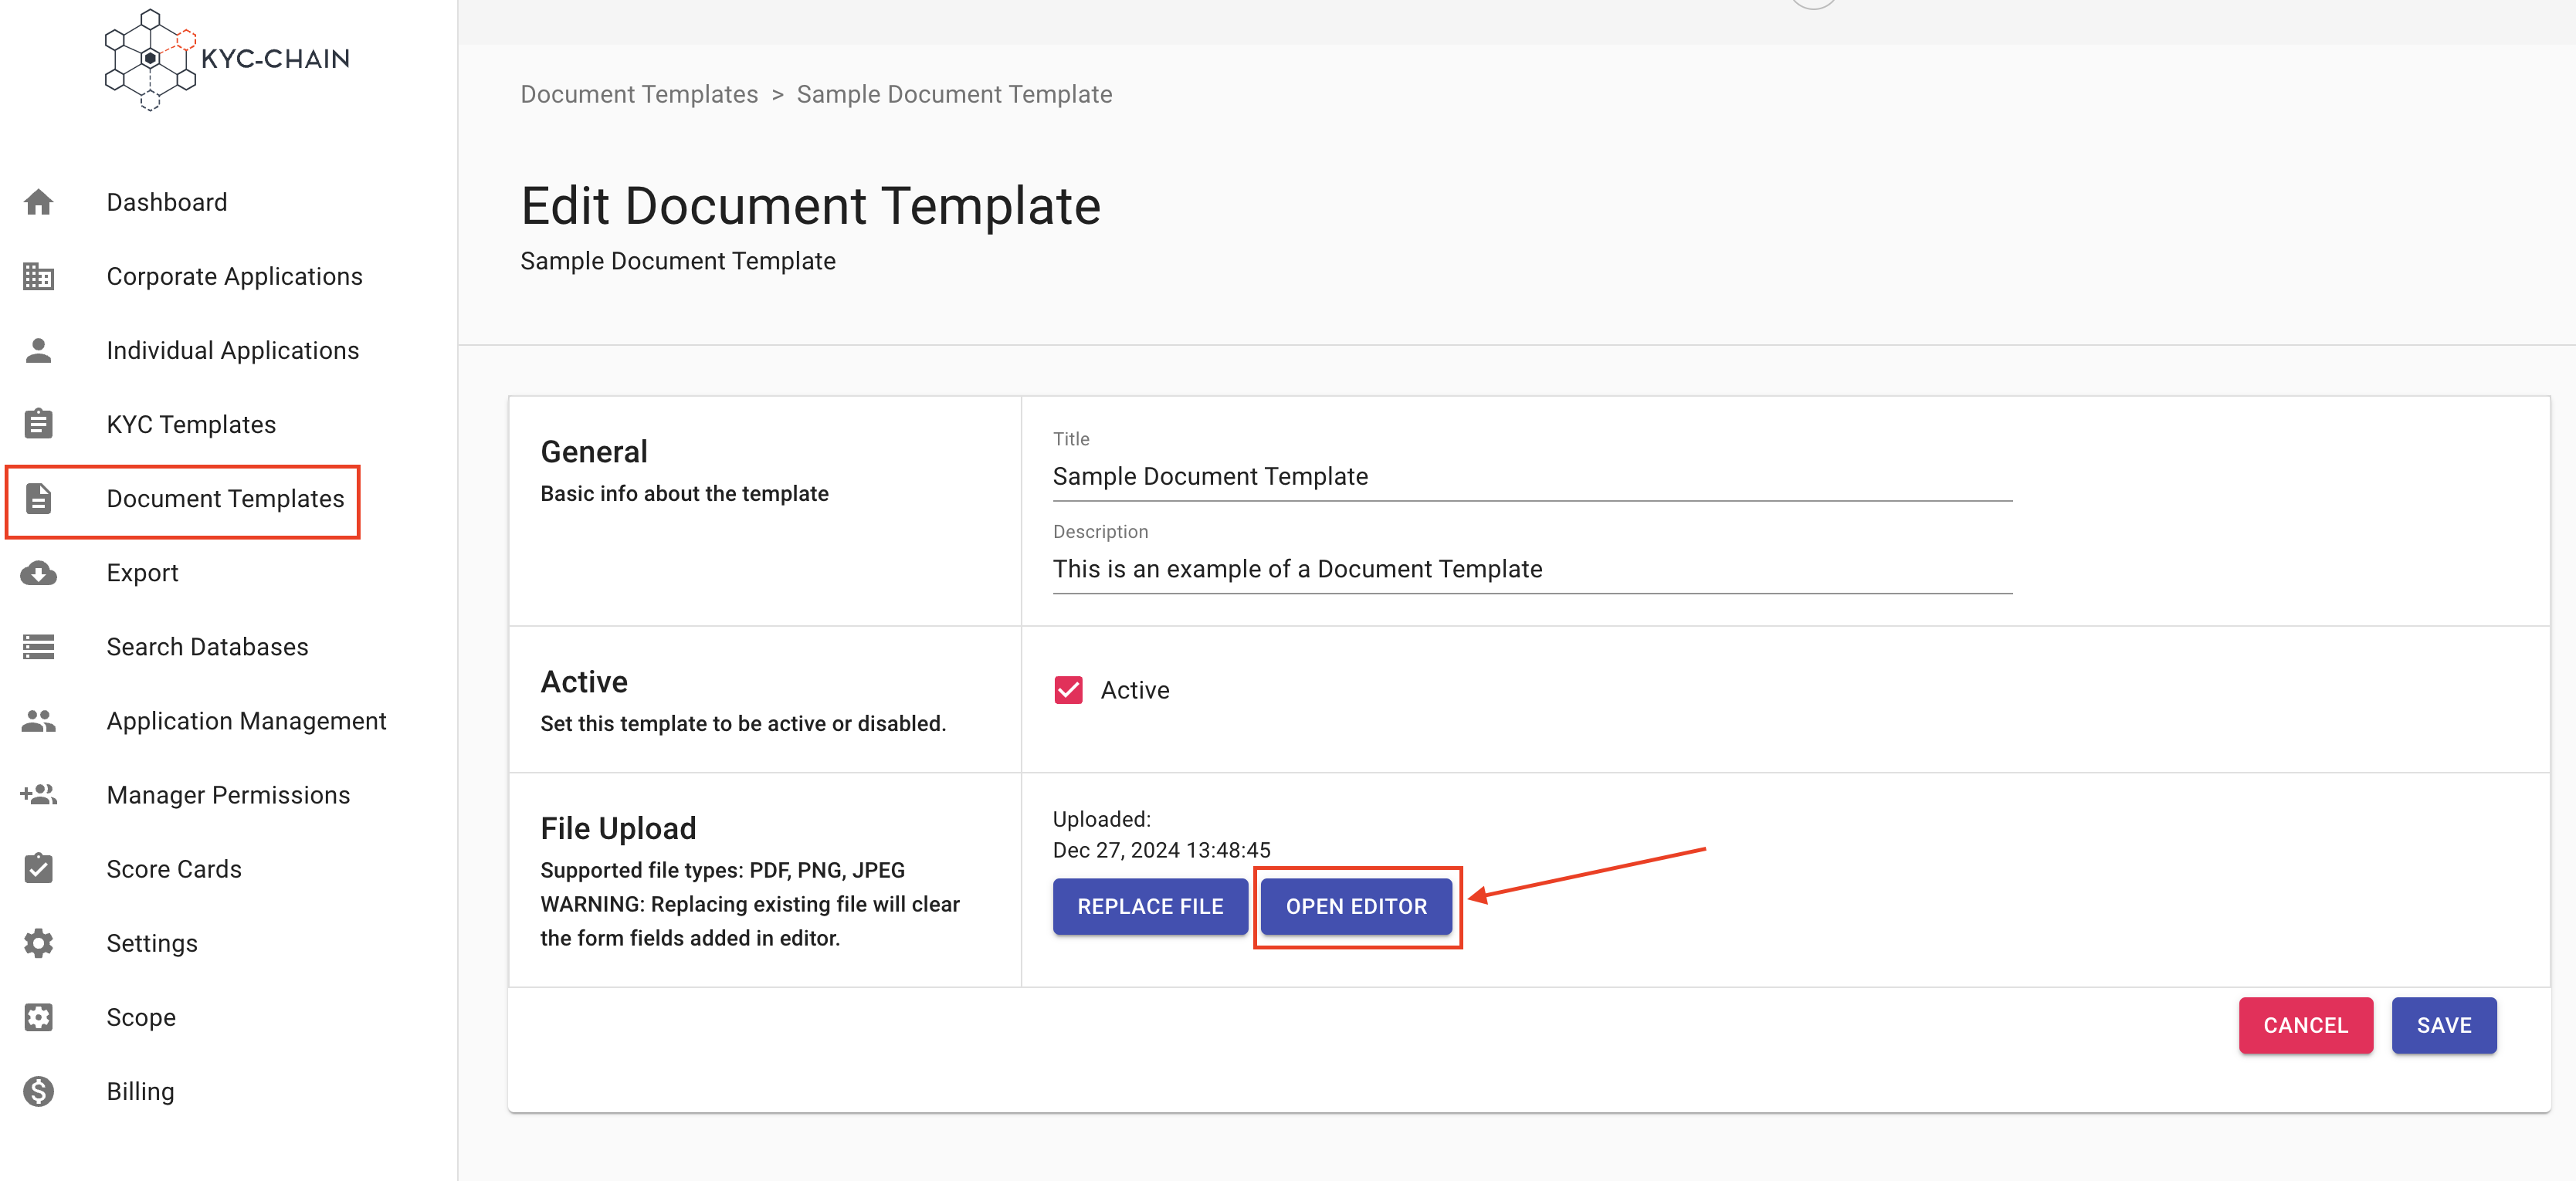
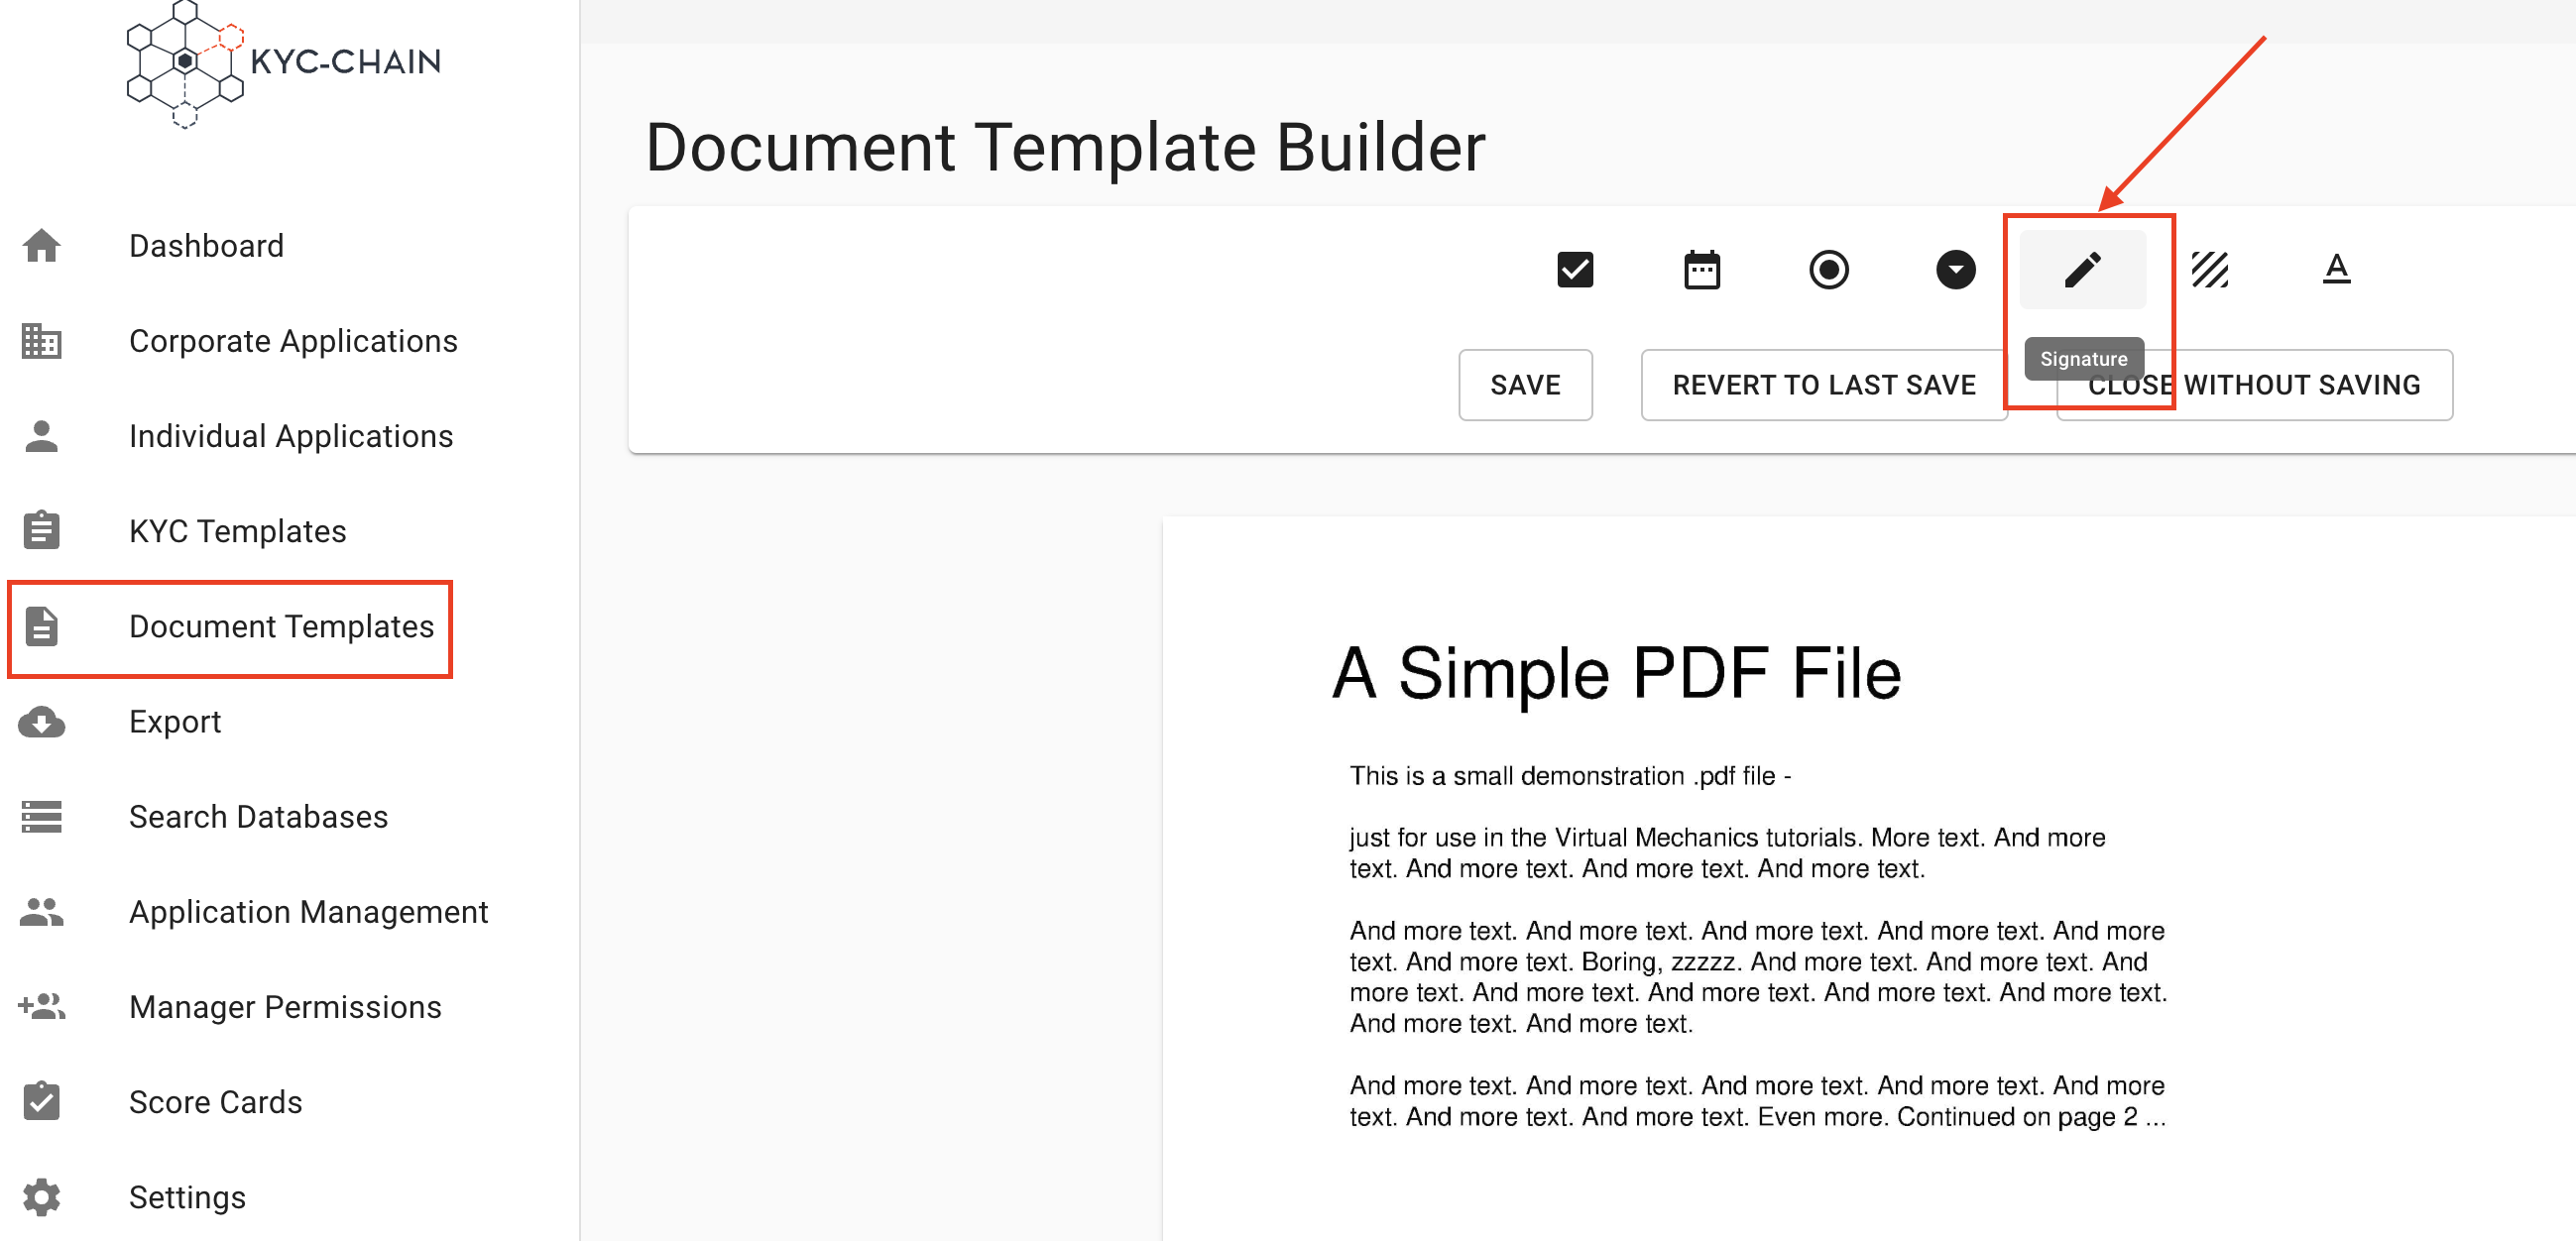
After you've uploaded a Document Template, you can open the editor and add a signature field by following these steps:
- Click on the Open Editor button.
- Drag and drop the signature box into the desired location in the document.
- Click on the preview button at the top of the page to see a live preview of the document.
- Click on the save button to save your changes or cancel to cancel all changes.
How to add the Terms & Conditions (create a Document Template)?
Management Users can upload the Terms & Conditions to which applicants must agree to start the KYC process. These Terms & Conditions are displayed on the dashboard throughout the process. To do that, the manager has to create a new Document Template and add it to the correct KYC template:
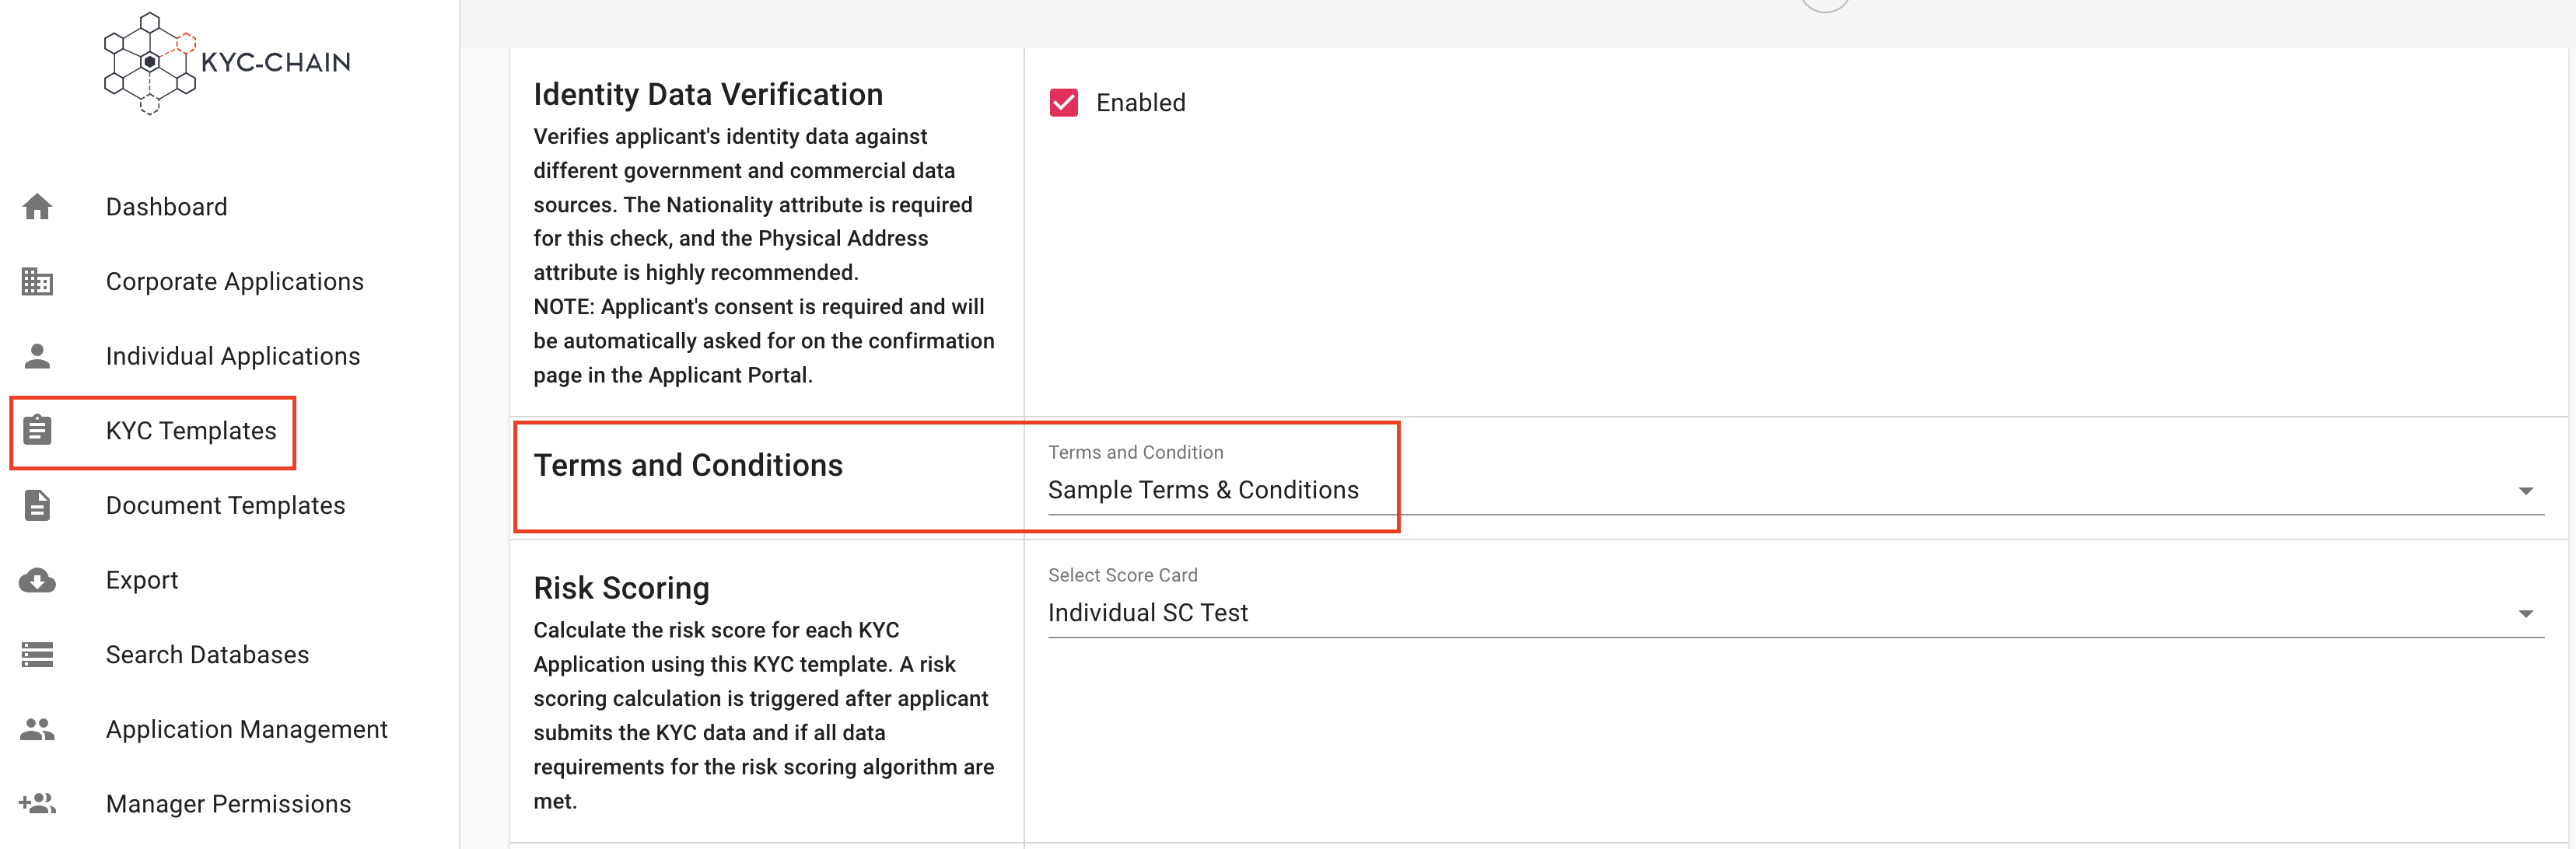
- Once you have created the Terms and Conditions in Document Templates, go to KYC Templates on the left side menu. Choose the Template where you want to add the Terms & Conditions and click on the View & Modify button (format text icon). (Original doc mentions [INSERT IMAGE 32], placeholder kept if needed)
- Once in the correct “KYC Template”, all that is required is to add the document template that contains the Terms & Conditions. For that, scroll down to the Legal Document and select the Terms and Conditions under Select Legal Document then click on Save:
Important when uploading the Terms & Conditions documentation:
- It must be a PDF File.
- If your Terms & Conditions are composed of several documents, you will have to combine them into a single PDF file (not exceeding 42 pages regardless of the file size).
- When you have added your Terms & Conditions, please double check how they are displayed on the user interface. Make sure that the title of the document is displayed correctly in the customer portal. If not, don’t hesitate to edit your document and upload it again:

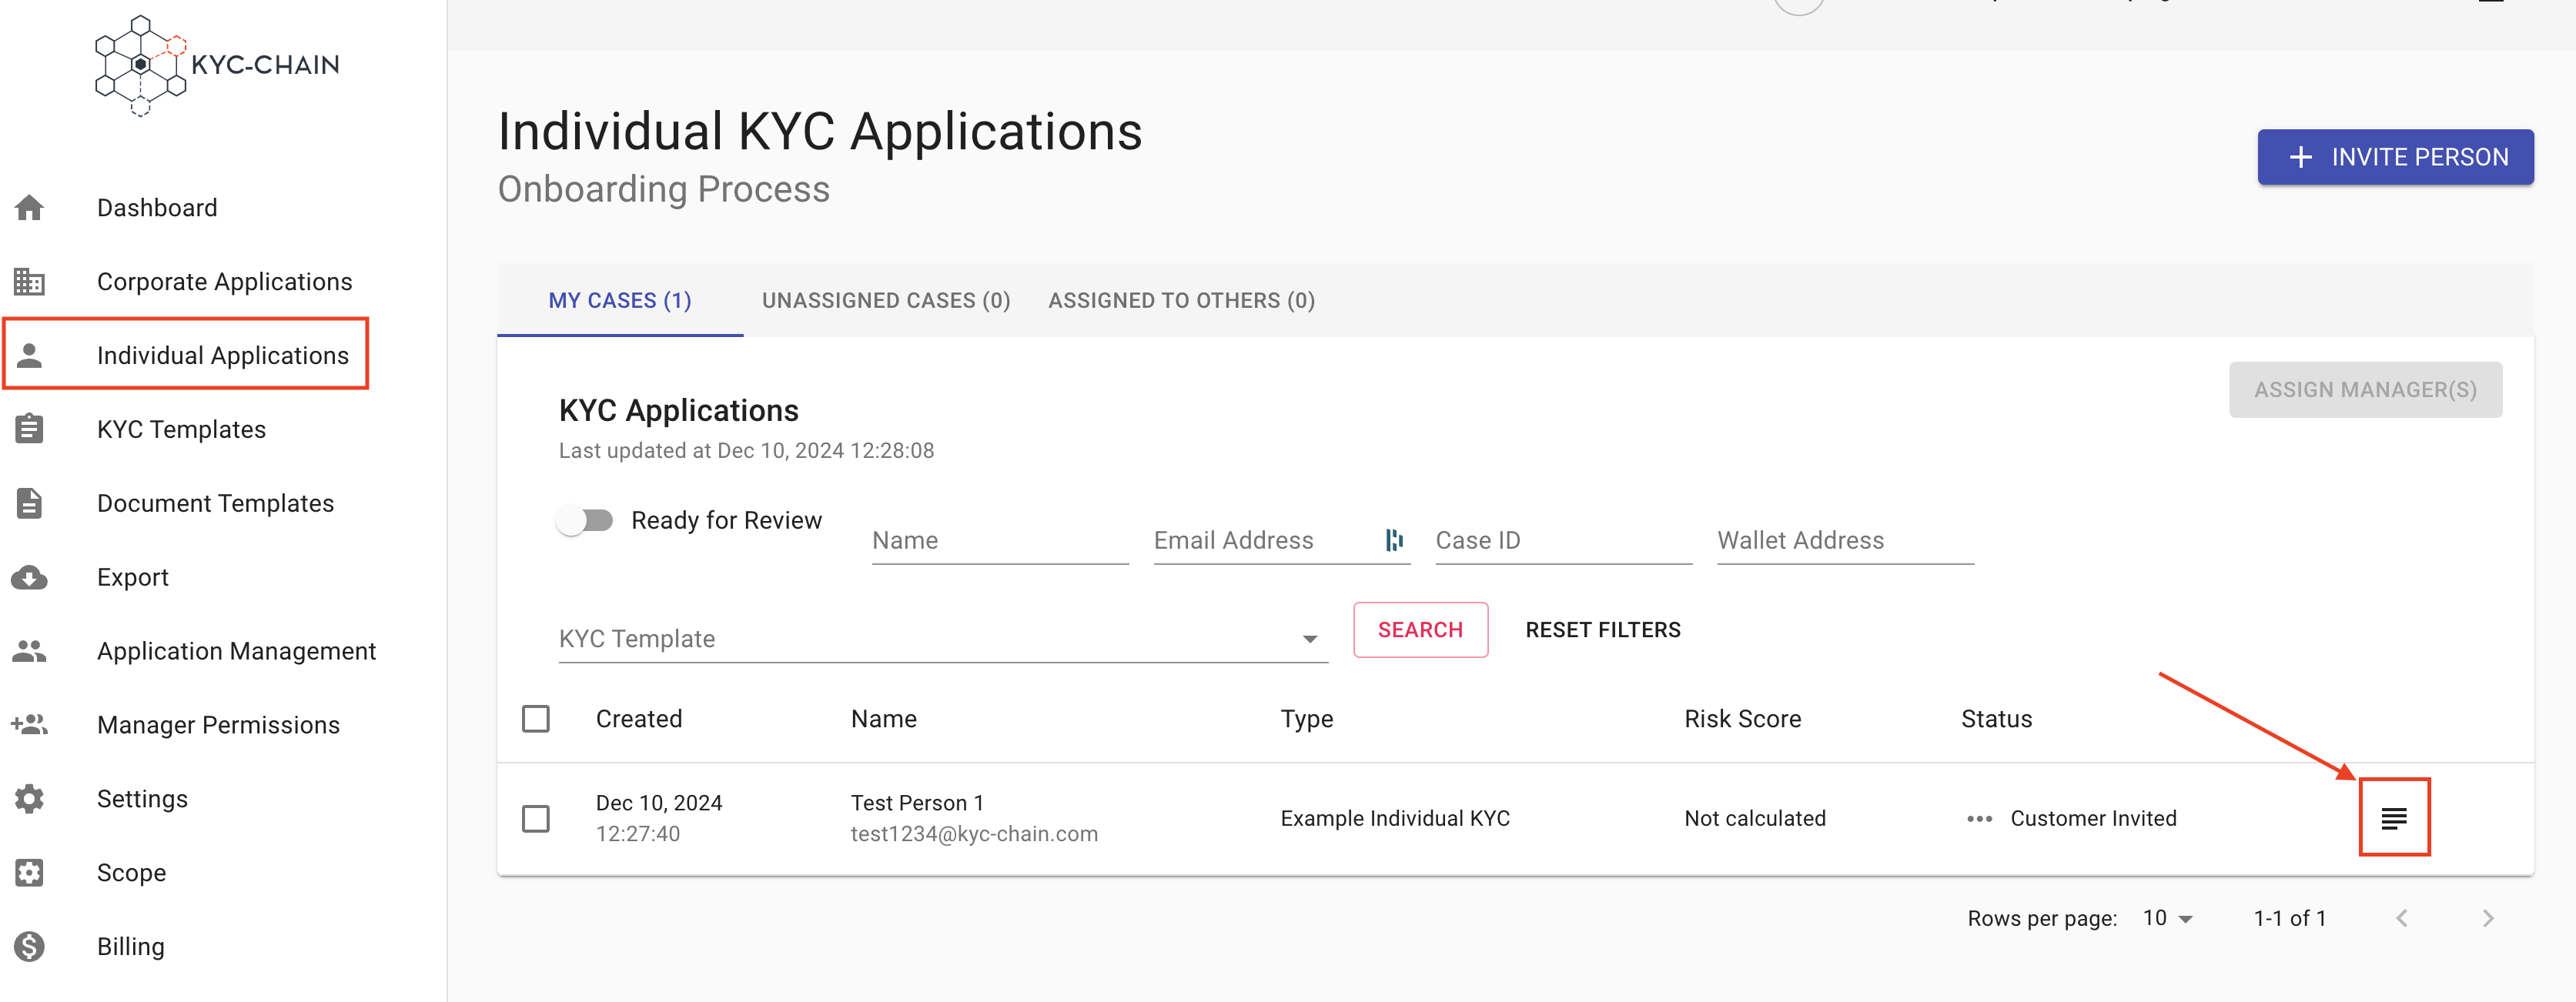
4.3 How To Check if a KYC Application is Ready for Approval?
Management Users can see indicators when cases are ready for approval. They can filter all cases specifically for those that are approved.
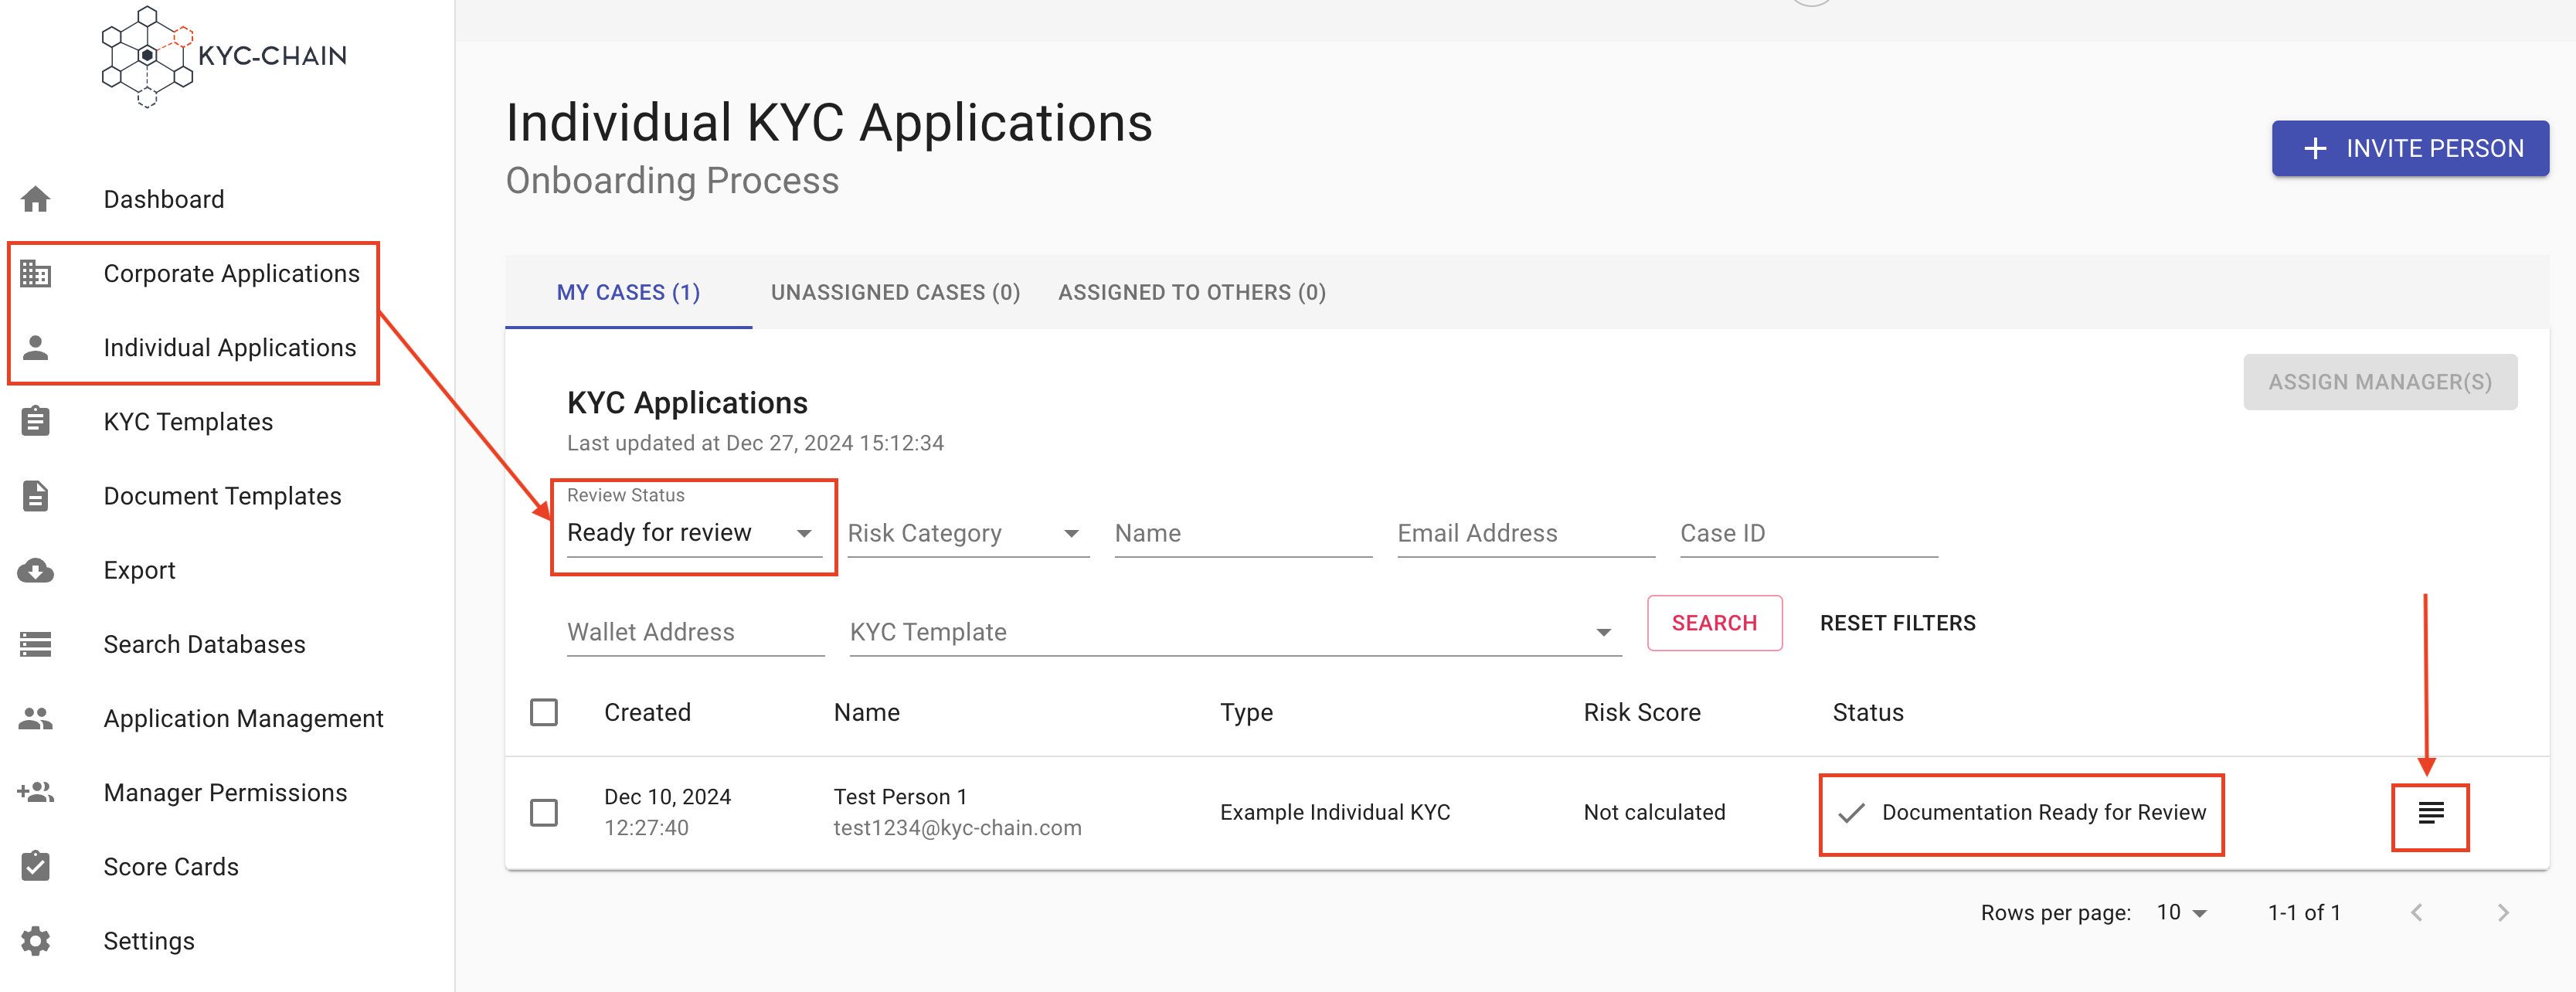
- Select the Corporate or Individual Processes tab on the left side menu. An overview of all the cases will show.
- Cases ready for review display the status "Documentation Ready for Review”.
- Click on the View button to open the case and review details that the user has provided.
To only display processes that are ready for review, managers can enable the "Ready For Review" slider.
4.4 How To Assign Managers to Review KYC Applications?
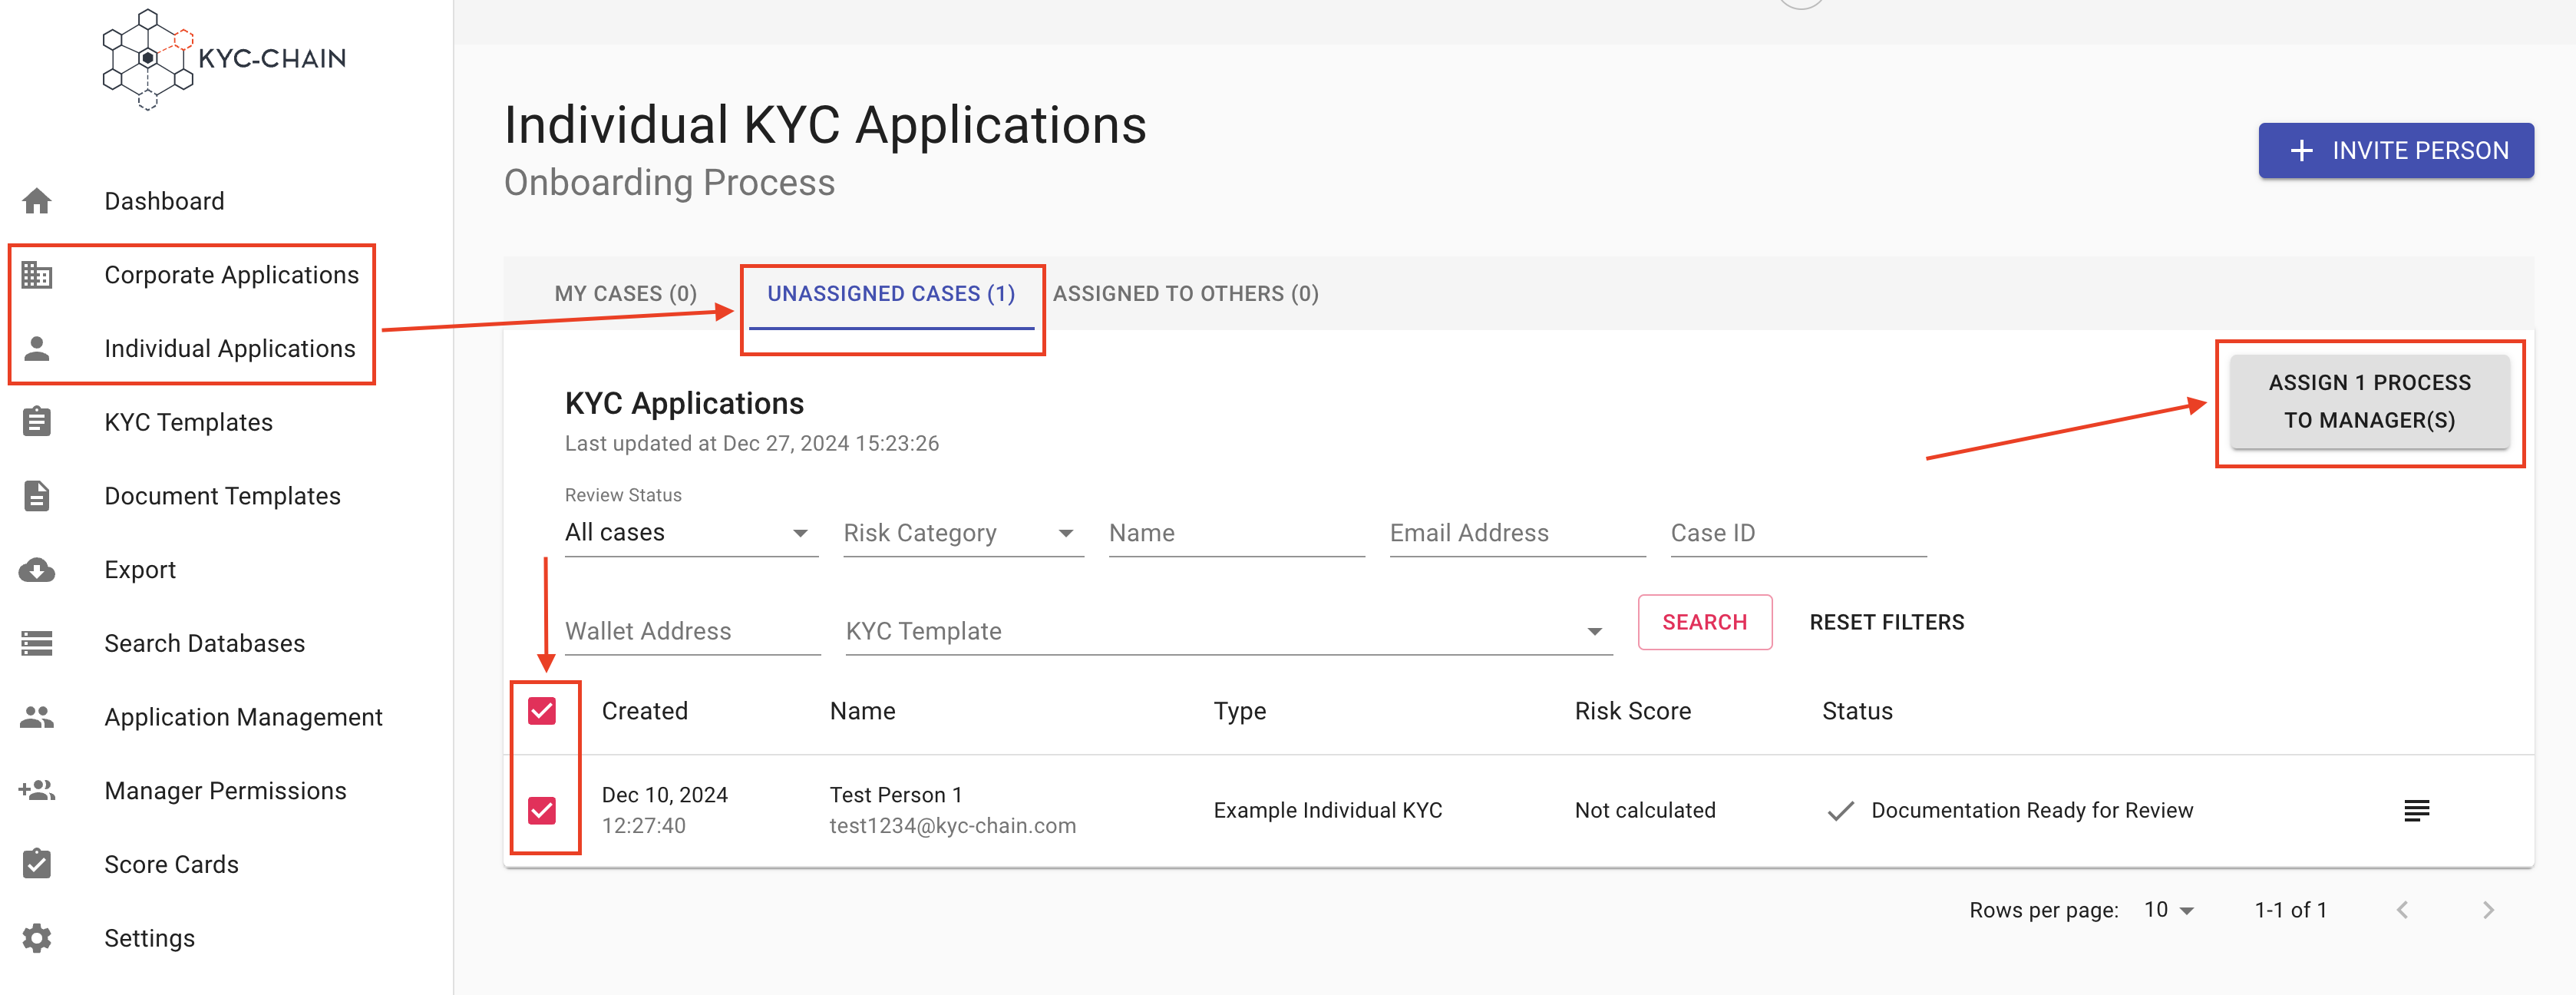
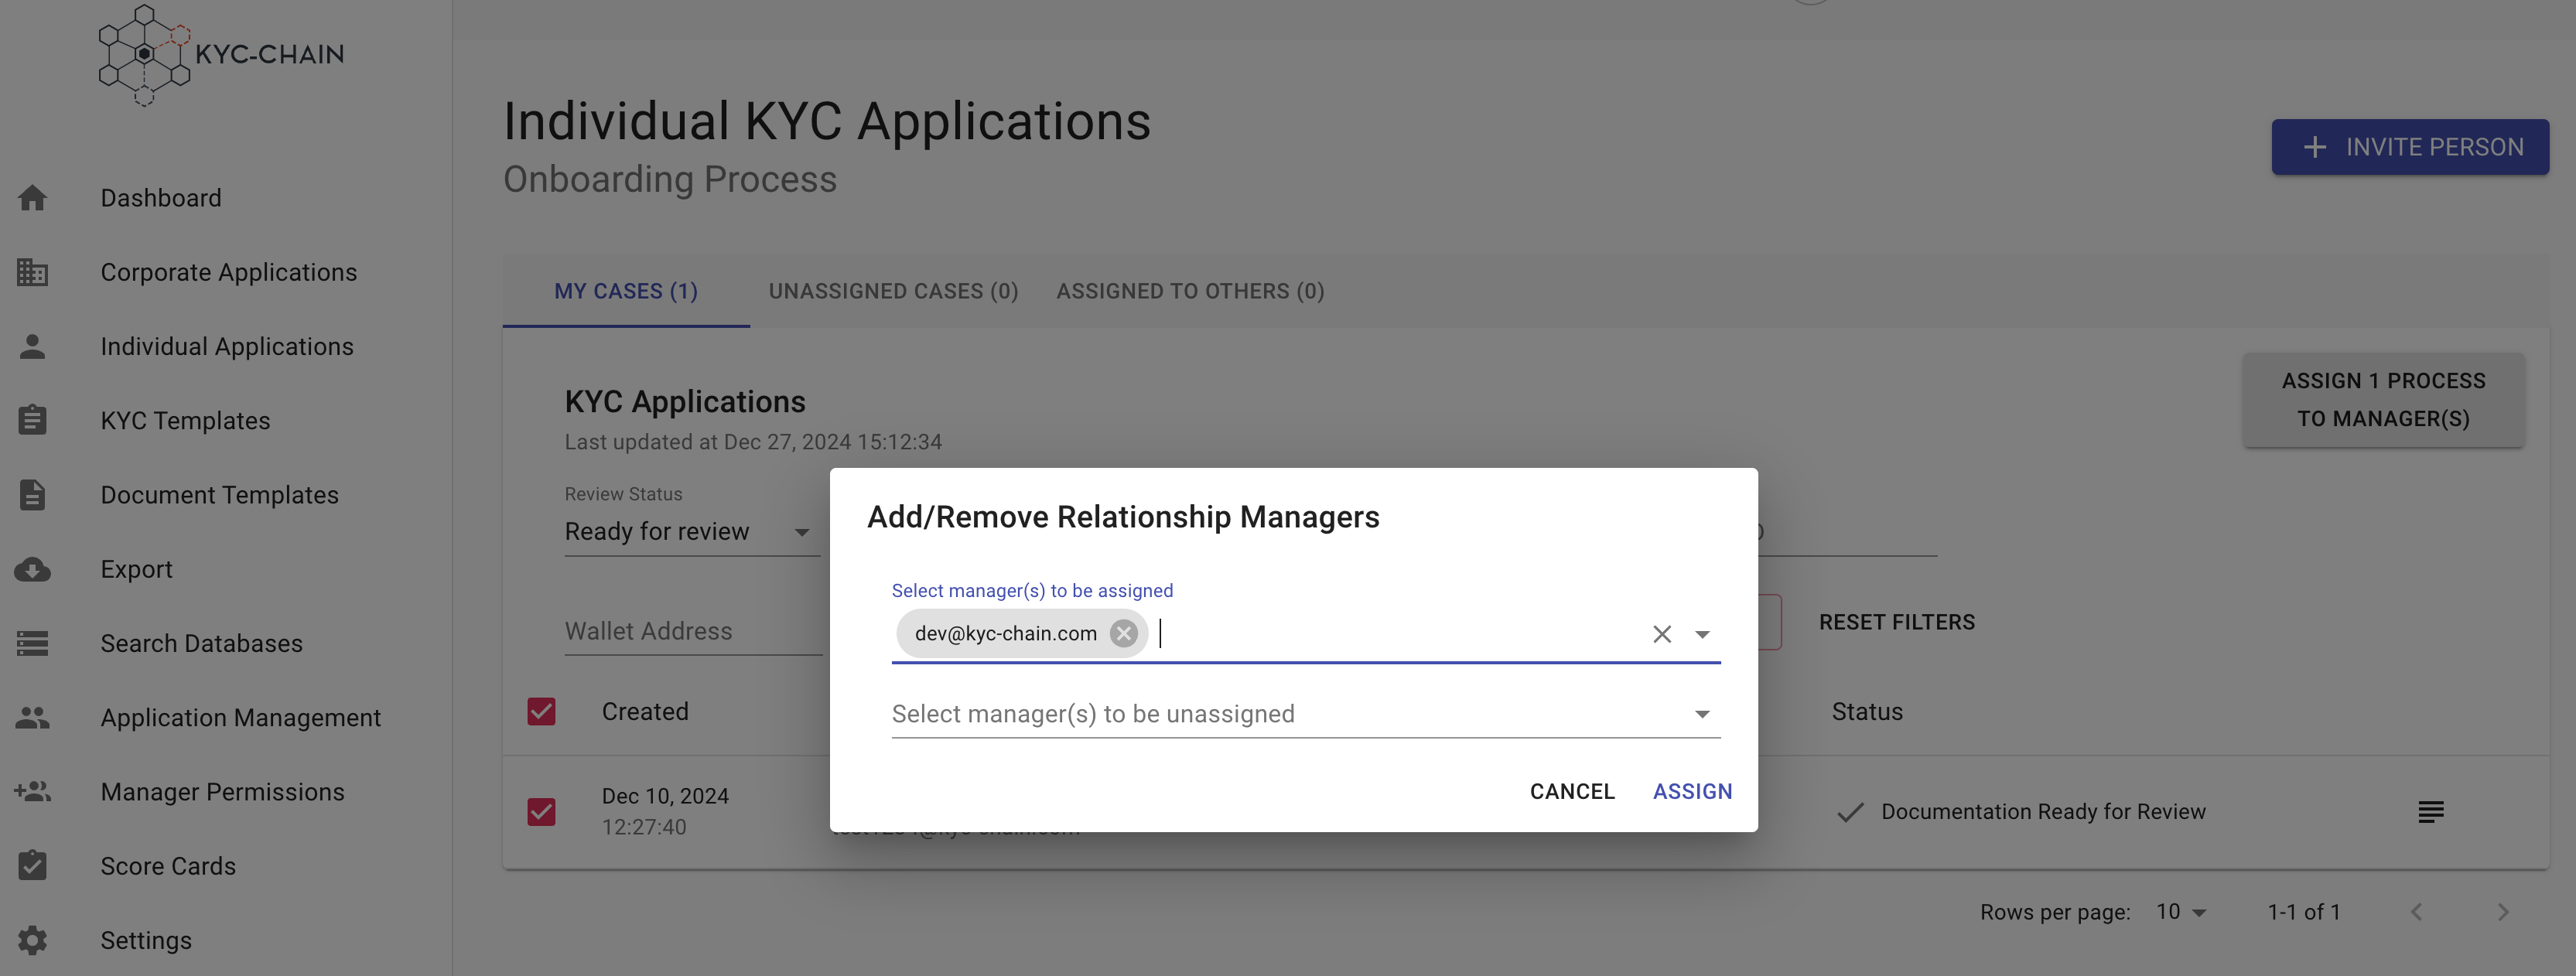
Management Users can select multiple cases for assignment to other KYC reviewers, or they can review and assign cases on a one-by-one basis. To bulk assign managers:
- Select the Corporate or Individual Processes tab on the left side menu. An overview of all the cases will show.
- Navigate to the Unassigned cases tab.
- Select cases you wish to assign and click on the Assign Manager button.
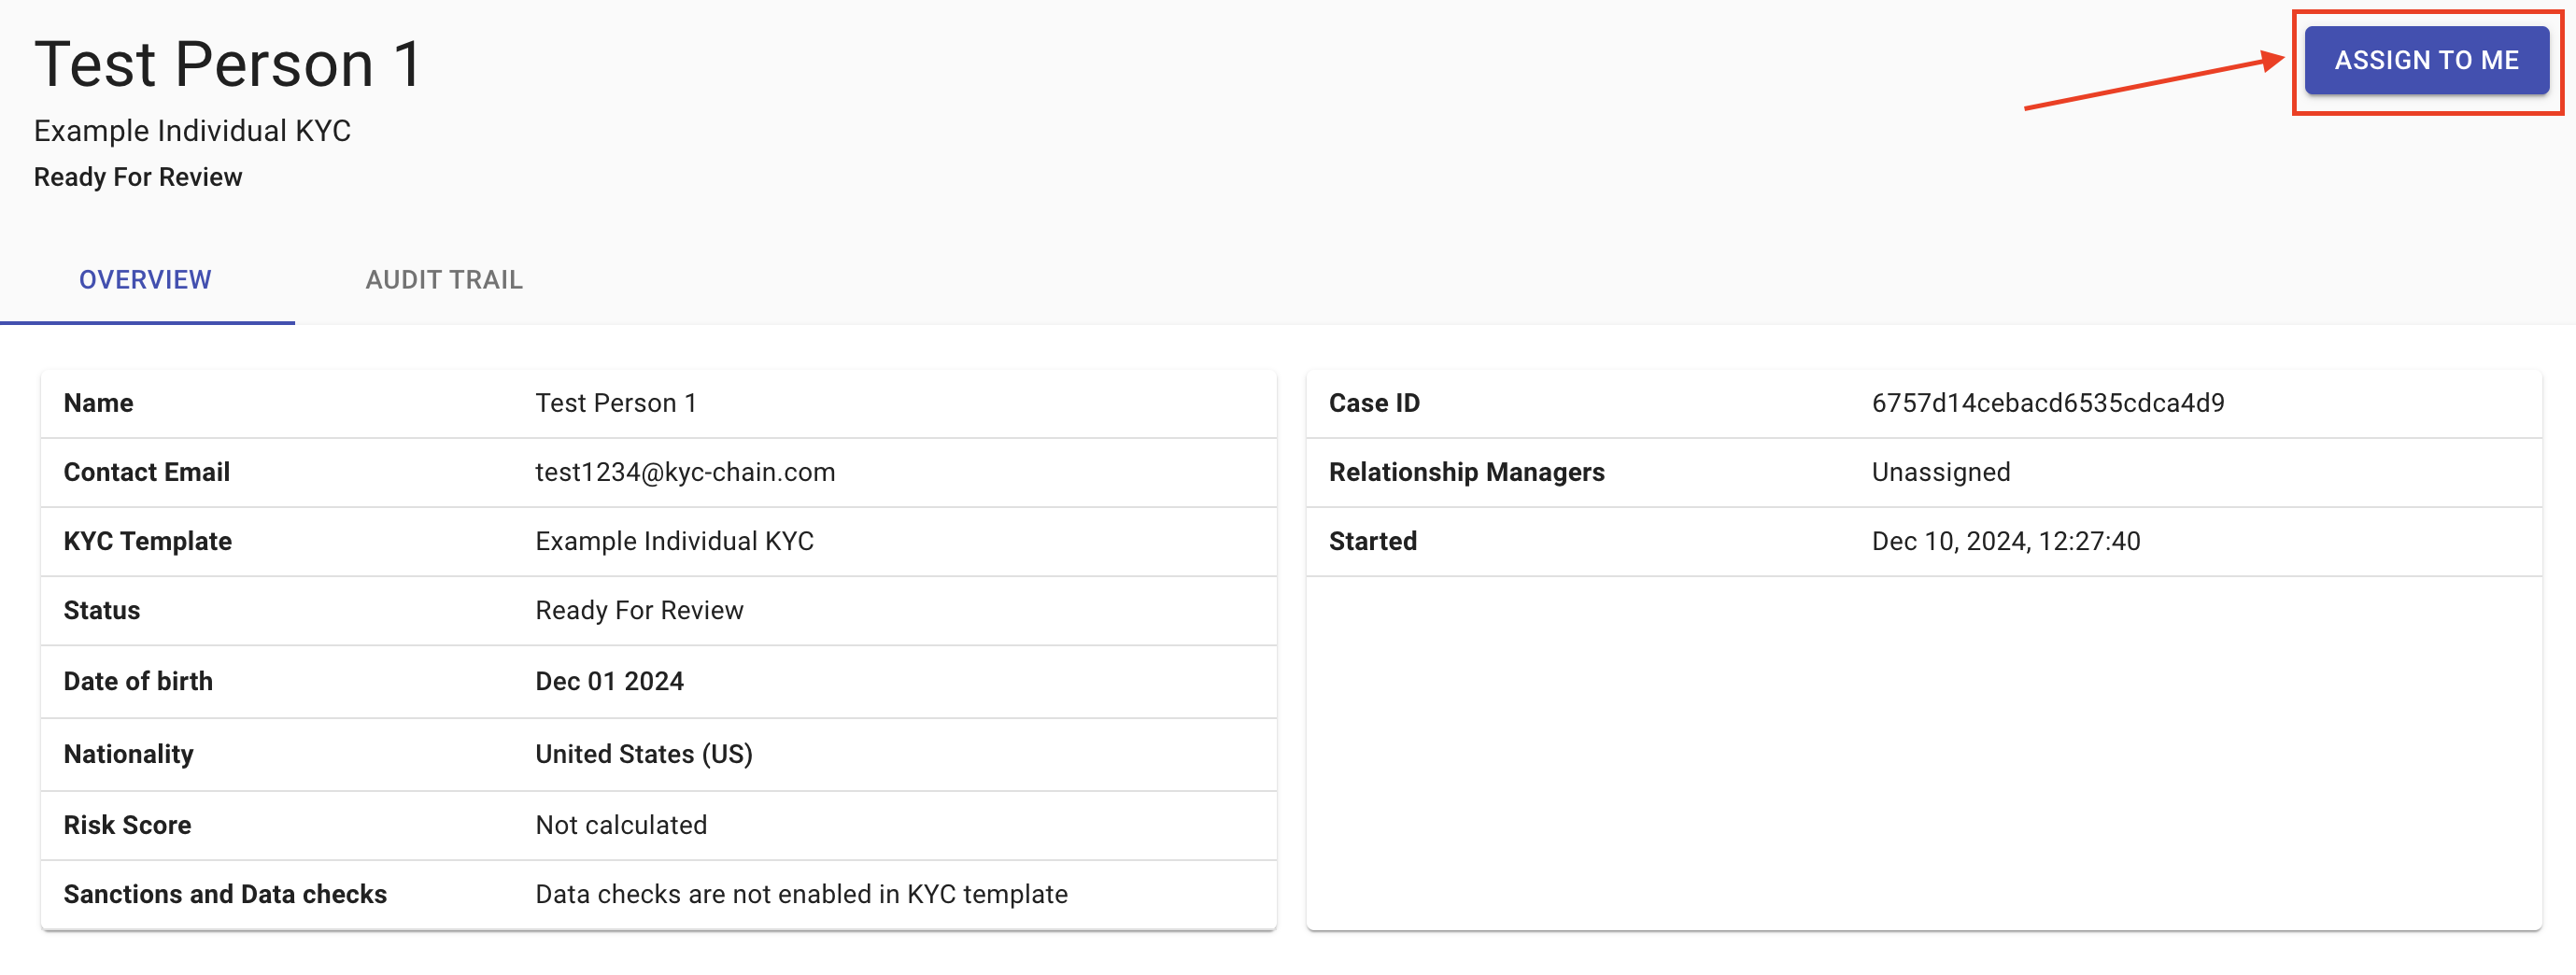
To assign yourself as manager to one process, simply view that process and then click the "assign to me" button in the top-right-hand corner of the screen.
You can set up KYC templates to be automatically assigned to a specific manager by default. Check the “How to set default Manager for new KYC processes” article in section 4.1.
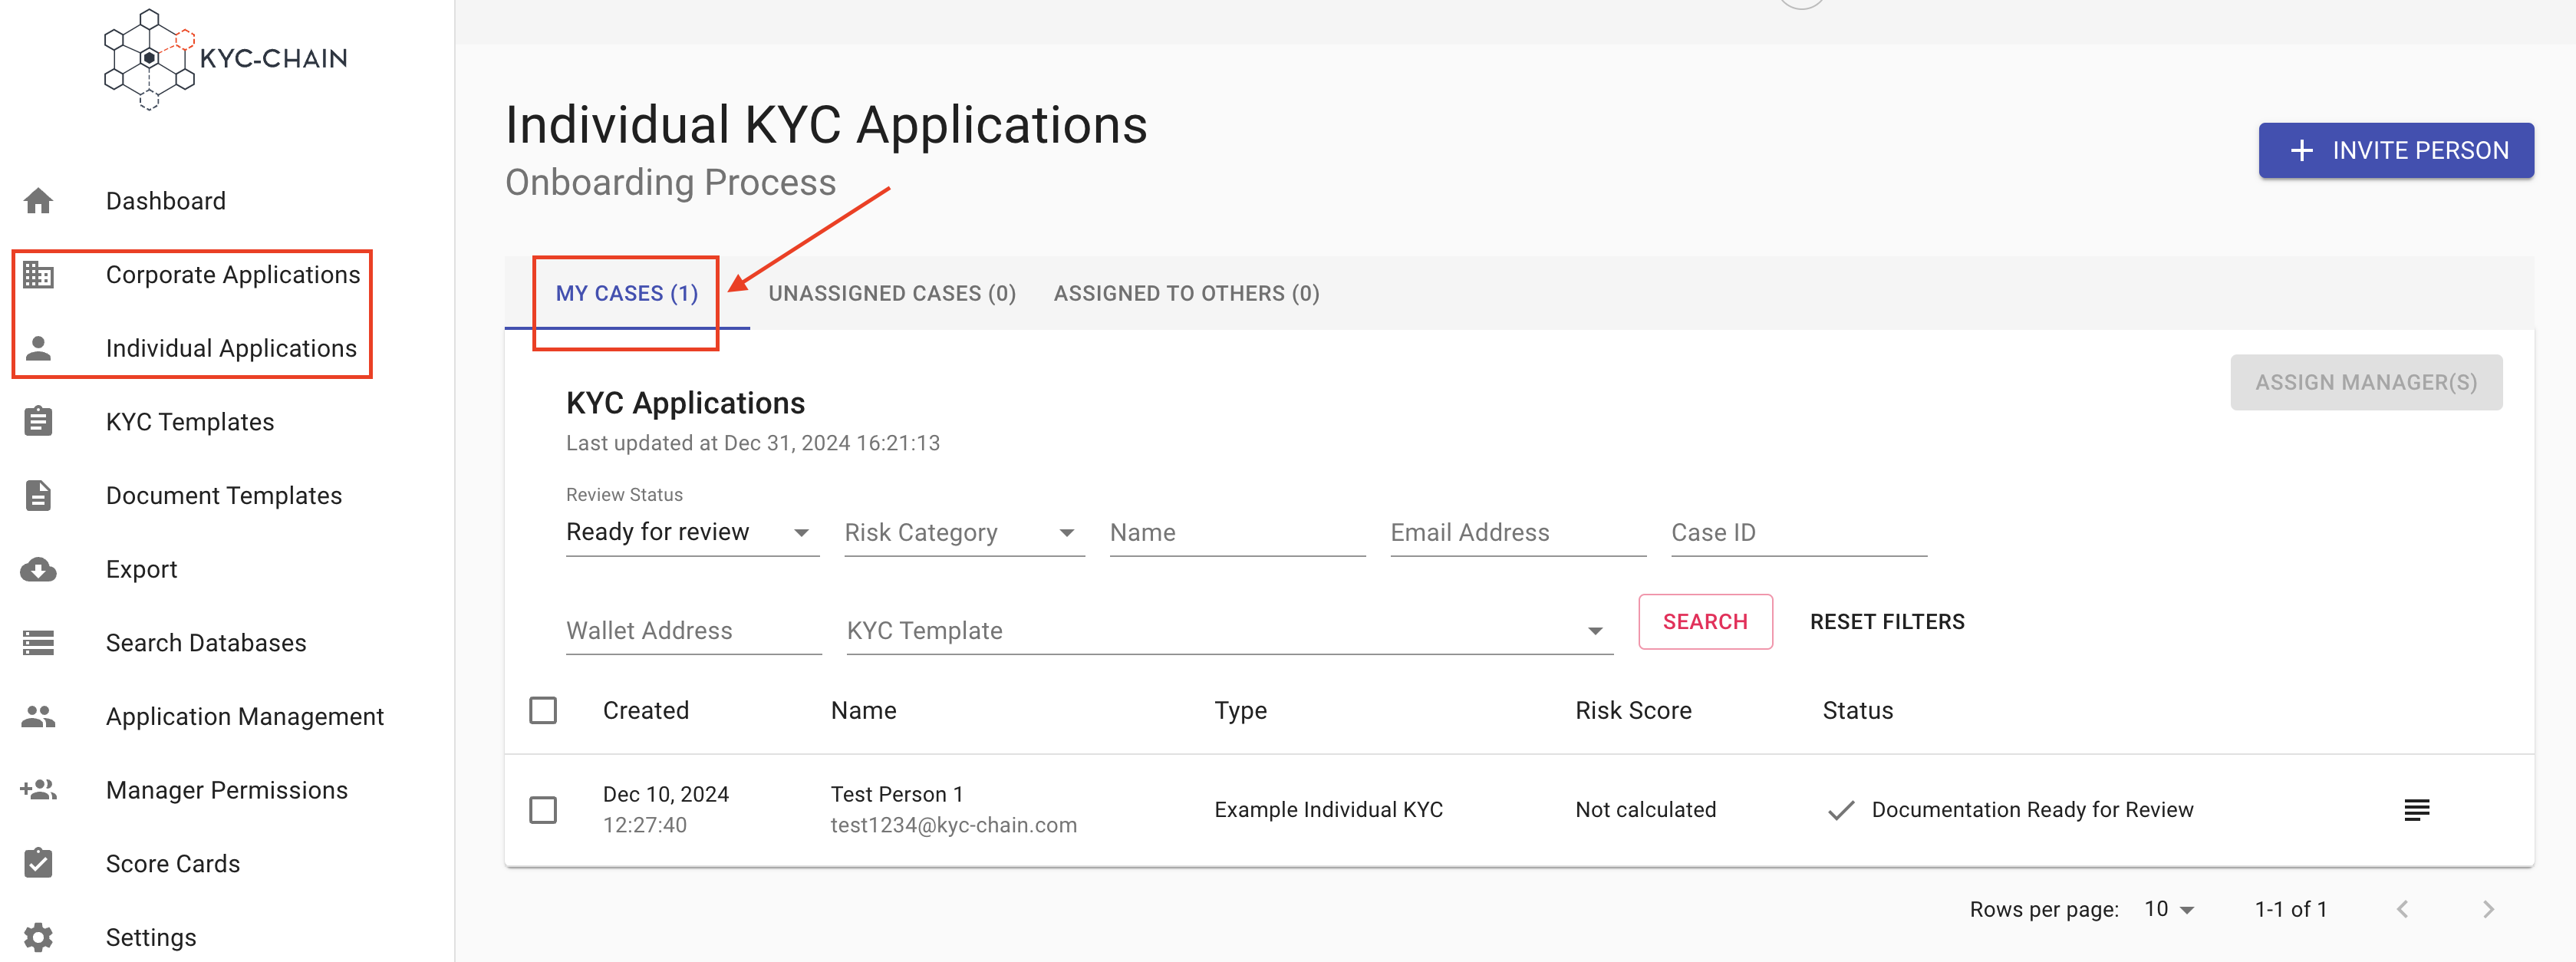
4.5 How To Check Cases Assigned to Me?
When in the Corporate or Individual Processes tabs, management users can quickly see the cases that are assigned to them in the "My Cases" tab, and determine which cases are ready for their review.
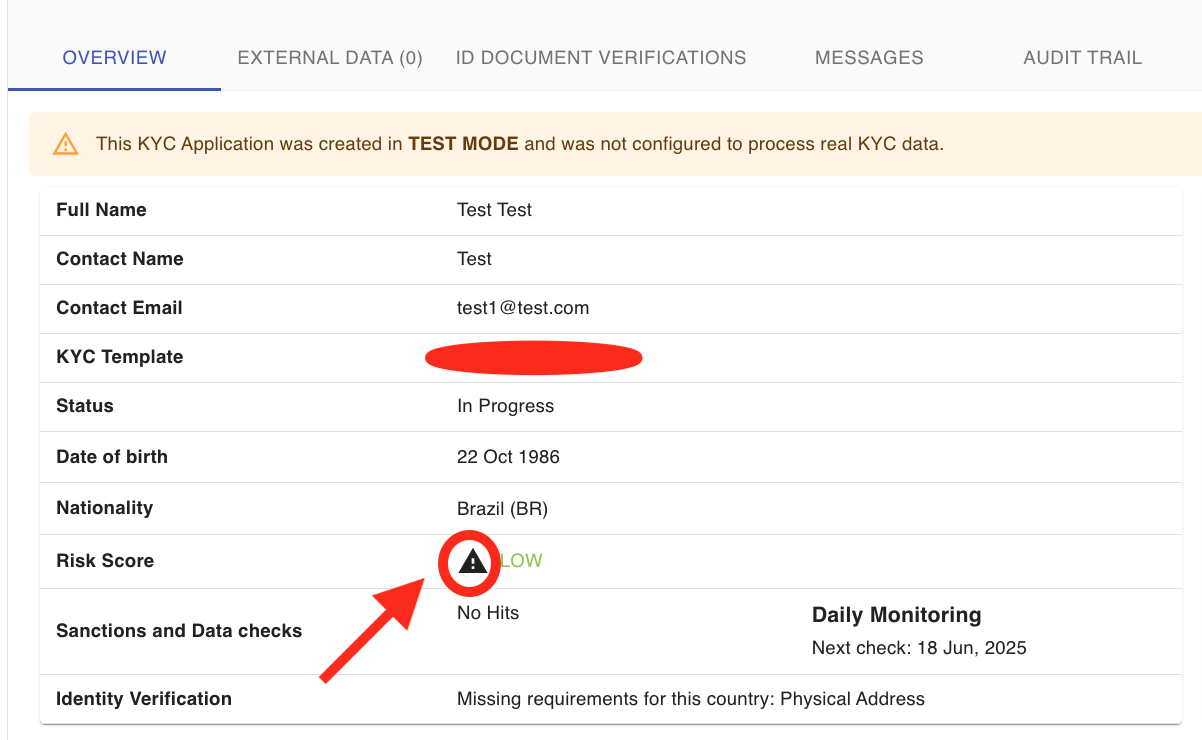
Checking The Risk Score:
When the application is submitted, and the risk score is calculated, managers can check the risk score details under the Overview section of the application by clicking the risk category: LOW, MEDIUM or HIGH:
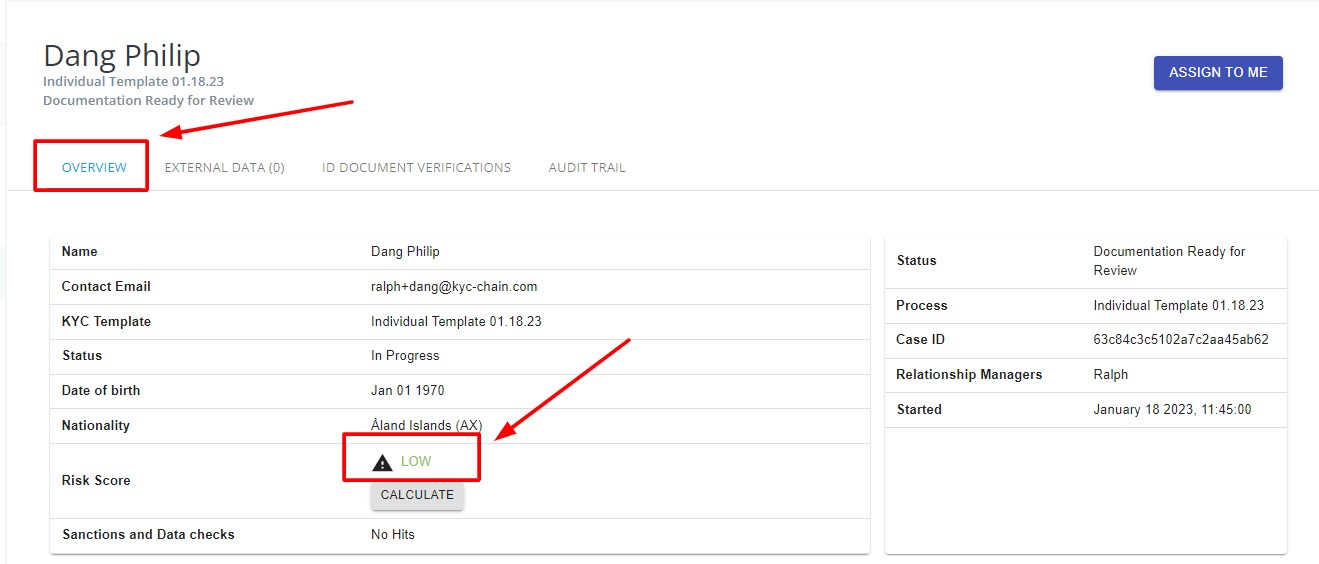
Overriding The Risk Category:
Please note that you can override the risk category manually and also include an internal note:

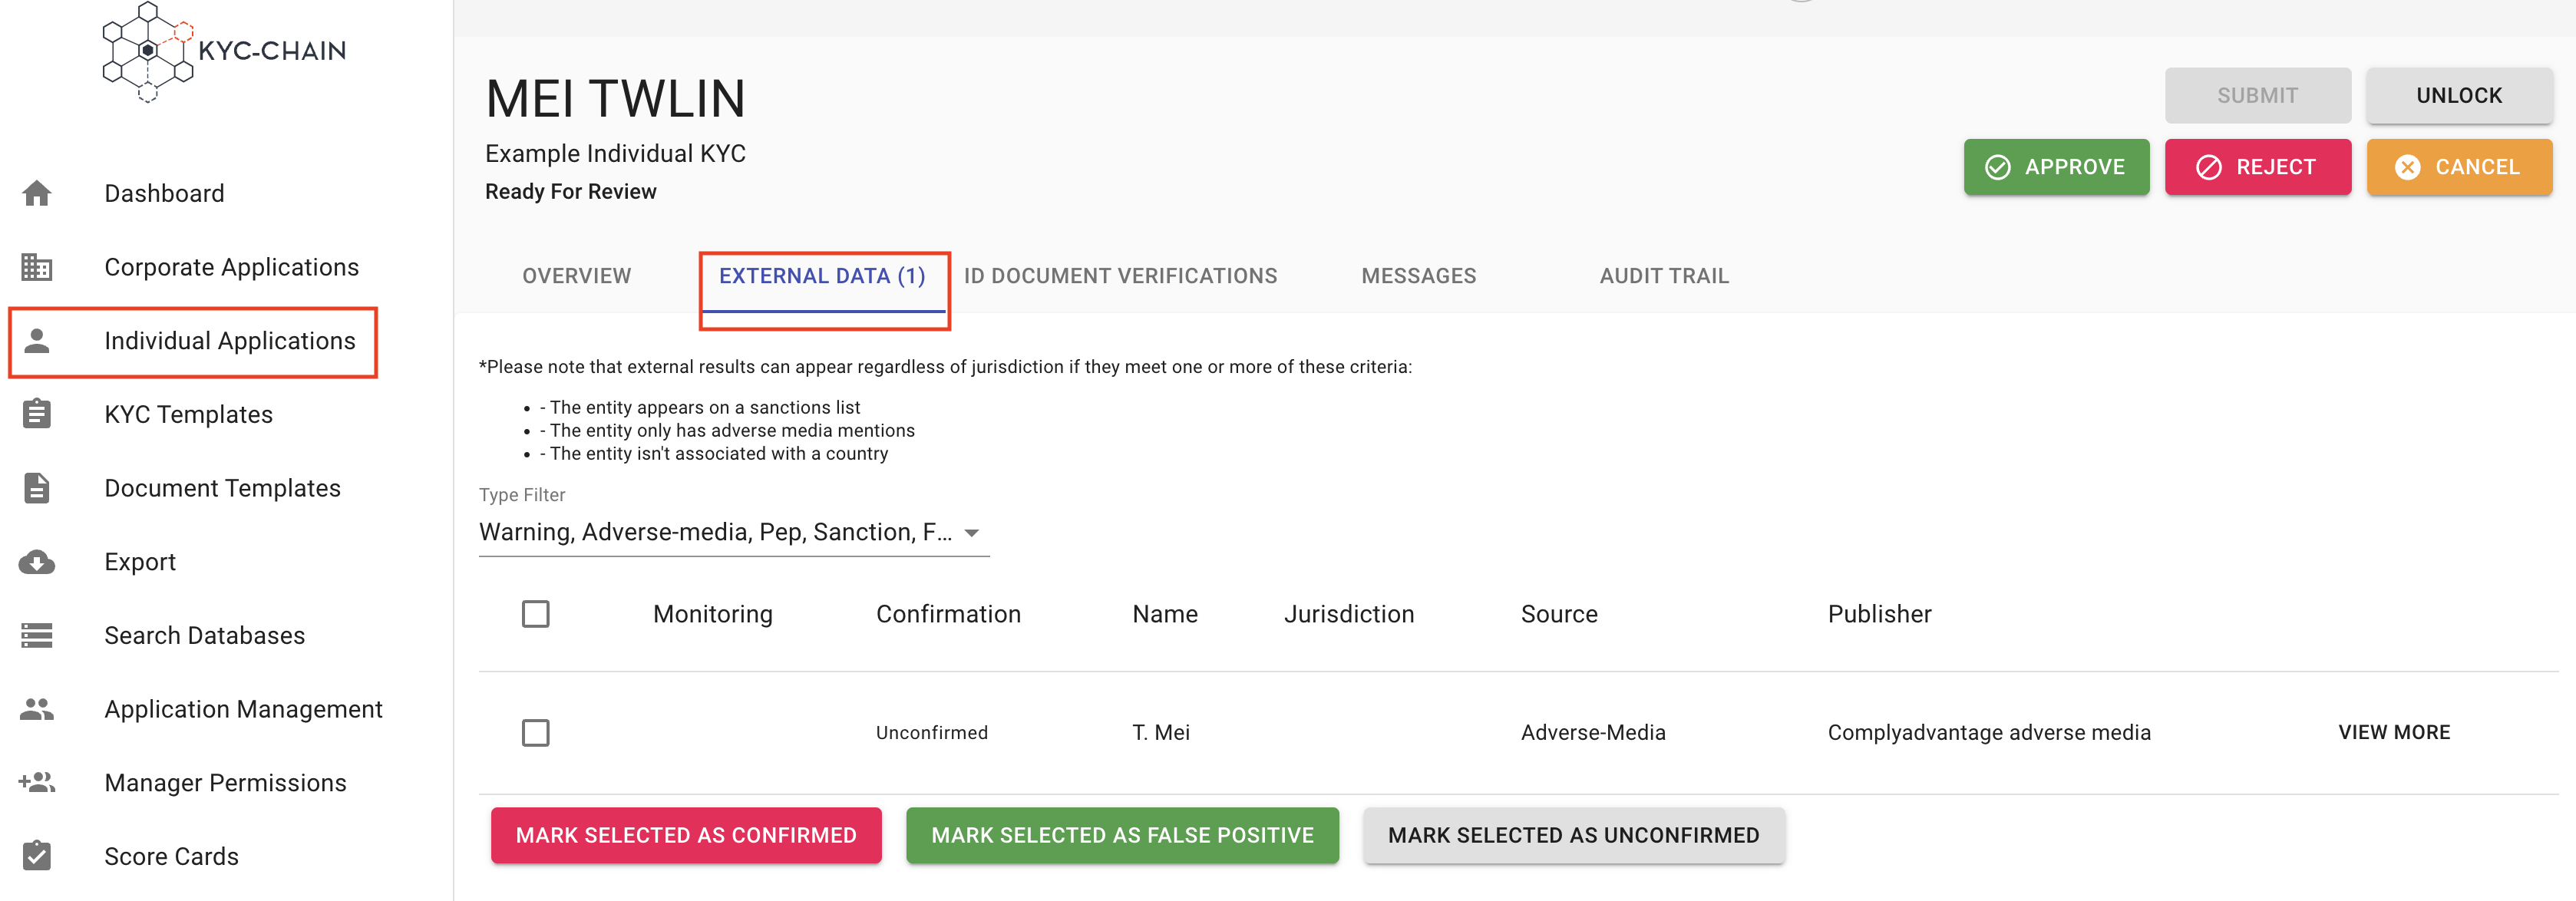
4.6 How To Check External Data Results
When reviewing a KYC process, one of the most important points is the External Data tab. The KYC-Chain app runs automatic sanctions checks on individuals and corporations. Our feature covers global and national sanctions lists: OFAC, US BIS, CIA, FBI, EEAS, SECO, HMT, MOD, World Bank and more. Additionally, we provide Adverse Media and PEP checks. Ask your account manager to provide more details about KYC-Chain Advanced Sanctions Screening or contact us at help@kyc-chain.com.
Individual Processes: Managers can see positive matches of individuals who are prohibited from certain activities or industries in the External Data tab:
- Navigate to a KYC case you want to review.
- Open the External Data tab. The list of positive matches for this individual will show up. If no matches were found, the "No Results" message will appear.
- Confirm the positive match(es) by checking the box near it/them, scrolling to the bottom of the list and clicking the Confirm Selected Results button.
Managers can filter false positive matches by clicking the “View More” button and verifying the ‘Date of Birth’, ‘Country’ and other data fields.
Corporate Processes: Managers can see positive matches for the entity and its members that are prohibited from certain activities or industries in the External Data and Members tabs.
- Navigate to a KYC case you want to review.
- Open the External Data tab.
- Then open the Members tab and click on the Member you want to check.
- Scroll down to the end of the Member details to External Data.
- The list of positive matches will show up. If no matches were found, there will be a "No Results" message.

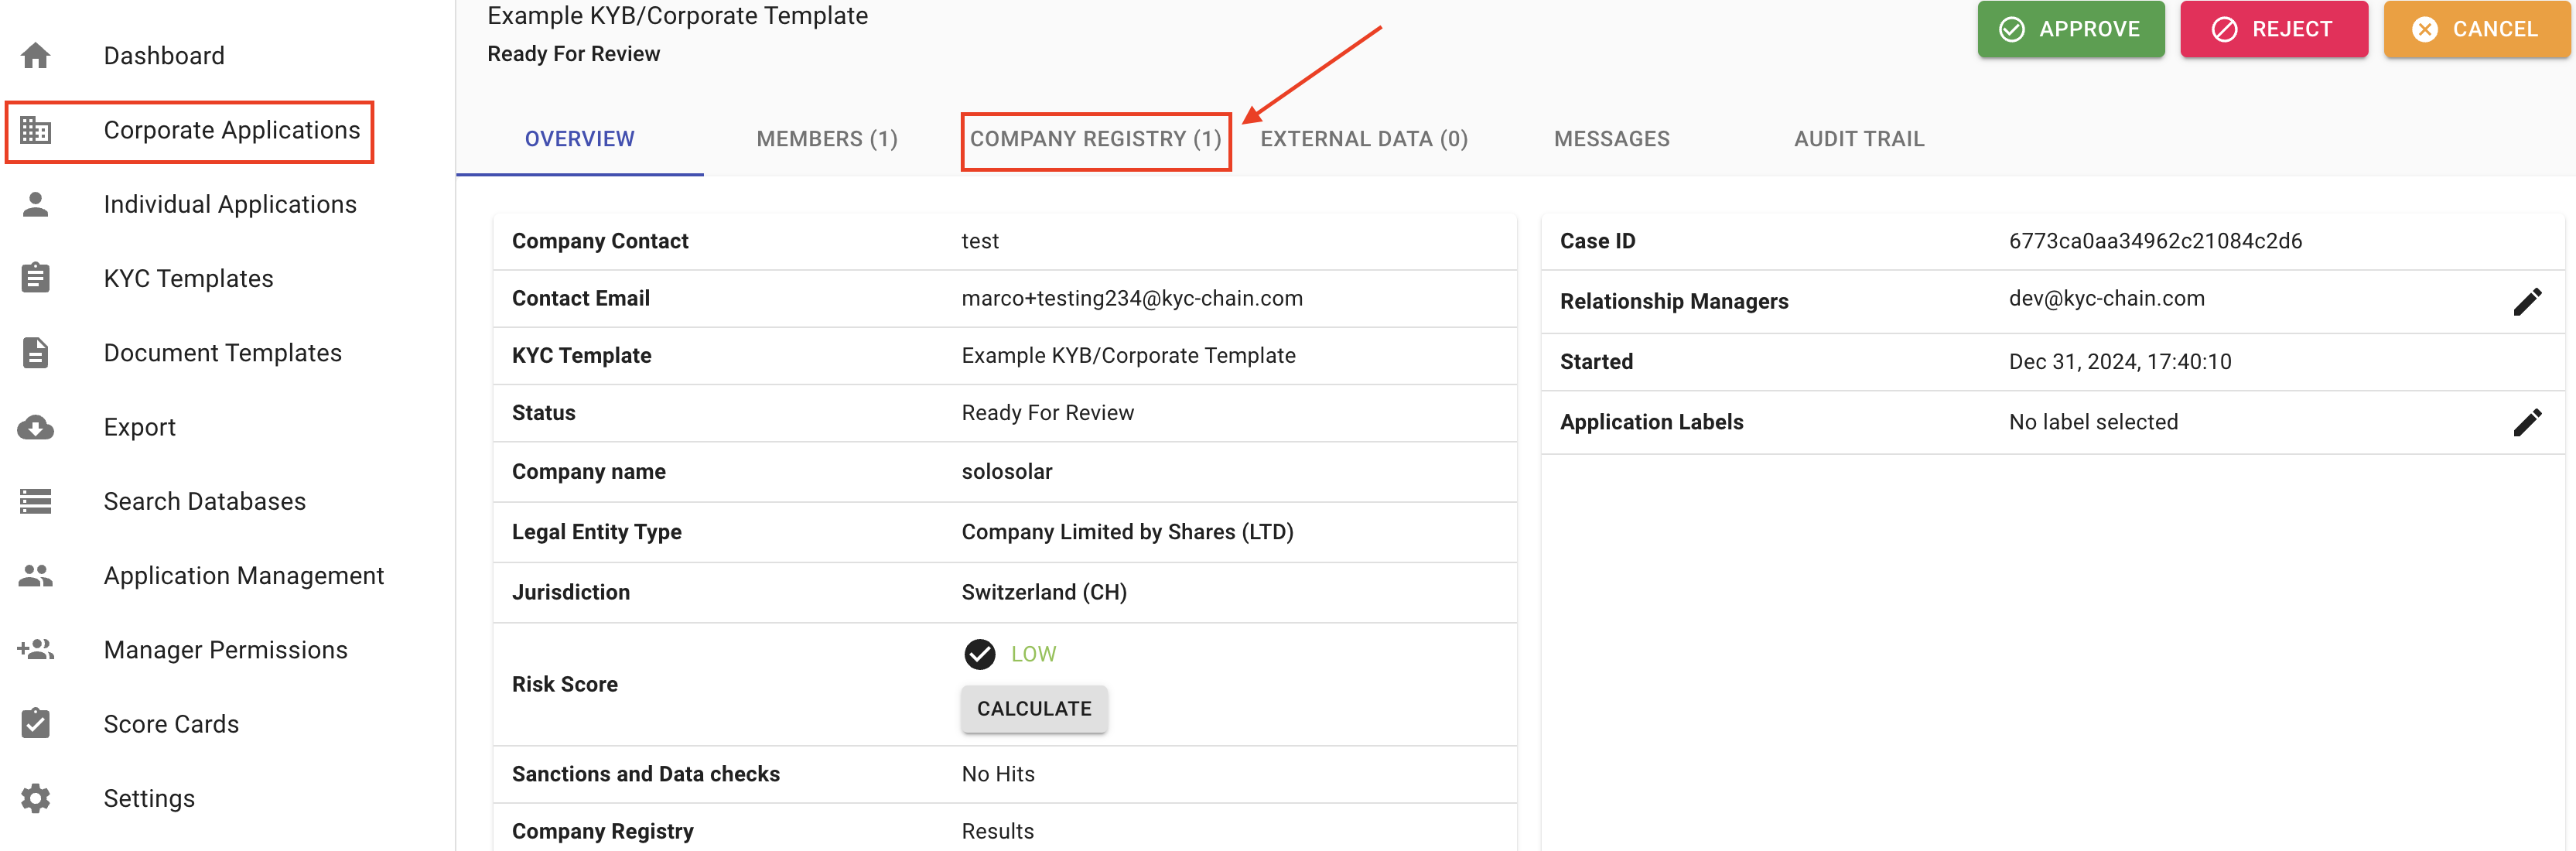
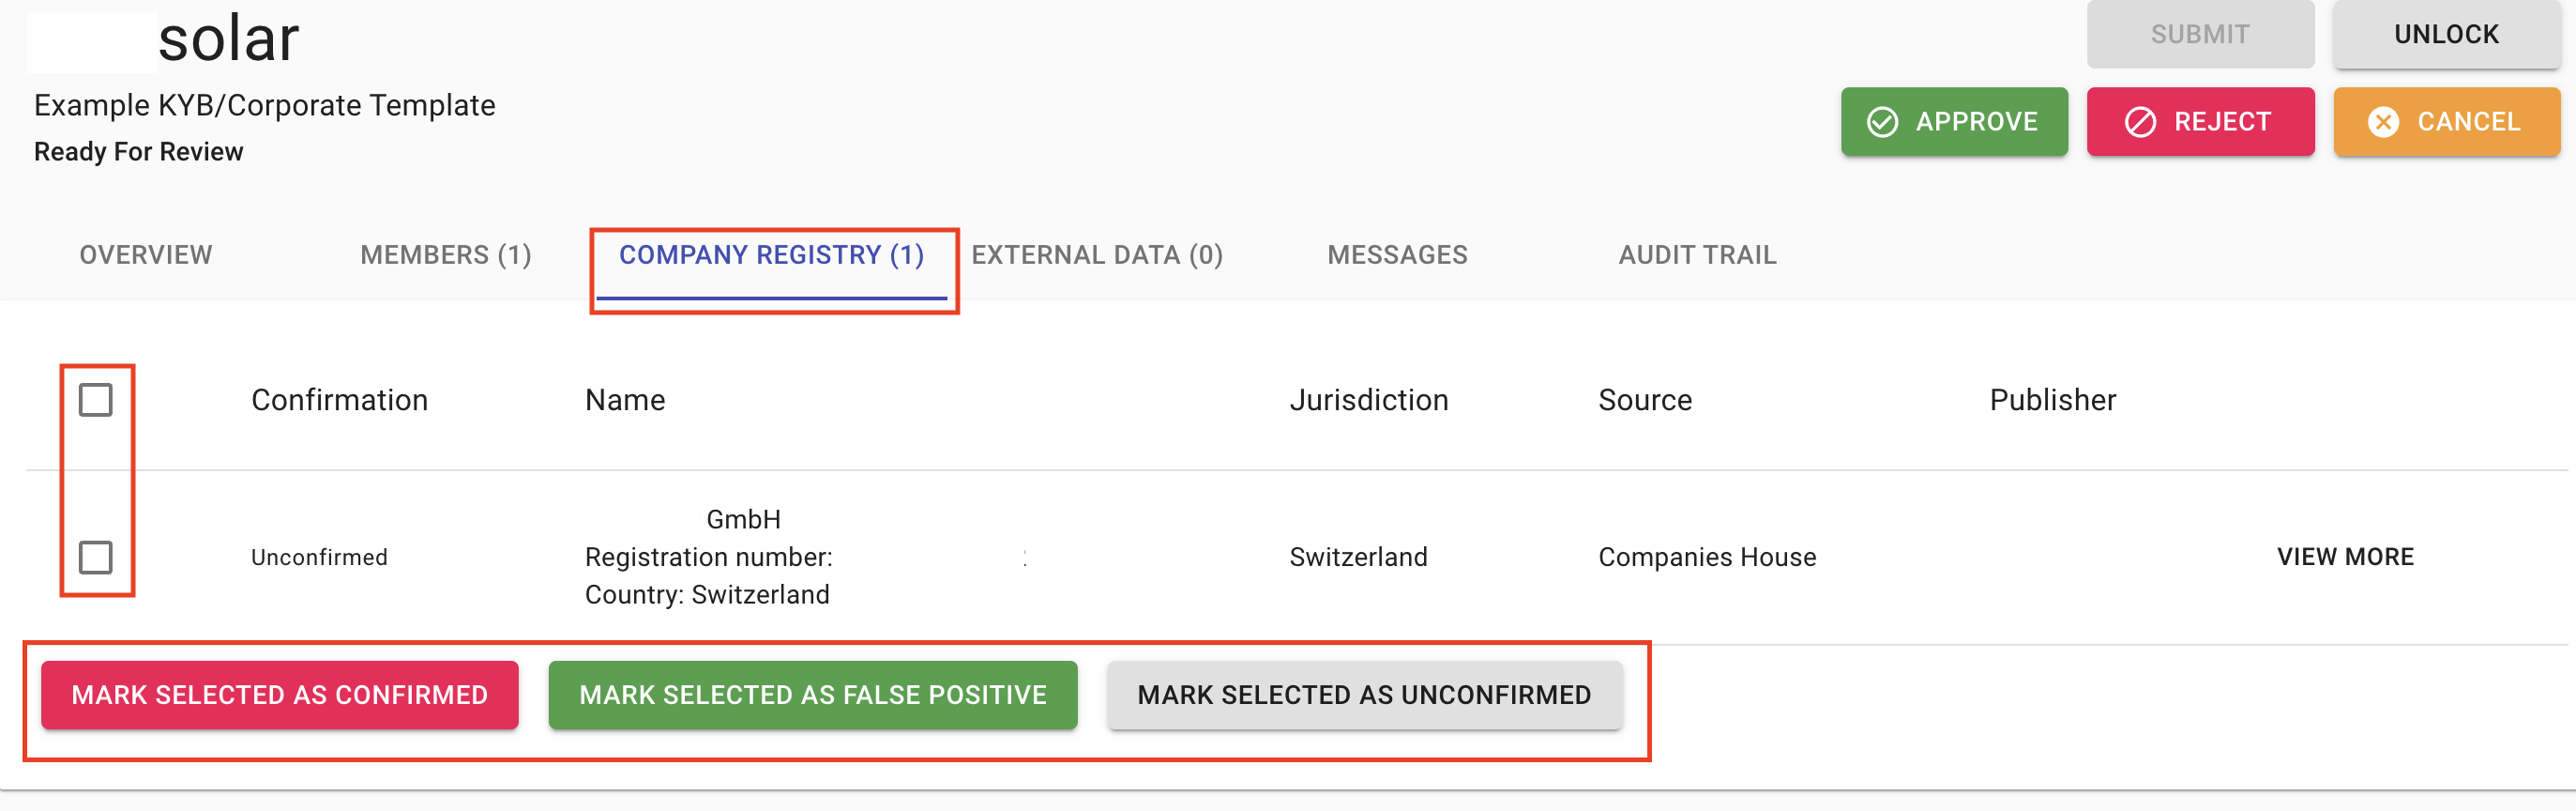
4.7 How To Check Company Registry Results?
Our system allows you to access business registration information from official and authoritative commercial register databases. Some of the data categories available are business registration number, address, incorporation date, activity status and list of directors and secretary. The data available depends on the jurisdictions. Ask your account manager to provide more details about the KYC-Chain company registry check or contact us at help@kyc-chain.com. As part of the Corporate Processes, management users can see company details in the Company Registry tab:
- Navigate to a KYC case you want to review.
- Open the Company Registry tab. The list will show the matching company profile. If we couldn't find the company or the jurisdiction is not supported, you will see a respective message.
- Confirm the company profile by checking the box on the left and scrolling to the bottom of the list and clicking the Confirm Selected Results button.
4.8 How To Enable ID Document and selfie verification with or without the LIVENESS check?
You can enable ID document and selfie verification with or without the liveness check.
ID document verification will check whether the uploaded (Passport, Driver License, National ID card or Foreigner card) is legitimate. The system will capture, extract, and analyze ID data in order to authenticate government-issued identity documents.
Selfie check is an identity verification method that will ask a user to take a photo of themselves that can then be used to compare against other photos, such as the photo on a government-issued ID, to confirm it's the same person.
Liveness check detects that there is a genuine presence on the other end of the device, and that they match the image in the presented ID document.
Strictness allows the manager to set level of strictness, there are 3 levels:
- Optional requirement - Applicant may choose to skip ID document and selfie verification.
- Required - Failed verification won't stop the application
- Strict requirement - Failed verification will stop the application
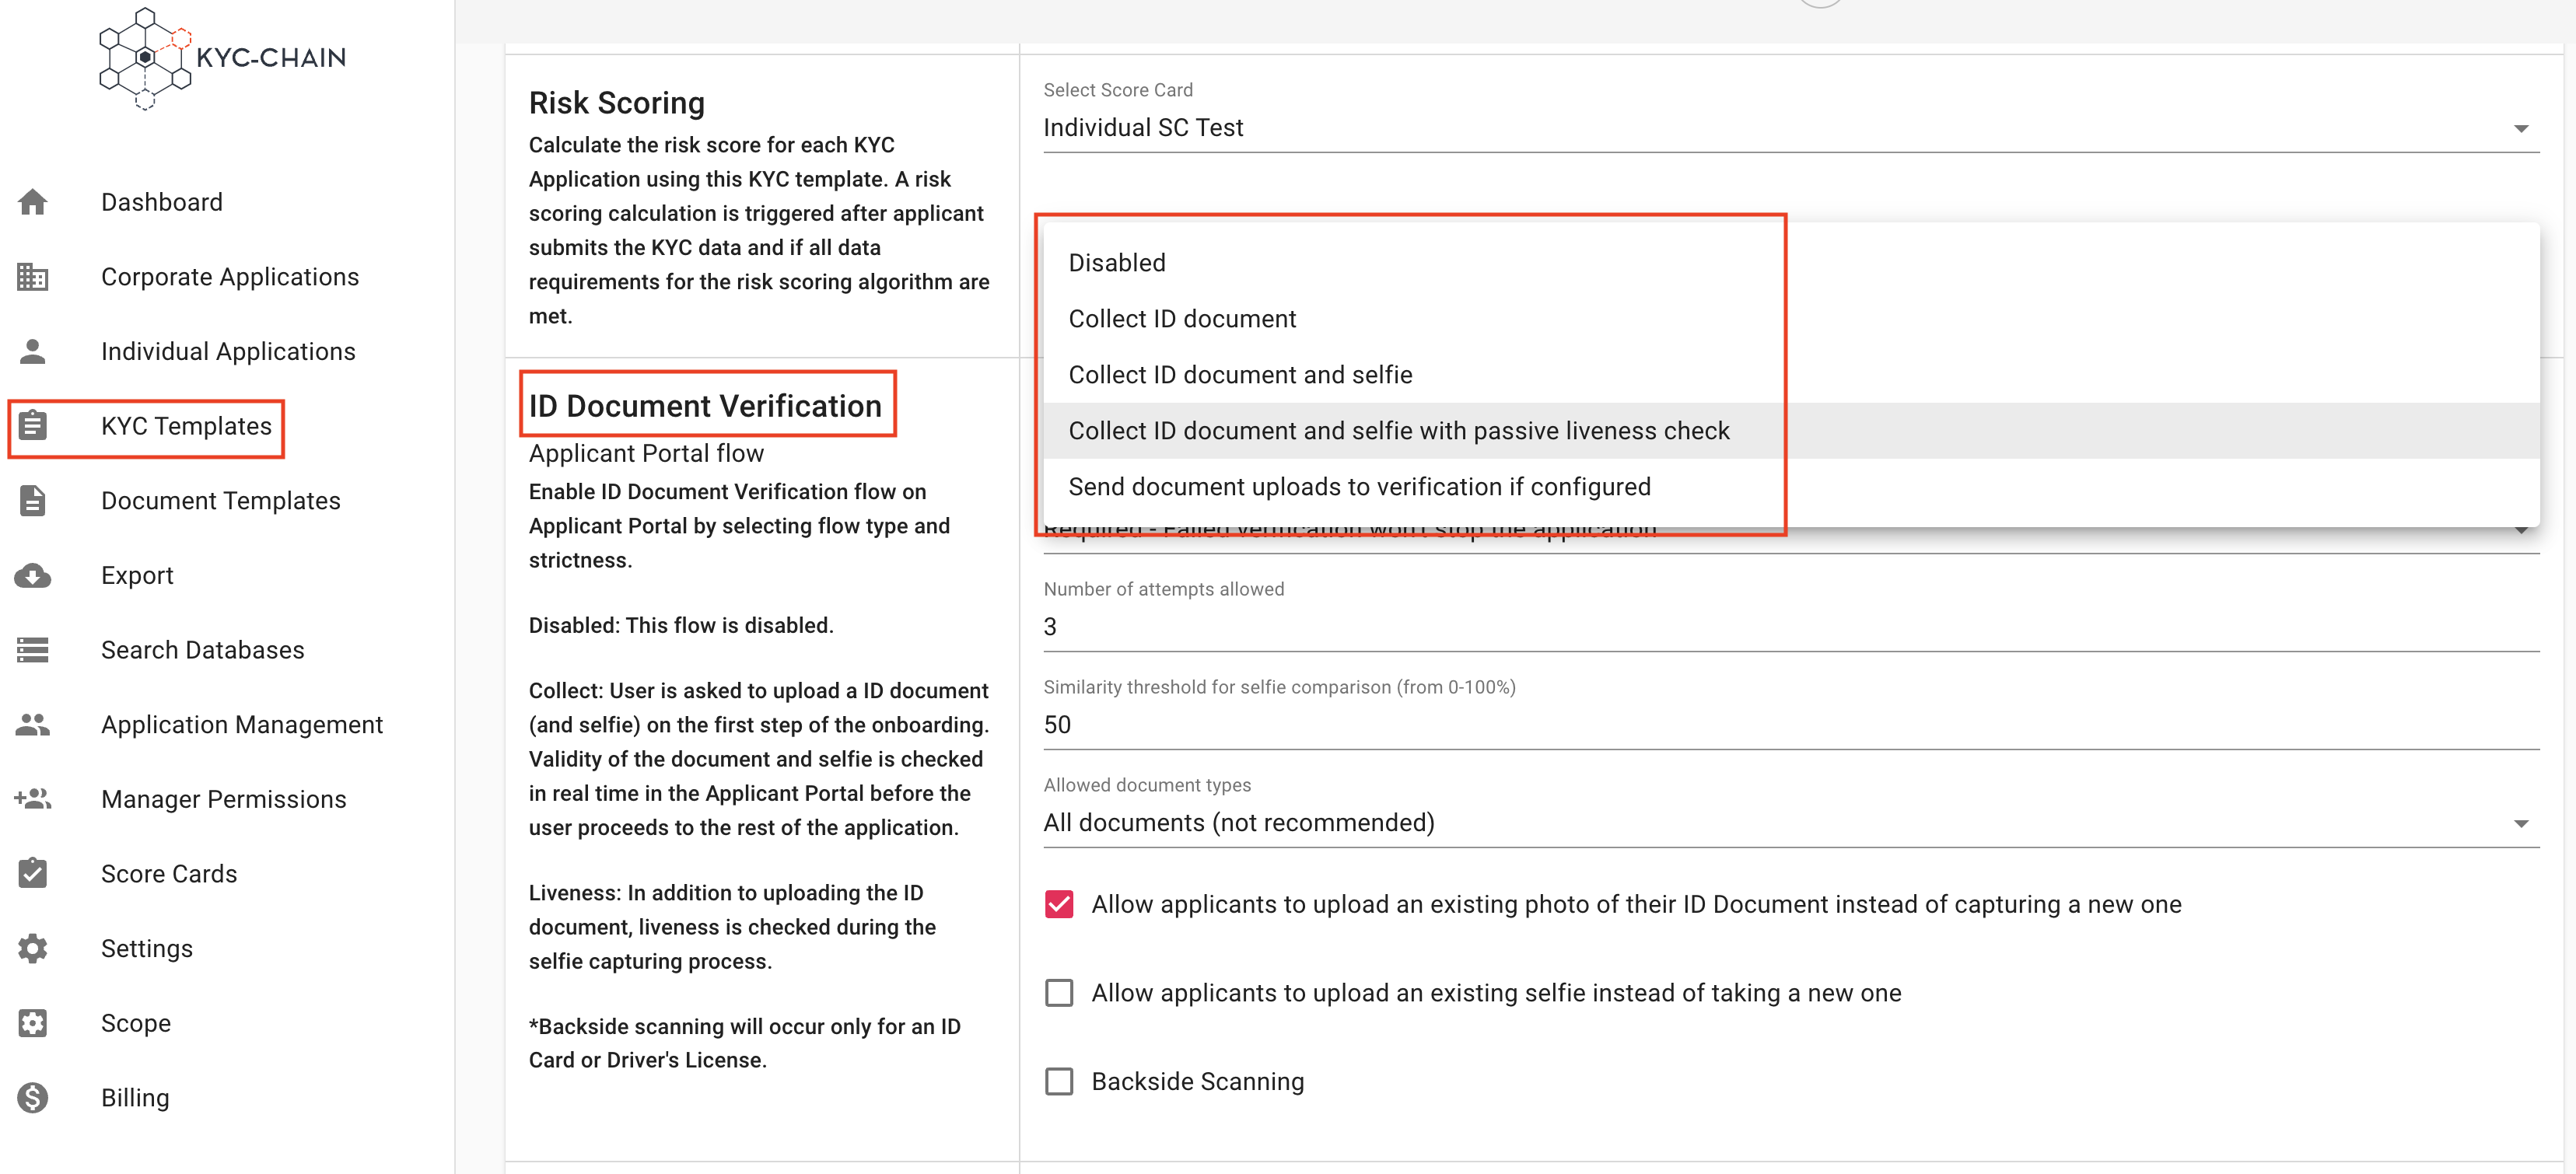
Number of attempts allowed can also adjust the number of tries allowed to successfully capture the client document (and selfie) using the device camera.
Similarity Threshold for selfie comparison (from 0-100%) will set the minimum comparison threshold by which the system will reject or accept the selfie when compared to the original ID document (50% is the standard).
Allow Document Types determines which types of documents and jurisdictions/geographic areas are allowable as official identification.
- Fully Supported Documents (Recommended) - The system will only accept ID documents that it can fully verify.
- Fully and Partially Supported Documents - The system will also allow for some document types that it can partially analyze and verify.
- All Documents (Not Recommended) - The system will accept any ID document as ID verification, even those that the system is unable to fully verify for authenticity.
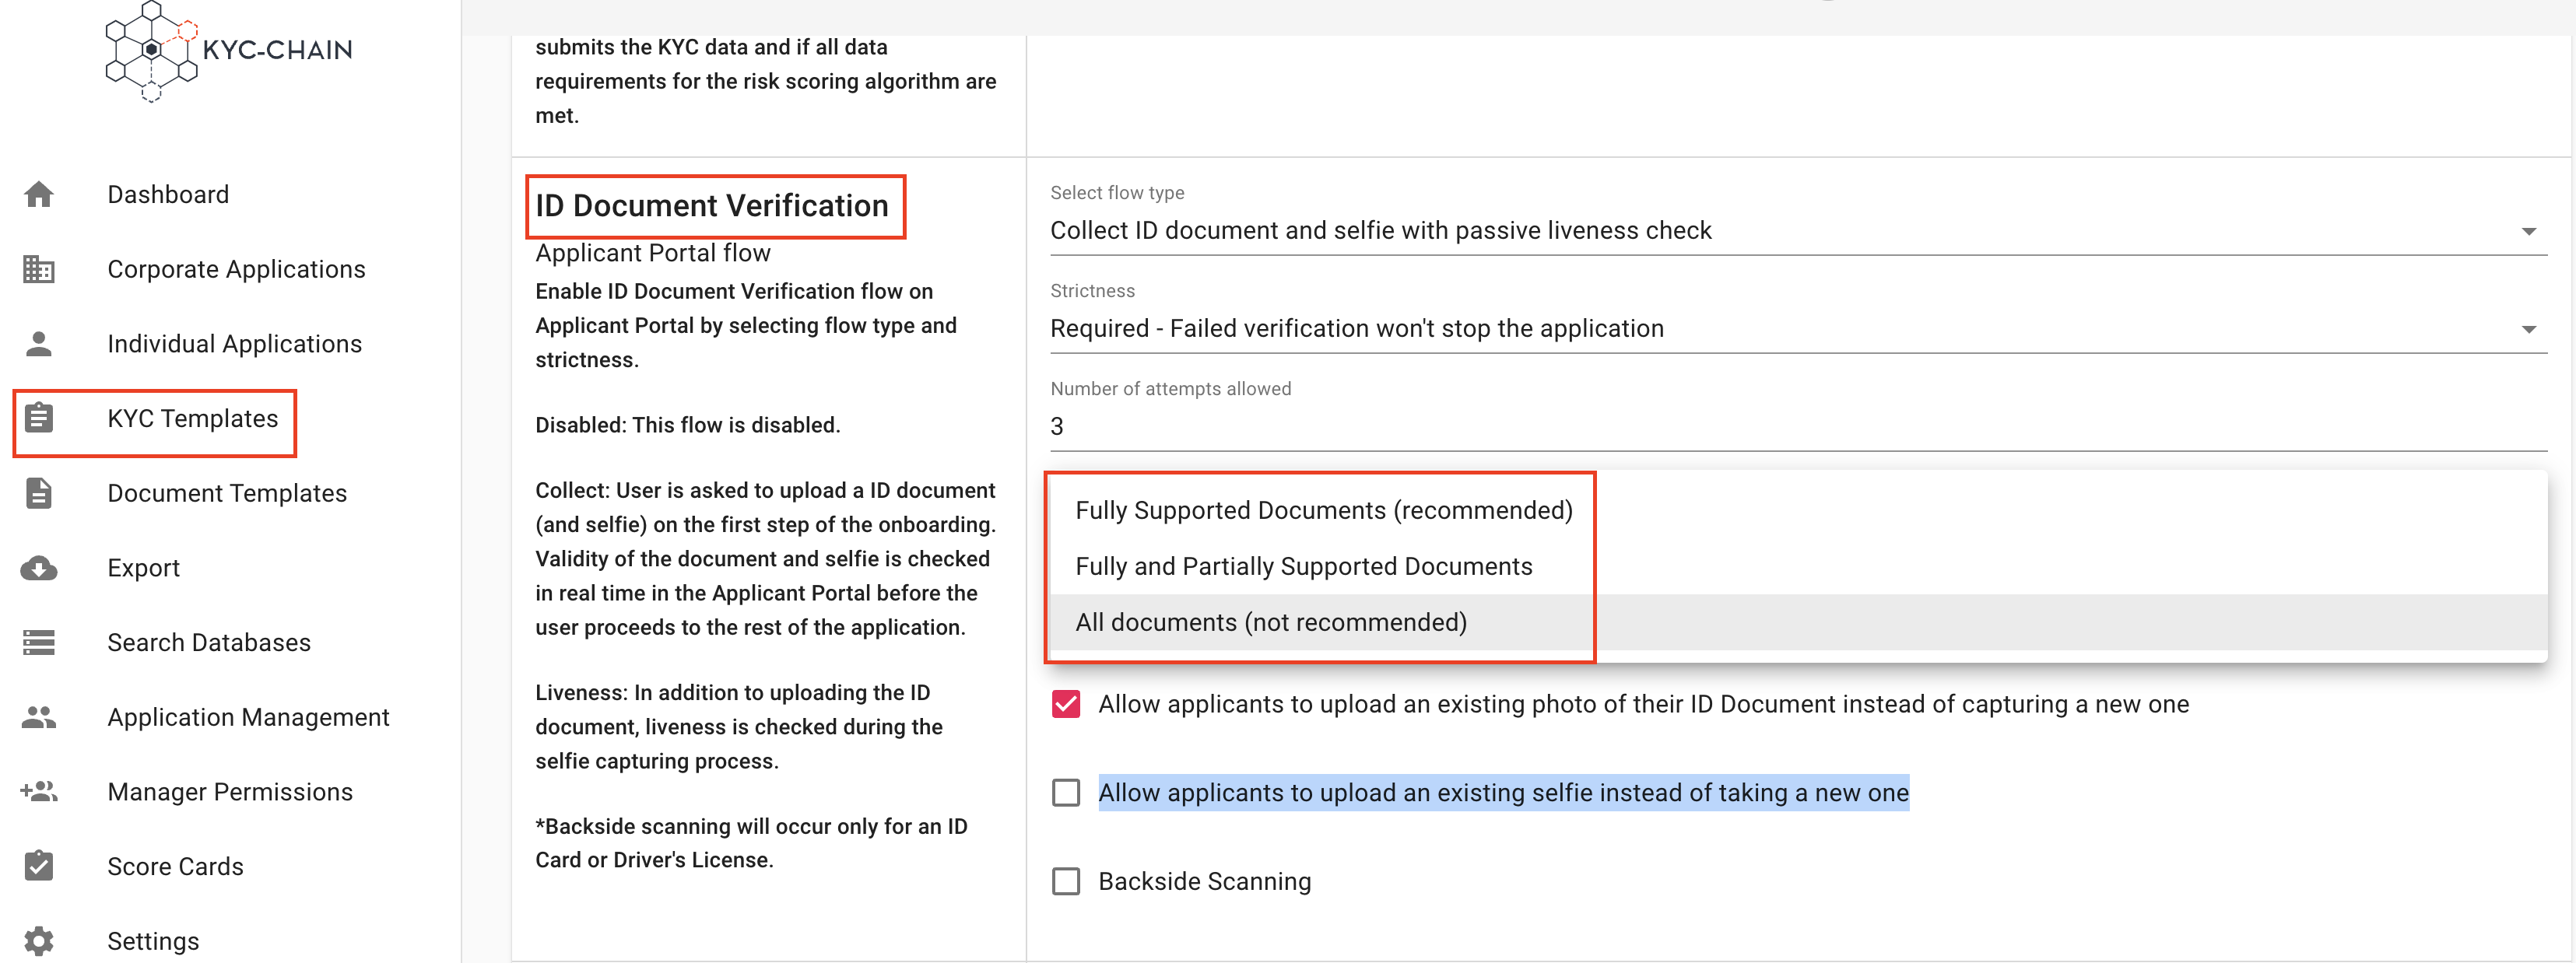
Options:
- Allow applicants to upload an existing photo of their ID Document instead of capturing a new one
- Allow applicants to upload an existing selfie instead of taking a new one
- Allow Backside Scanning: The system will also scan the backside of the ID document (for National ID cards and Driver's Licenses)
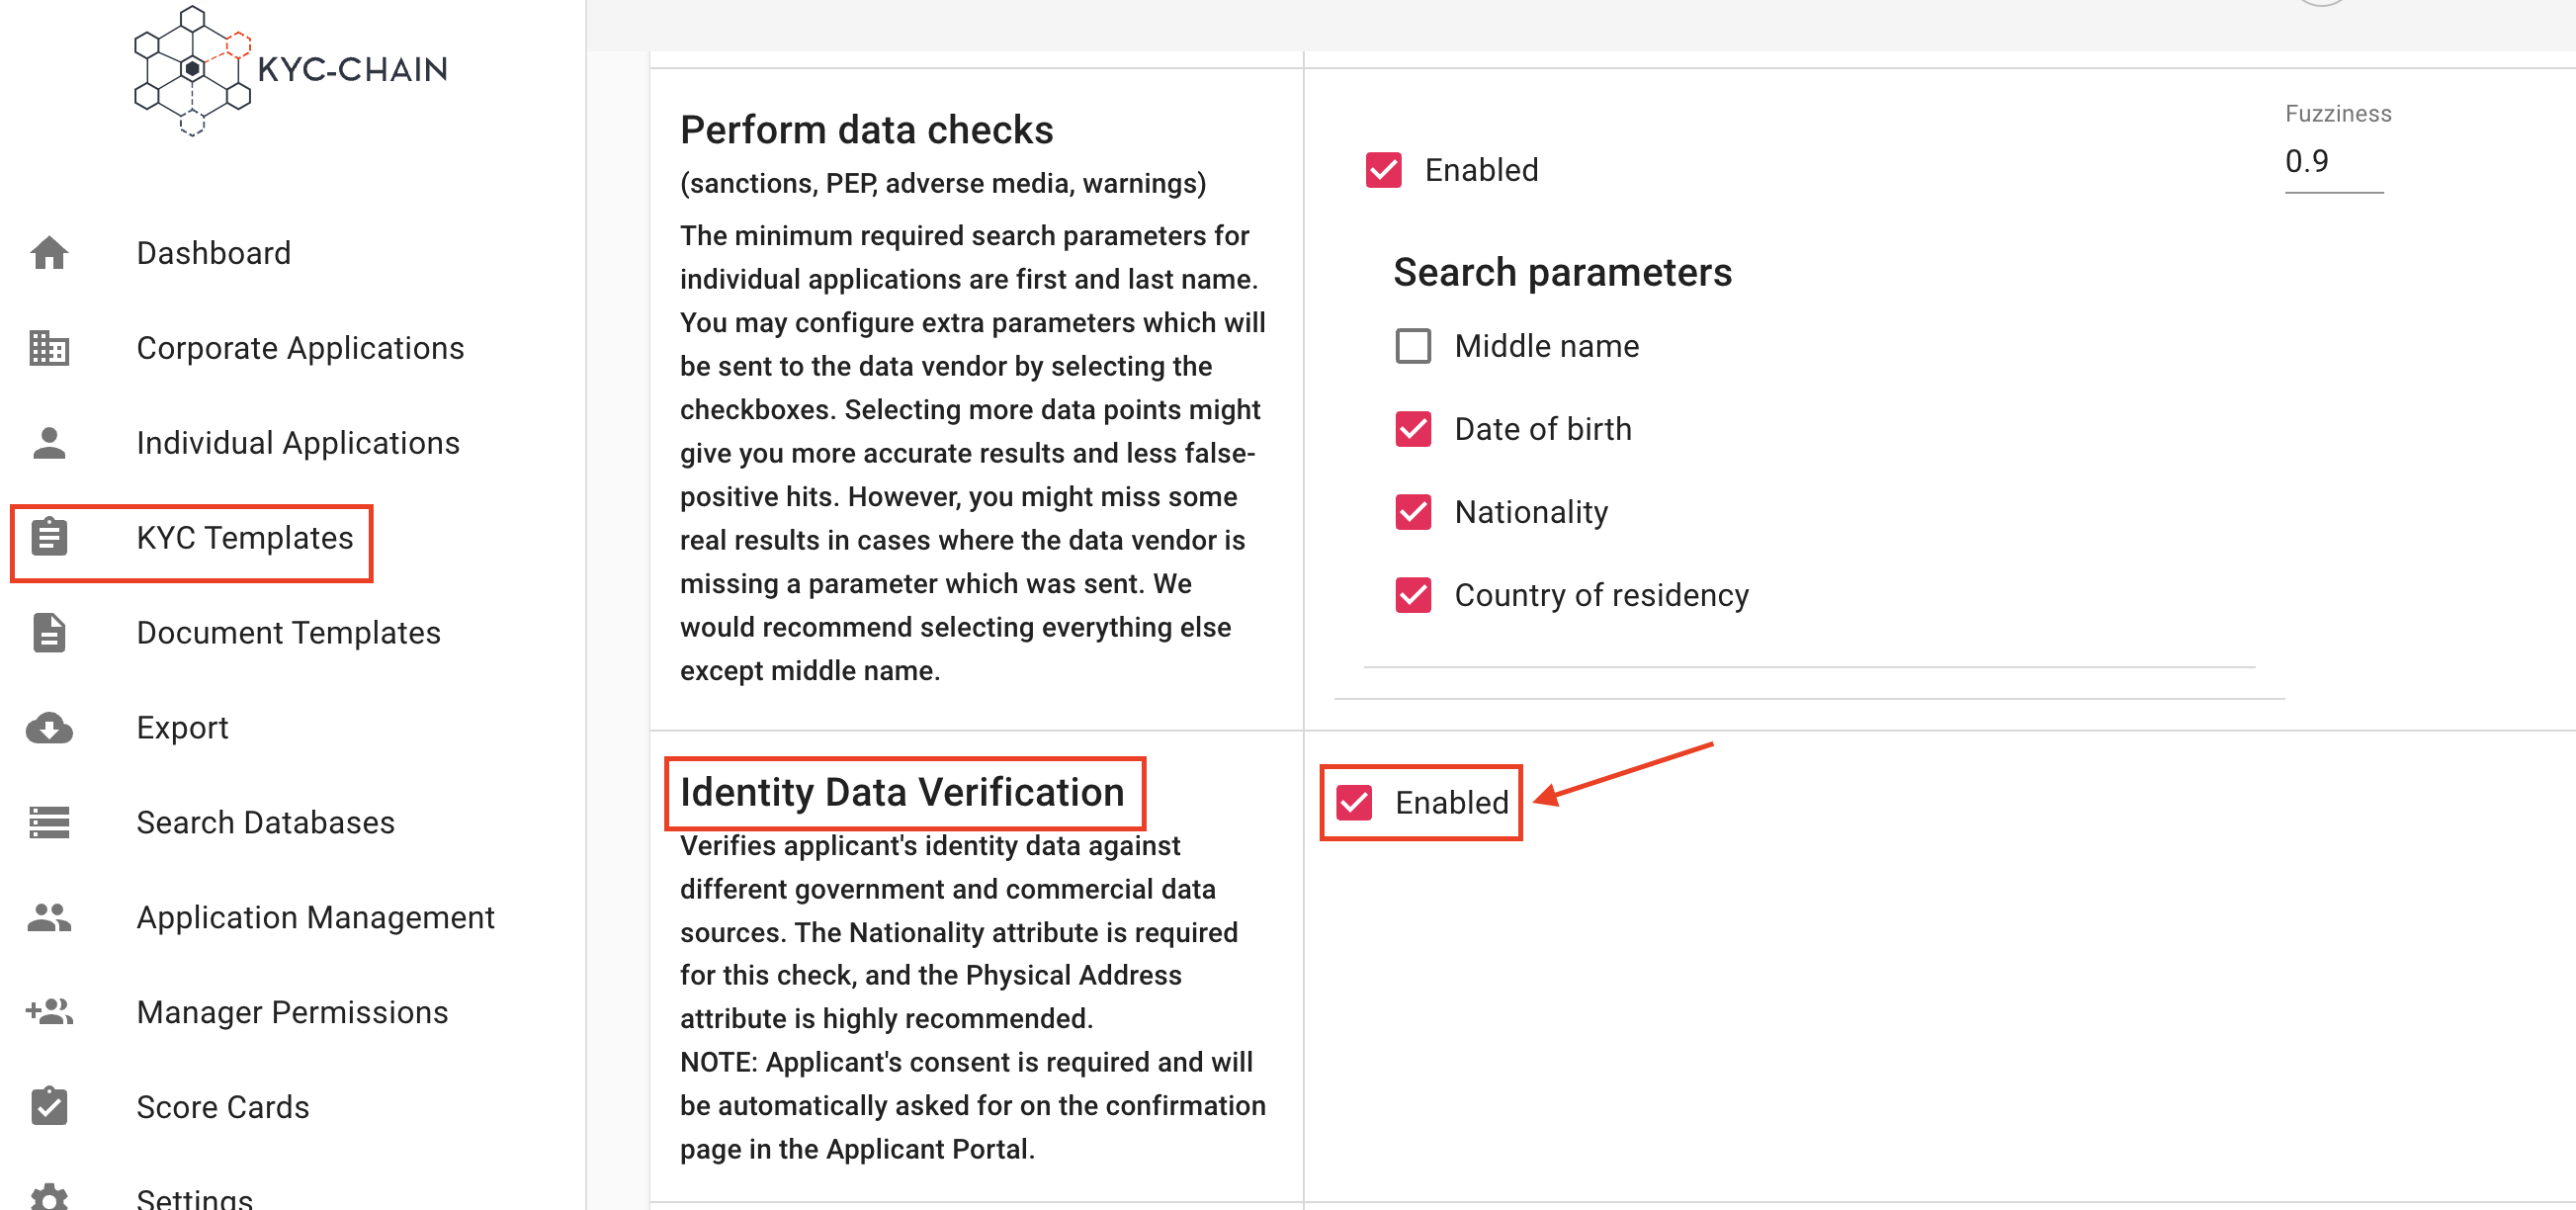
4.9 How To Enable ID Data Verification?
This feature verifies the applicant's identity data against different government and commercial data sources. The following attributes are required: first and last name and national id number. It is also recommended to include the physical address attribute:
- Go to: "KYC Templates"
- Select and Open Template
- Scroll to "Identity Data Verification", and click "enable"
- Save the template

4.10 How To Check ID Data Verification results?
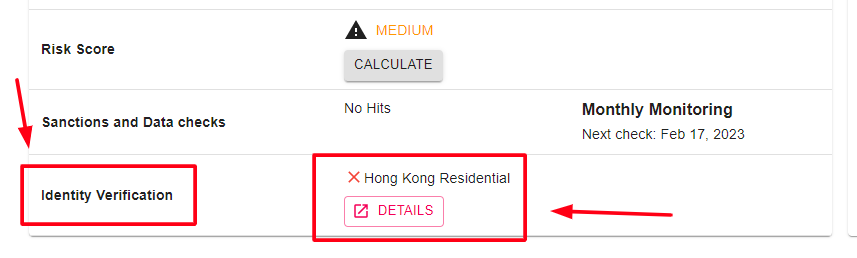
The results will show if the provided name, date of birth and address exist in government databases. The system will also display a match score:
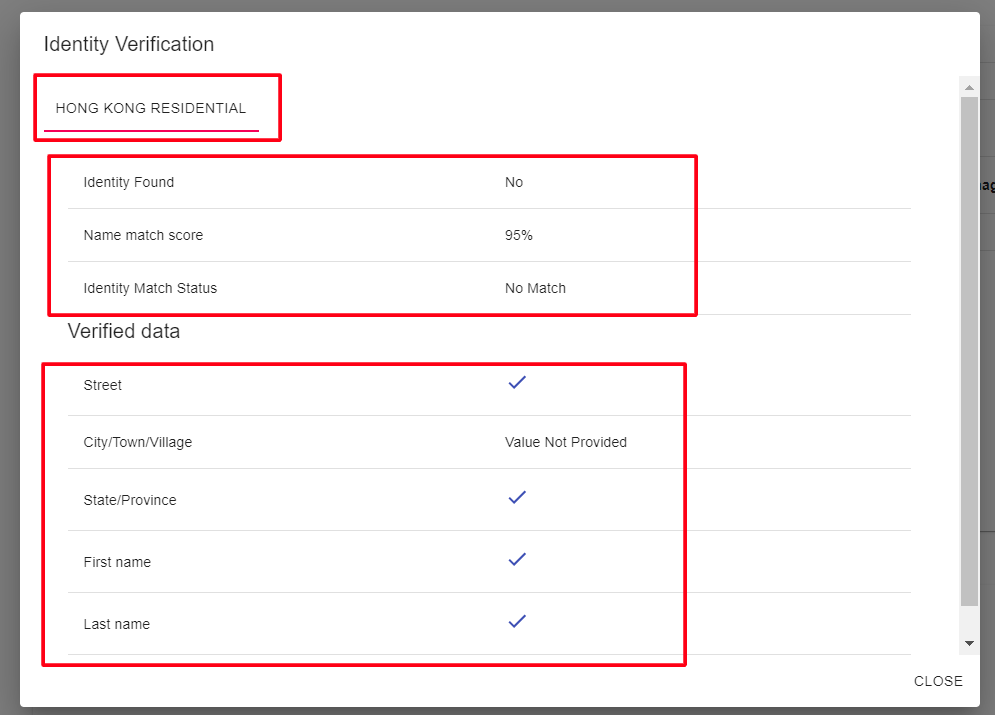
If not enough data was provided, or if the data was not formatted correctly and could not be verified, an error message will explain this to the manager. The data can then be modified, and a new check will be triggered if/when the application is re-submitted.
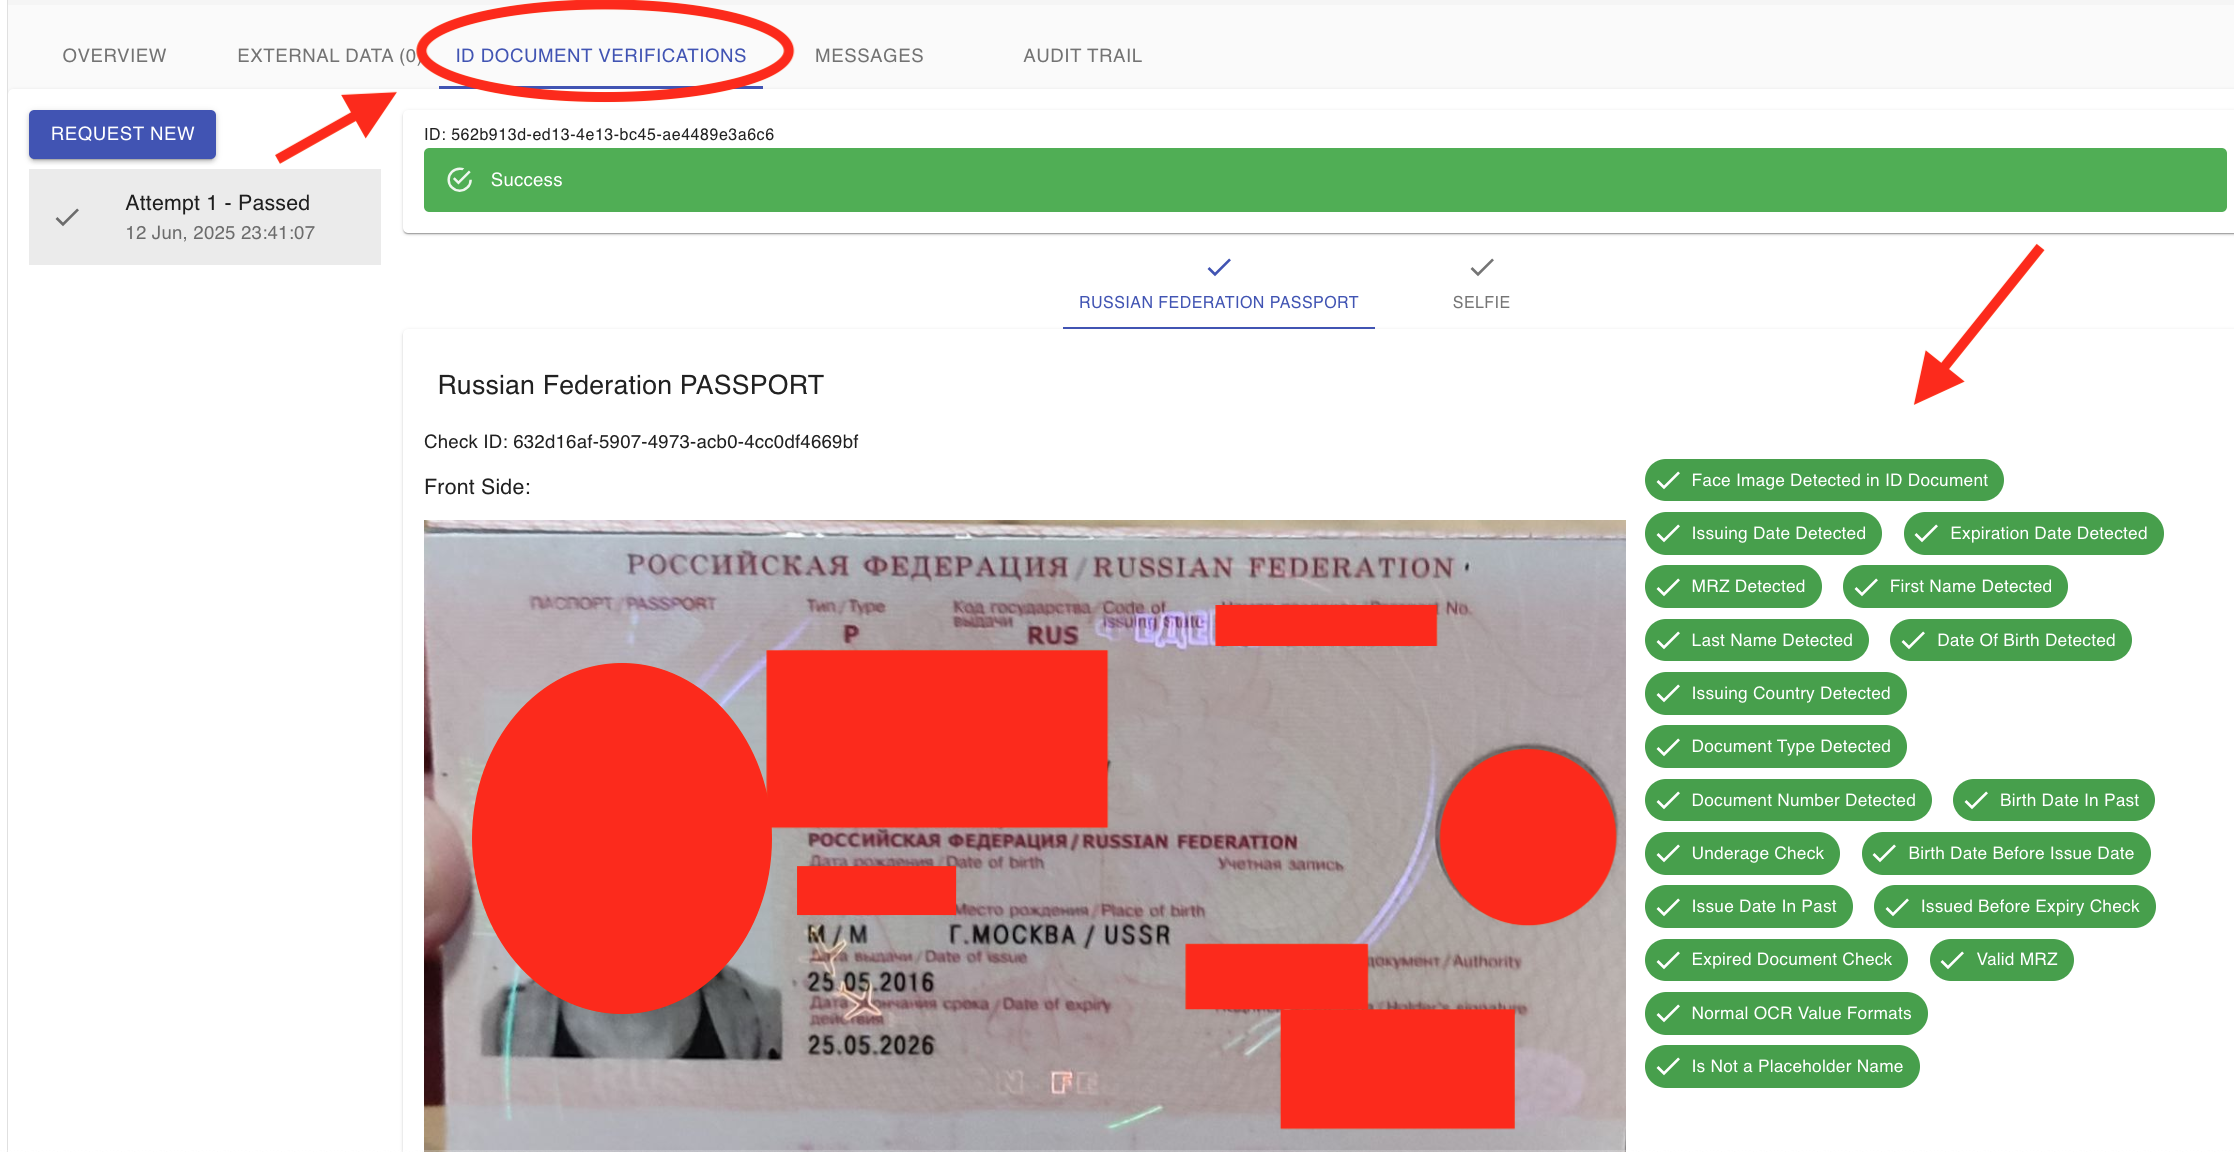
4.11 How To Check ID Document Verification Results?
Management Users can see a validation check of facial biometrics between ID document and photo, as well as extracted data from the document in the ID Document Verification tab.
- Select the Individual Processes tab on the left side menu
- Navigate to a KYC case you want to review
- Open the ID Document Verification tab
If ID document verification or selfie check failed, you can request upload again (screenshot) or the system can request upload again automatically if on the risk scoring card it is set to "Request".
Taking the perfect photo: If you or an applicant of yours is taking a photo of your ID with your smartphone, try to follow these simple tips:
- Capture the entire document, partial images will not be enough.
- Ensure that the entire image is in focus, using a 5+ megapixel mobile camera is ideal.
- Only your ID should be in the image, remove any background clutter.
- Do your best to avoid glare from your flash or lighting.
- Avoid glares, shadows or using flash.
- Ensure capture the data page only, as any other sides or pages will not be used.

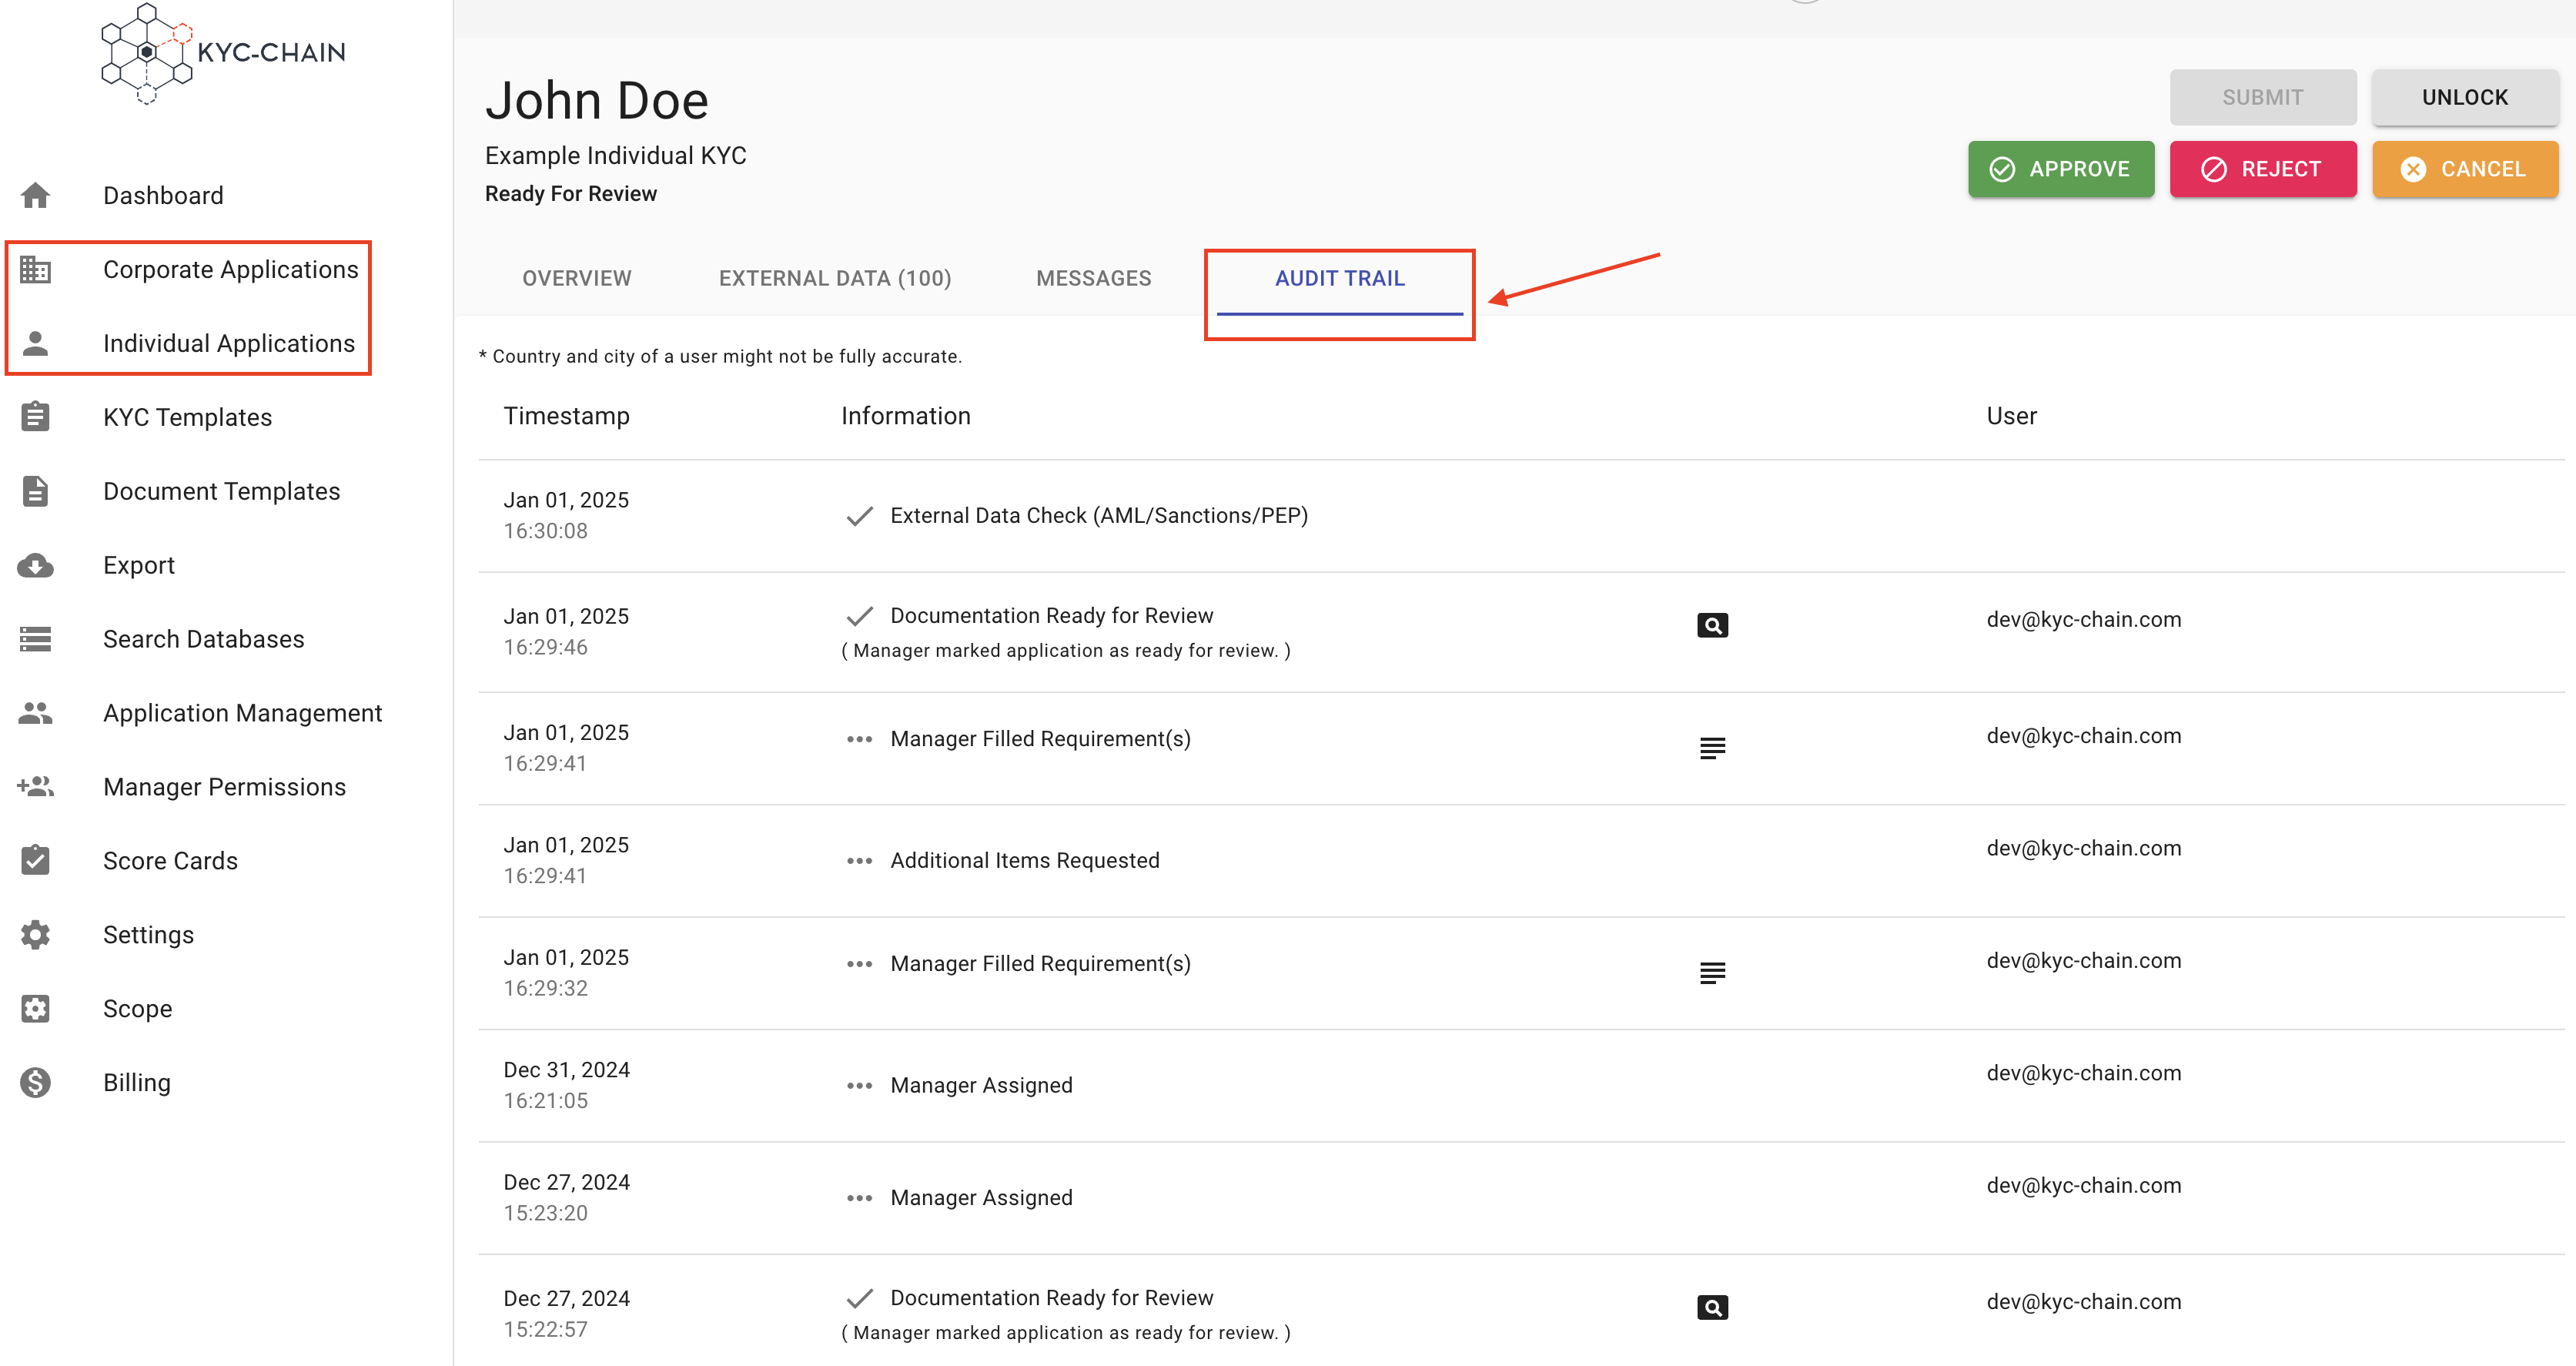
4.12 How To Check The Audit Trail?
The Audit Trail allows managers to view the full status history of an application along with various metaData such as:
- The status of the application.
- The applicant's IP address, Country, City, Browser, and OS.
- Any notes associated with a status.
- Any changes to a specific requirement value, such as the old and new value.
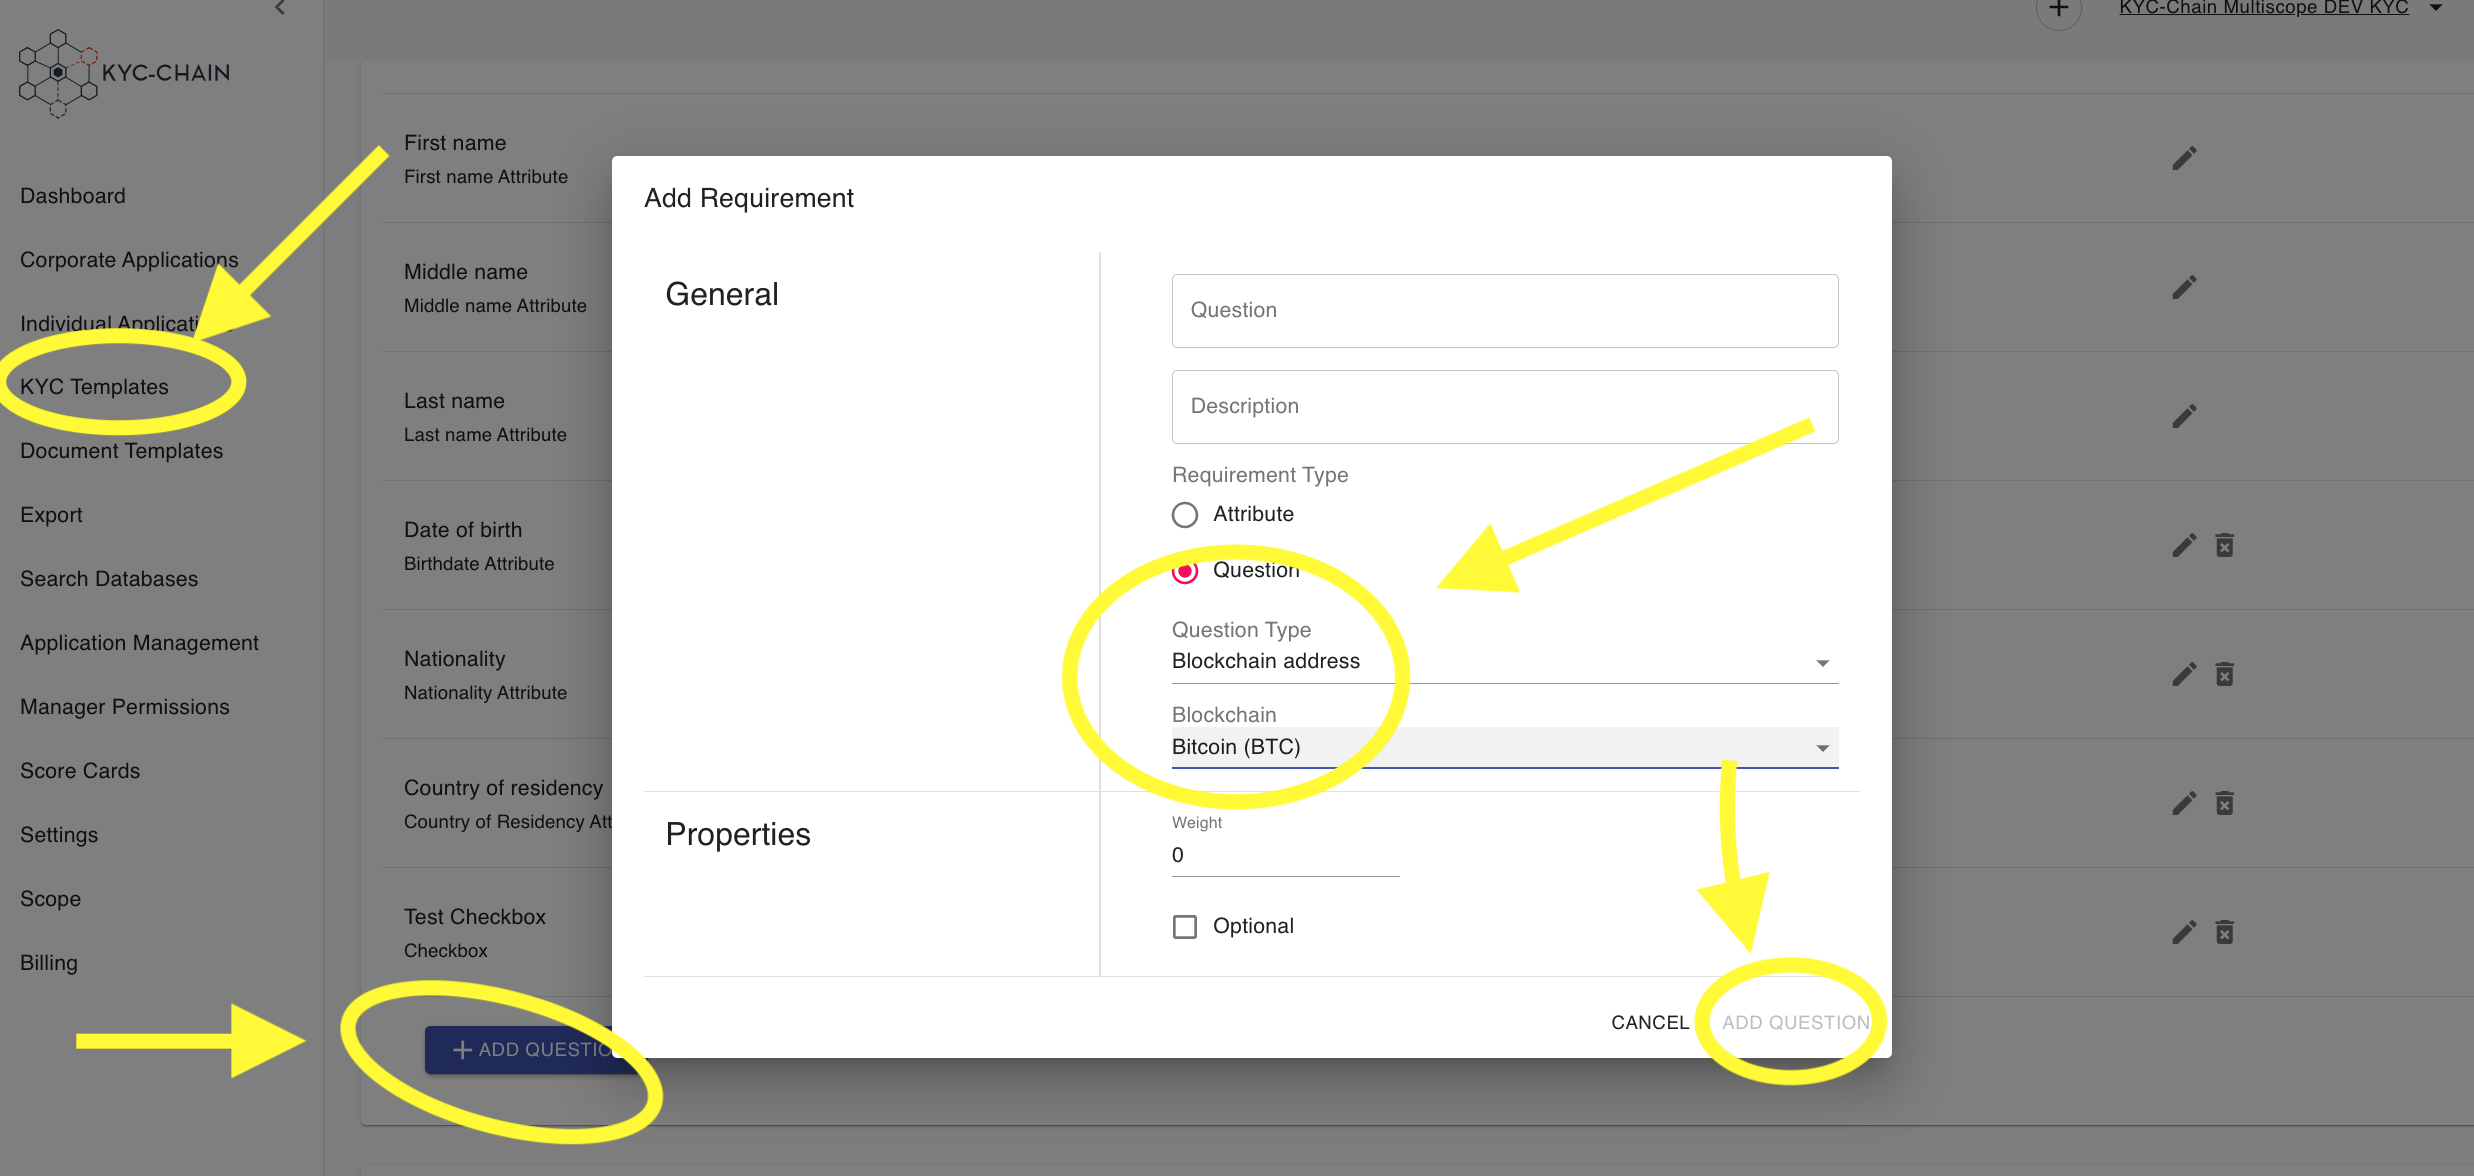
4.13 How To enable wallet screening in the KYC process?
To enable blockchain wallet screening in your KYC process:
- Navigate to the KYC Templates section of the dashboard and select Add Question.
- In the "Add Requirement" dialog: Set the Requirement Type to Question. Choose Blockchain address as the Question Type.
- Select the relevant blockchain (e.g., Bitcoin (BTC)) from the dropdown menu. Save the configuration and ensure it is included in the KYC flow.
When the user submits a blockchain wallet address, the system will validate and screen it against leading blockchain analytics databases to identify potential risks. A comprehensive report will be generated, highlighting any red flags associated with the wallet.
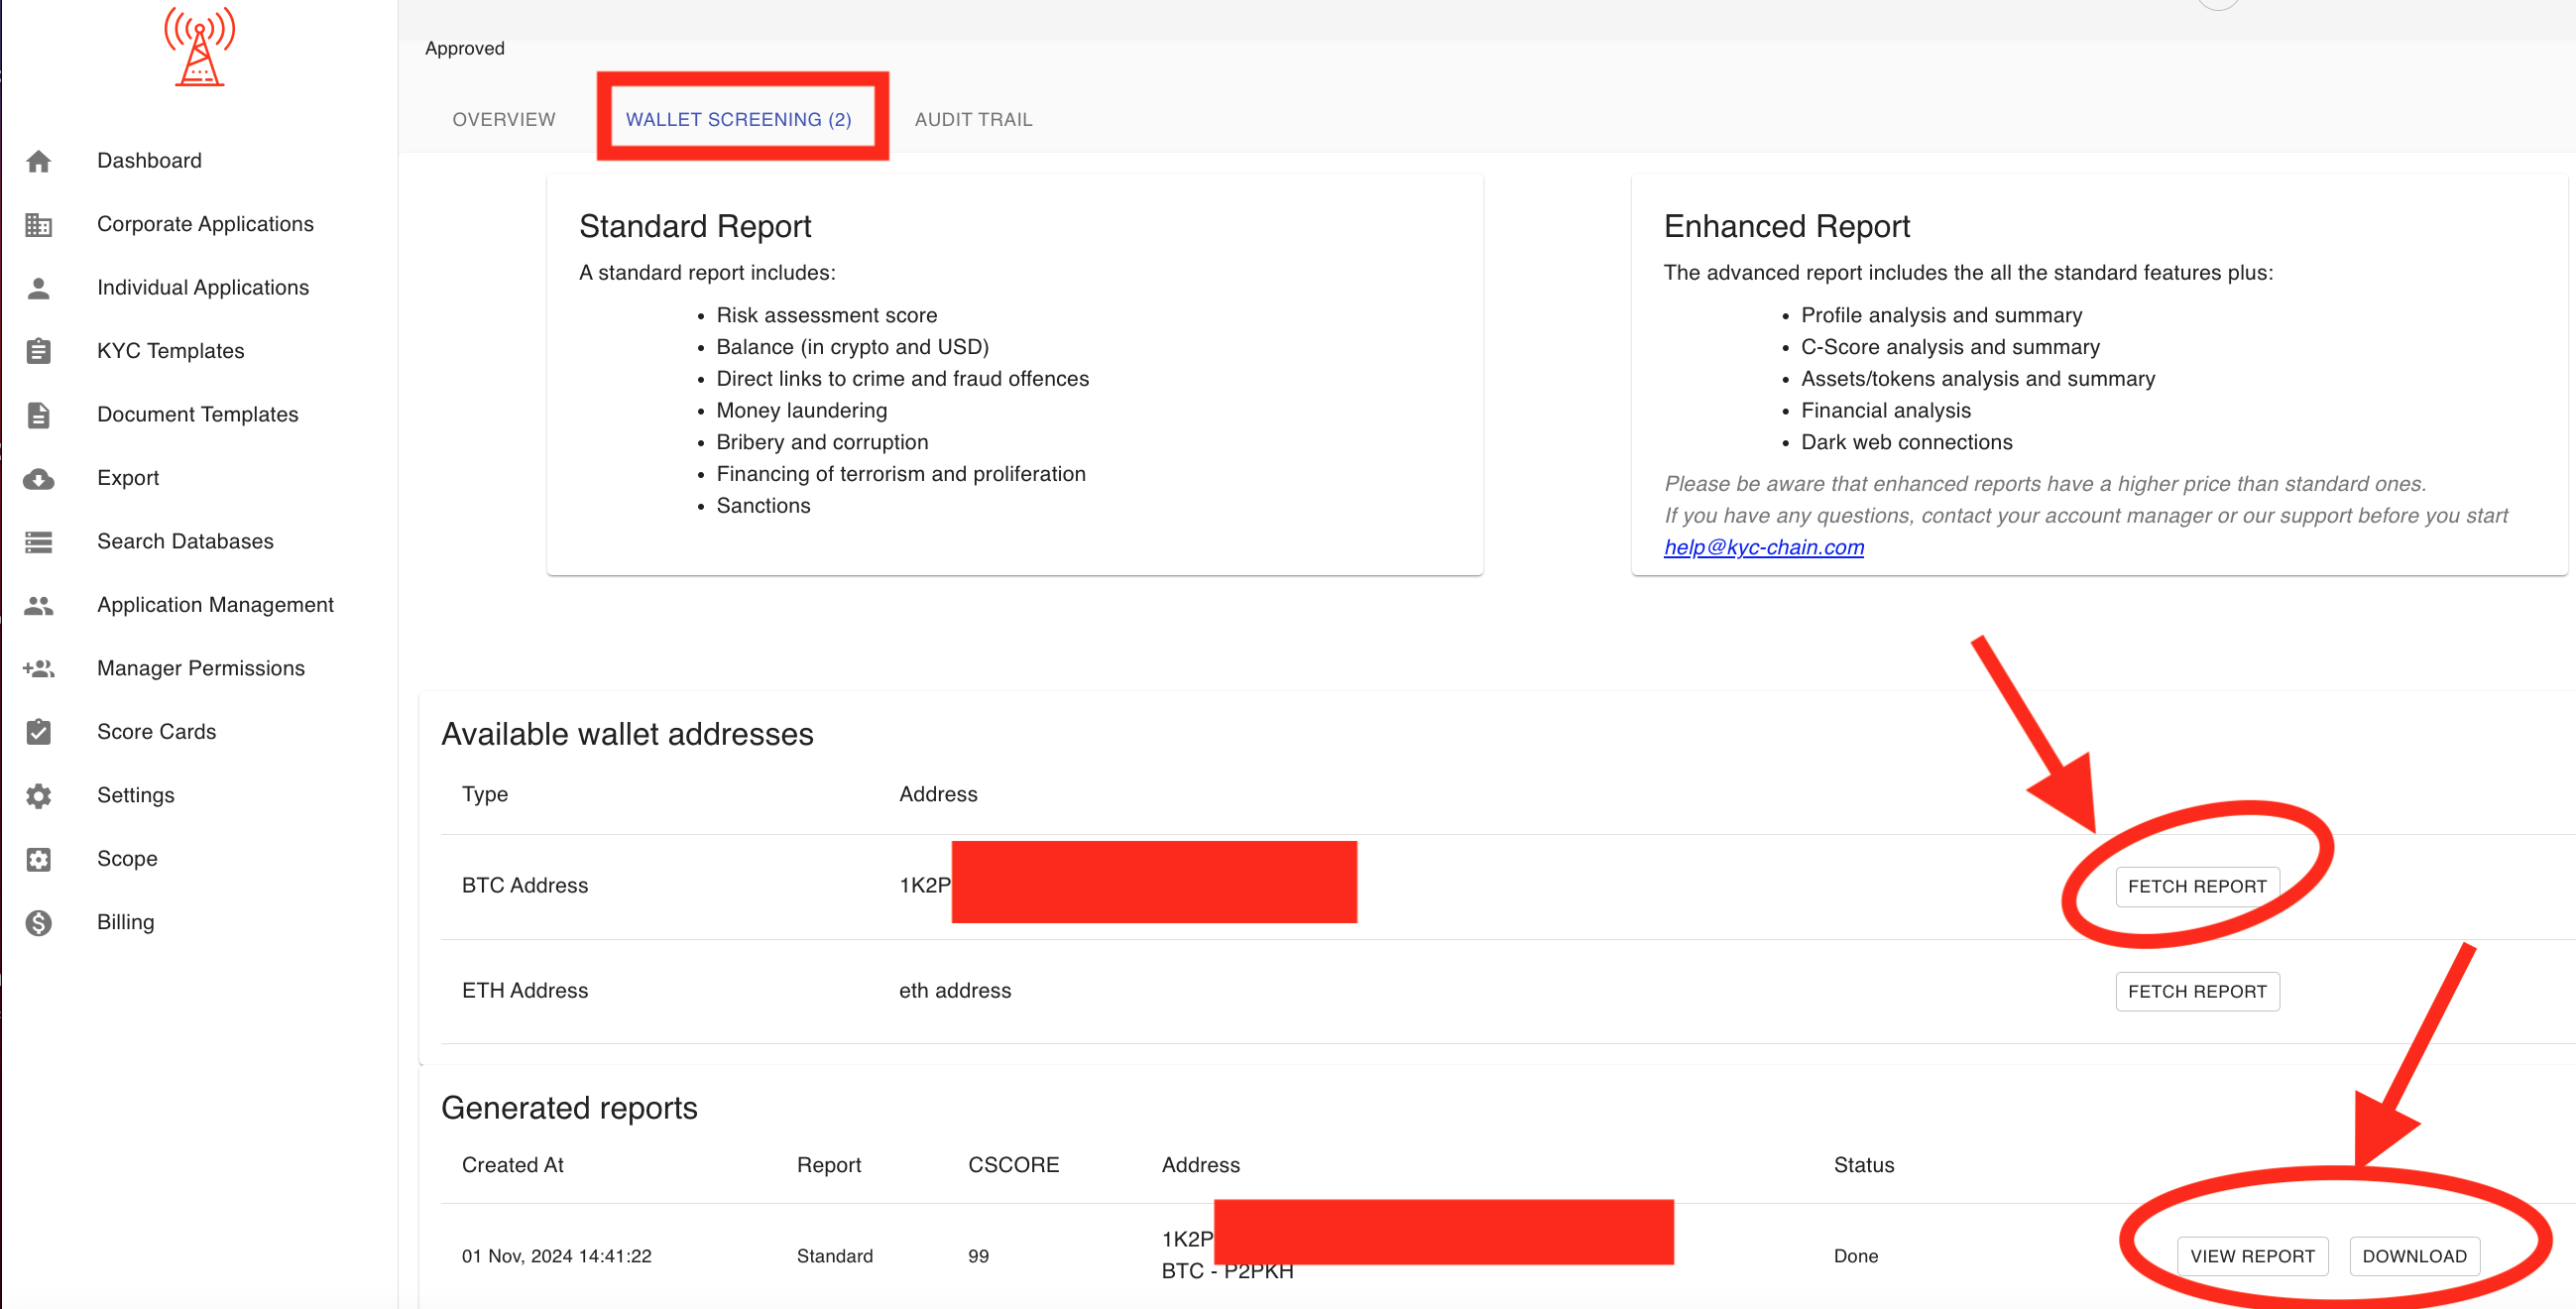
4.13.1 How To Check Crypto Wallet Screening Results?
Our system is able to screen crypto wallet addresses. Management Users can easily review screening results for Bitcoin, Ethereum and Dash wallet addresses and review the following details in the WalletScreening tab:
- Risk score
- Balance
- Records of crime and fraud offenses: money laundering, bribery and corruption, financing of terrorism, and sanctions.
- Navigate to a KYC case you want to review
- Open the Wallet Screening tab
- Check the box next to the address(es) you would like to see a report for, and then click the button to generate either a standard or an enhanced report.
Managers can download the full report as a PDF file by clicking the “Download Report as PDF” button and requesting to generate an updated report by clicking the "Refresh" button.
4.13.2 How To Run a quick wallet check without initiating a KYC process?
- Click Wallet Screening in the left sidebar menu
- Complete the required fields:
- Select "Blockchain" from dropdown
- Enter "Wallet Address"
- Choose "Report Type" (Standard or Enhanced)
- Click SUBMIT SCREENING REQUEST button
That's it! Your wallet screening will be processed according to your selected report type. You can view the results and download the wallet report in the Wallet Screenings section.

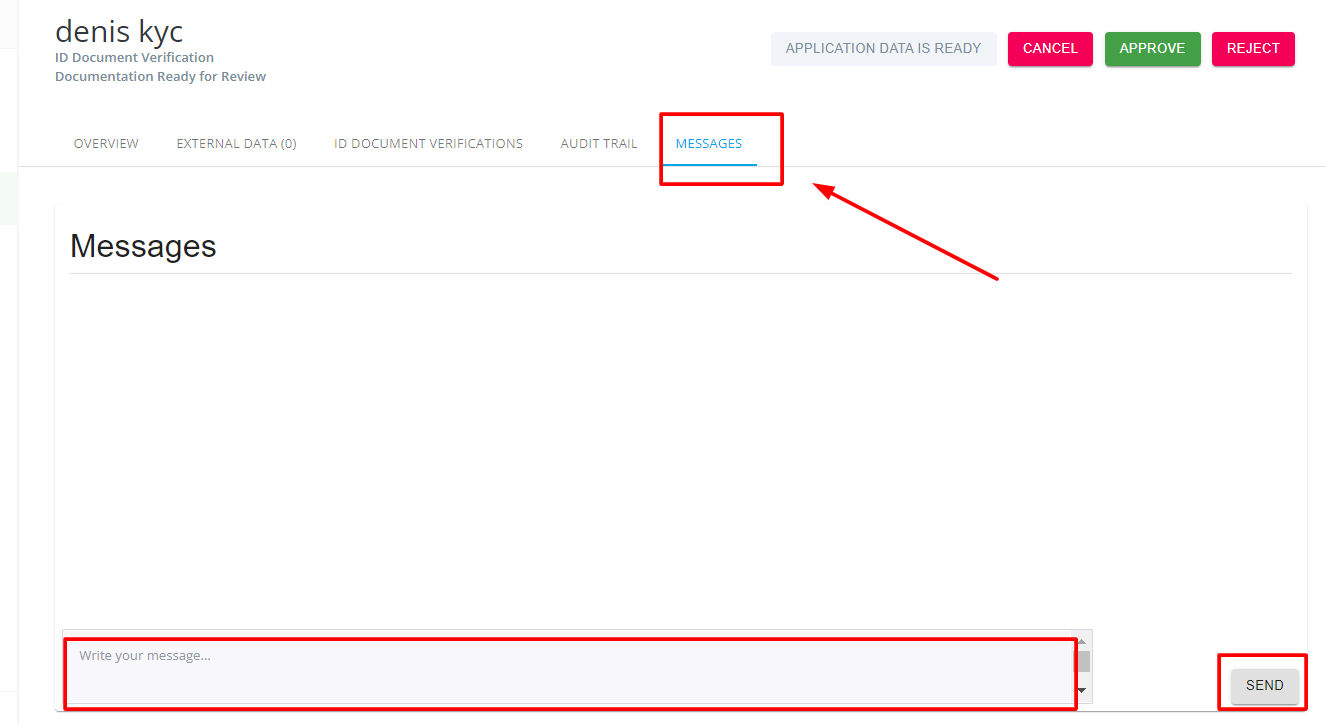
4.14 How To Help Applicants during KYC process?
Managers can exchange messages to help applicants during the KYC process using the MESSAGE box. Please note that this will only work as long as manager is logged into the management app and applicant is on their application.
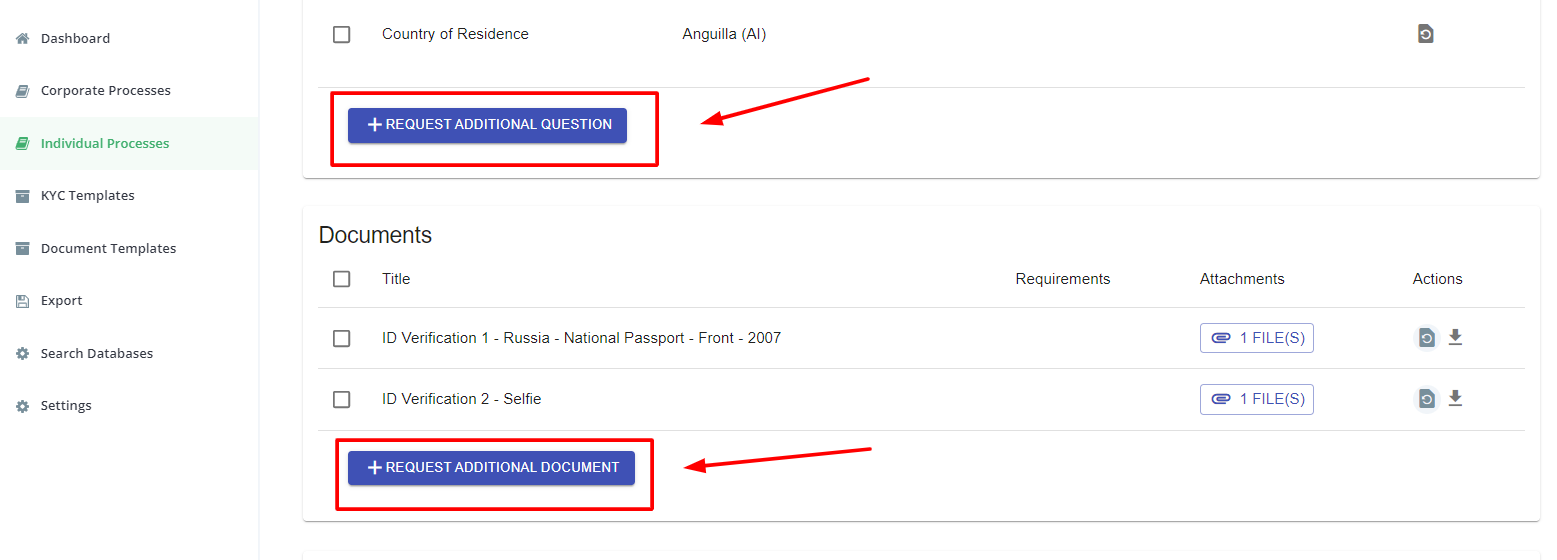
4.15 How To Request Additional Documents or Questions?
Management Users can request additional documents / questions from a user at any point during the KYC application process. This allows for a quick email communication with the user through the KYC-Chain interface. Management Users can add a customized External Note which users will see when they receive the email notification to add additional documents / questions.
- Navigate to a KYC case you want to review.
- Scroll down to the "Documents" or "Questions" section and click on the Request Additional Documents or Request Additional Questions button.
- In the pop-up window that opens, enter the necessary details and click the Save button. Add an External Note which will be included in the email notification to the user.
- The email will be sent to the user asking them to provide the additional details you have requested.
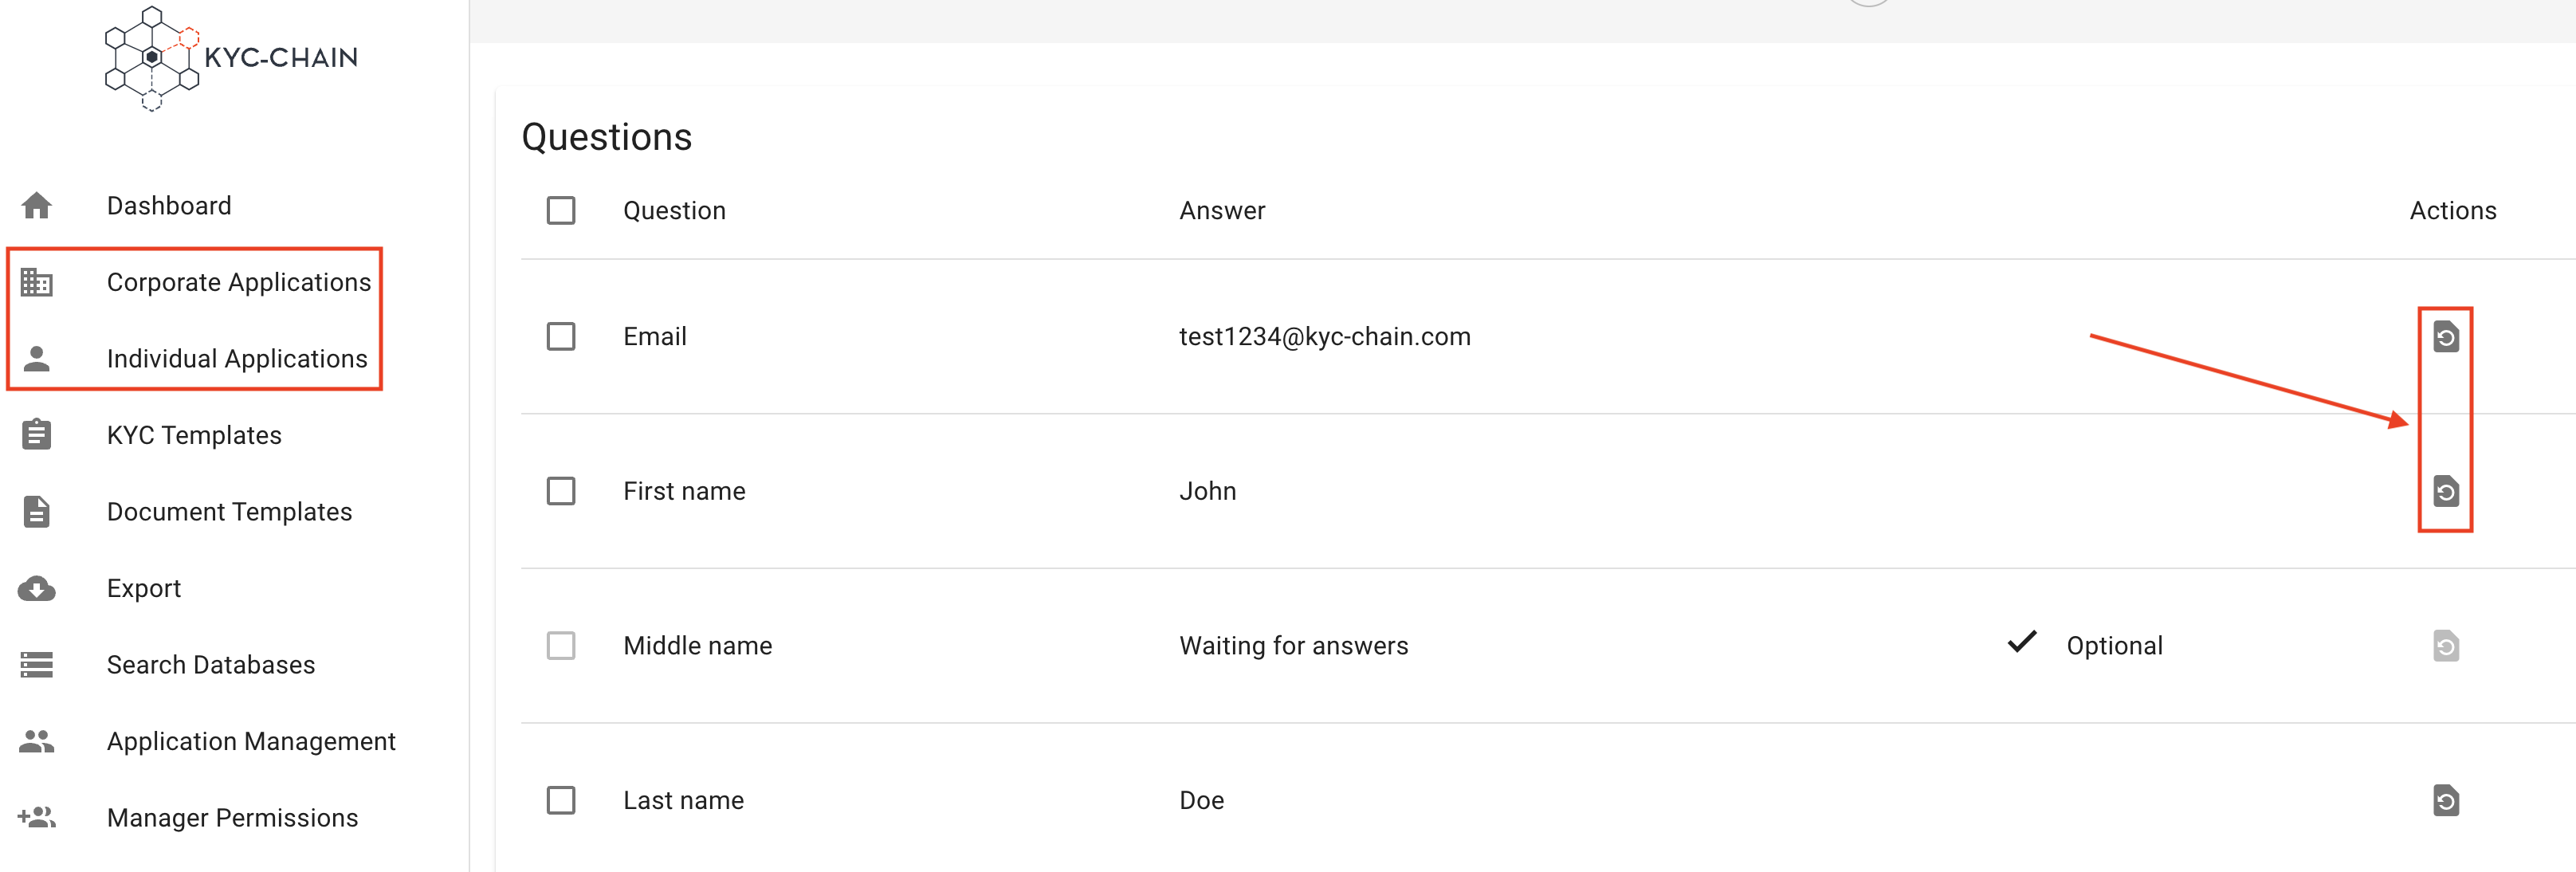
4.16 Request to Re-upload Documents or Answer questions?
Management Users can request a reupload of documents / questions from a user at any point during the KYC application process. This allows for a quick email communication with the user through the KYC-Chain interface.
- Navigate to a KYC case you want to review.
- Scroll down to the "Documents" or "Questions" section.
- Click on the Request Upload Again button (refresh icon on the right side of the screen). If you need to make multiple requests, check the box near the documents/questions, and then click on the "Request Re-upload/answer for (X)" button.
- The email will be sent to the user asking them to re-upload the details you requested.
4.17: Scope Settings:
This section allows app administrators to configure and customize portal settings efficiently. It provides essential options for branding, authentication, integration, and formatting. Administrators can ensure the system aligns with their organization's requirements while maintaining a professional and user-friendly interface for end users.
5: FAQs:
When is the applicant sent email communications by the KYC-Chain software? The applicant will only receive automated email notifications related to their KYC process after one of the following actions is taken:
- When the applicant is invited to start the KYC process
- When the applicant is requested to submit additional details
- When the applicant is requested to re-submit details
- When the KYC process is reviewed by a manager and is approved, rejected or canceled.
- When the applicant has started, but not submitted the KYC process, they will receive a reminder
Please note that if risk scoring is enabled and any Pre-Checks are set to "Request" then the system may automatically request a re-upload of this requirement without any direct input from the manager.
Where can product documentation be found? https://docs.kyc-chain.com/
What steps should be taken if a user cannot access expected features after a permission update?
If this occurs, please open a ticket and provide the user's email address along with the list of permissions that have been updated. This will allow us to investigate the issue on our end.
What are the options for maintaining an account during a temporary decrease or halt in KYC activity?
Please send an email to help@kyc-chain.com and include your project name. Our team will get back to you as soon as possible.
Can customer support modify KYC template settings on my behalf?
Yes, our customer support team can assist you with modifying your KYC template settings. Simply send a request with your project name to help@kyc-chain.com, and our team will be happy to help.
Can the system be deployed on both cloud and physical servers?
KYC-Chain is offered as a managed SaaS (Software as a Service) solution and is deployed on the cloud servers.
Where can I find documentation, demo videos, or a demo environment for the system?
You can consult our application documentation via the following link: https://docs.kyc-chain.com/
Why are applications not appearing on the main dashboard view, and where can all open applications be found?
Applications may not appear due to:
Misconfigured filters – The "All cases" filter may exclude in-progress applications, or "Review Status" filters hide open cases.
How can I view all open applications in the system? All open applications can be easily filtered and viewed directly from the dashboard:
-
Using the Status Filters
- Locate the "Review Status" column in the KYC Applications table
- Filter for:
- "Ready for Review"
- "In Progress"
- "Open"
-
Quick Access via Sidebar
- Go to: Individual KYC or Corporate KYB Processes → Use the same status filters
The dashboard interface (as shown) is designed to let you quickly filter and access all open applications with just a few clicks. If applications still don't appear, check that no other filters (like Labels or Risk Category) are accidentally hiding them.
What is the optimal process for coordinating a system reset and switch-over to production?
"Key Considerations and Steps for Moving from Test to Production in KYC-Chain:
Key Considerations:
- Data Isolation: Keep test and real applicant data completely separate.
- Configuration Review: Double-check all production settings, KYC templates, integrations, and notifications.
- Integration Updates: Use production API keys and endpoints for all external services.
- User Access: Grant live system access only to authorized personnel.
- Compliance: Ensure all regulatory and data retention settings are correct.
Steps to Go Live:
- Request Production Access: Switching to live mode requires action from the support team. Contact support to enable live mode for your instance.
- Finalize Settings: Confirm all templates, branding, and user permissions are set up as needed for production.
- Update Integrations: Swap test credentials for live ones and update webhooks.
- Test in Production: Run a few internal test applications to confirm workflows.
- Go Live: Invite real applicants and monitor for any issues.
It is also recommended to document differences between test and production setups for your team.
What automatic screenings are performed for companies and their members upon application submission?
Upon application submission, the system automatically performs sanctions checks, adverse media checks, and PEP (Politically Exposed Persons) checks for companies. It also accesses business registration information from official company registry databases.
For members of corporations (such as directors, UBOs, and shareholders), the system automatically runs sanctions screening, adverse media checks, and PEP checks. If configured, ID document verification, ID data verification, selfie checks, including a passive liveness check, are also triggered.
What are the available methods for accessing or printing reports?
To generate a comprehensive PDF report of all screening results:
-
Navigate to your management portal.
-
Click the Generate Report button in the top-right corner.
Note: If the button is unavailable, please contact our Help Desk for assistance.
Are there charges for CA reports or search certificates?
No, CA search certificates are free and available for download upon request.
Can the minimum password length requirement for user accounts be customized?
No, password length requirement cannot be customized.
How does the risk score icon provide information on application issues?
To view detailed information about application issues, click the warning icon ⚠️ for error notifications:
Under what circumstances are automated checks charged?
Automated KYC/AML checks incur charges in these scenarios:
-
Submission Triggers
- Fees apply immediately upon: ✓ Initial application submission ✓ Re-submission after edits
-
Check Types
- Identity Verification (e.g., document authenticity, biometric matching)
- Sanctions/PEP Screening (global watchlist checks)
- Wallet Checks (blochain walet screening)
- Company checks (company registry check)
-
Cost Controls
- Disable auto-processing to: ▶ Manually review applications pre-submission
- View real-time estimates in Billing Dashboard
Example: A failed ID check requiring re-upload = 1 additional charge.
Why are face match verifications failing?
Face match verification compares the applicant's live selfie with the photo in their passport/ID document and fails when:
-
Low Similarity Score
- The system detects insufficient facial match between the selfie and the ID photo.
-
Unprocessable ID Photo
- The passport/ID photo is: • Blurry, low-resolution, or obscured • Affected by glare, shadows, or poor lighting • Digitally altered or damaged
For successful face matching:
| Selfie Tips | Passport/ID Photo Tips |
|---|---|
| • Face centered with neutral expression | • Ensure the ID photo is fully visible |
| • Even lighting without shadows | • Avoid reflections on the photo area |
| • No hats/masks/obscuring objects | • Capture the data page flat and in focus |
Does exiting or refreshing the page remove an application from the risk score calculation queue?
No. Exiting or refreshing the page does not remove an application from the risk calculation queue because risk scoring is only triggered upon formal submission of a completed application.
Key details:
-
Draft applications
- Incomplete applications (not submitted) are saved but never enter the risk scoring queue.
- Refreshing/exiting preserves draft data based on your session settings, but does not trigger processing.
-
Submitted applications
- Once fully submitted with all required information, risk scoring is initiated immediately.
- This process is server-side and irreversible – page actions won’t affect already-queued submissions.
-
System integrity
- Risk scoring depends on locked, post-submission data snapshots.
- Partial/interim data is never scored to ensure accuracy and compliance.
Example: If you refresh during form entry, your application remains saved. Only after clicking "Submit" would the system queue it for scoring – and that queue persists regardless of browser activity.
What is the timeline for the platform's full launch or feature availability?
Thank you for your question. In order to provide an accurate response, could you please specify which platform or feature you are referring to? Once we have more details, we will be happy to share the relevant timeline or update.
Can a shared email address be used for account management or notifications?
Yes, shared email address can be used for accessing the account or receiving notifications.
Where can I find information about API integration and its technical requirements?
All API information and documentation is available at: https://apidocs.kyc-chain.com/#/
To obtain login credentials for accessing the API documentation, please submit a support ticket.
Is the platform compatible with cloud hosting platforms other than AWS, such as Digital Ocean?
No, our platform is compatible with AWS, Google Cloud and Minio.
Are additional credits required to generate a PDF wallet screening report?
Generating a PDF report does not incur additional credit charges. Please just be aware that Enhanced reports are priced slightly higher than Standard reports.
What should I do if document uploads are taking an unusually long time or appear unresponsive?
If your internet connection is stable and your upload speed is sufficient, please open a support ticket including your project name and any relevant details. This will help our team troubleshoot the issue effectively and provide prompt assistance.
How can I ensure that attachments or linked documents are properly displayed and accessible on the welcome page?
To ensure that links and documents are displayed correctly, run a quick test by inviting yourself to complete the KYC process. If anything appears incorrectly, you can edit the document template or open a support ticket for further assistance.
How can I access the public-facing portal?
The Customer/Applicant Portal is available at your unique instance URL: https://your-scope-name.app.kyc-chain.com
(Replace your-scope-name with your designated project identifier)
How do I configure a question as optional in a template?
"To configure a question as optional in a template:
- Go to the KYC Templates tab.
- Select the template you wish to edit and click the View & Modify button.
- When adding or editing a question, locate the ""Optional"" checkbox.
- Check this box if you want the applicant to be able to skip the question.
- Click the Save button."
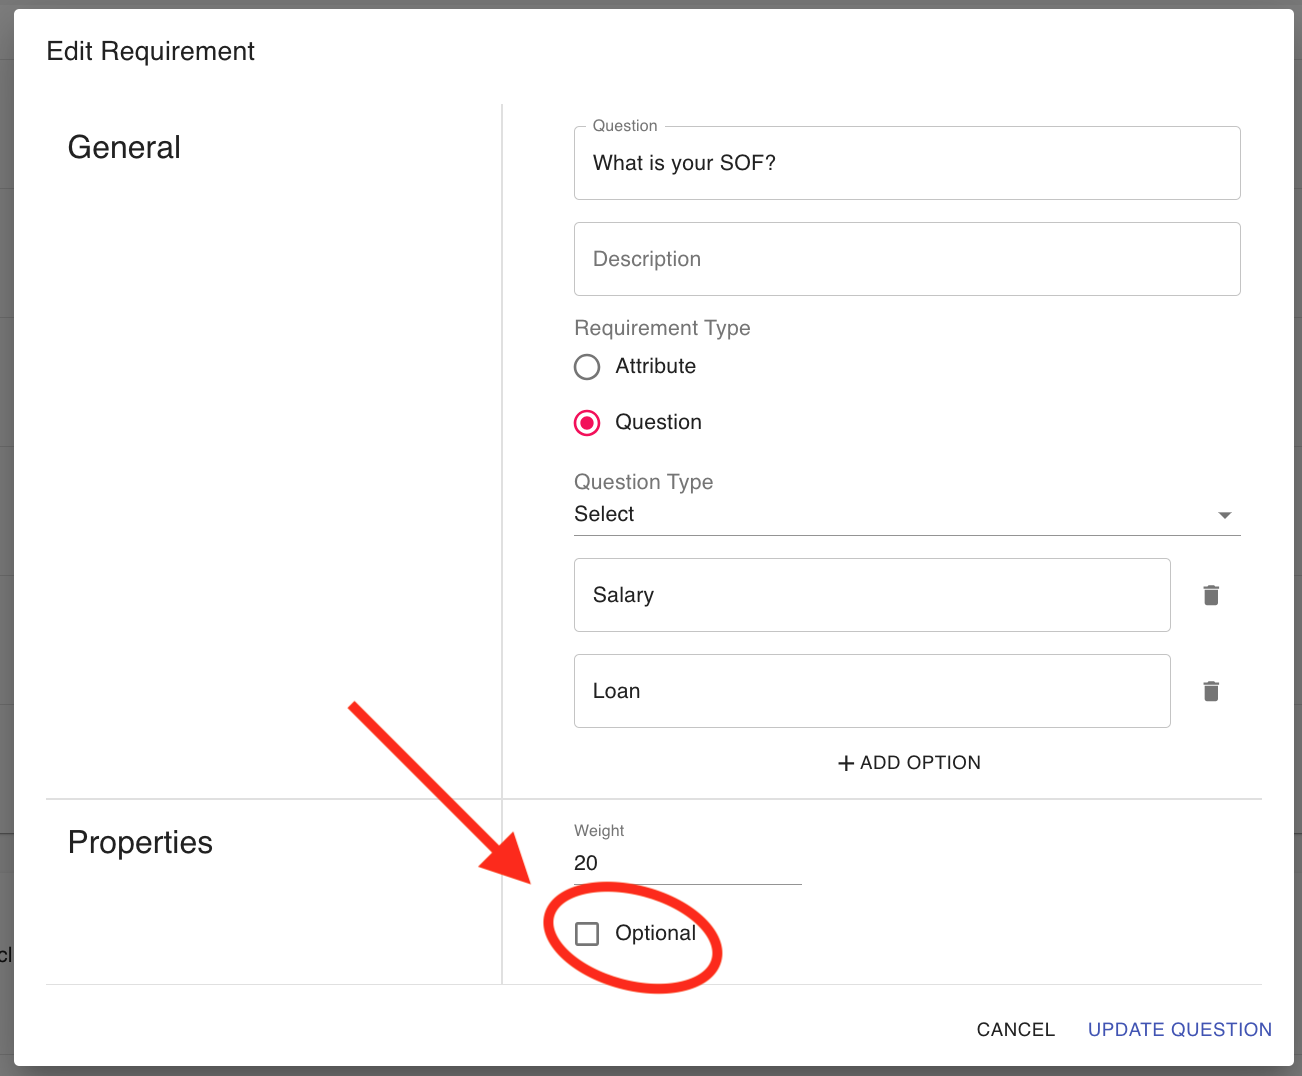
How long do feature customization requests typically take to implement?
Customization timelines vary based on complexity, resources, and current development priorities. To provide an accurate estimate, we encourage opening a support ticket so we can evaluate your specific requirements case by case. We'll assess the scope and provide a tailored timeline promptly.
How can I customize the display order of questions within an application?
You can customize the order of questions using ''Weight' parameter.
- Go to KYC Templates
- Select KYC Template you would like to adjust
- Scroll down to find all question and try to edit question
- You will see an option to add ''WEIGHT'' the higher the WEIGHT value the more the quesiton will be moved down the list, so question with WEIGHT 1 will be at the very top of the questionnaire, please refer to the following screenshot for more information:
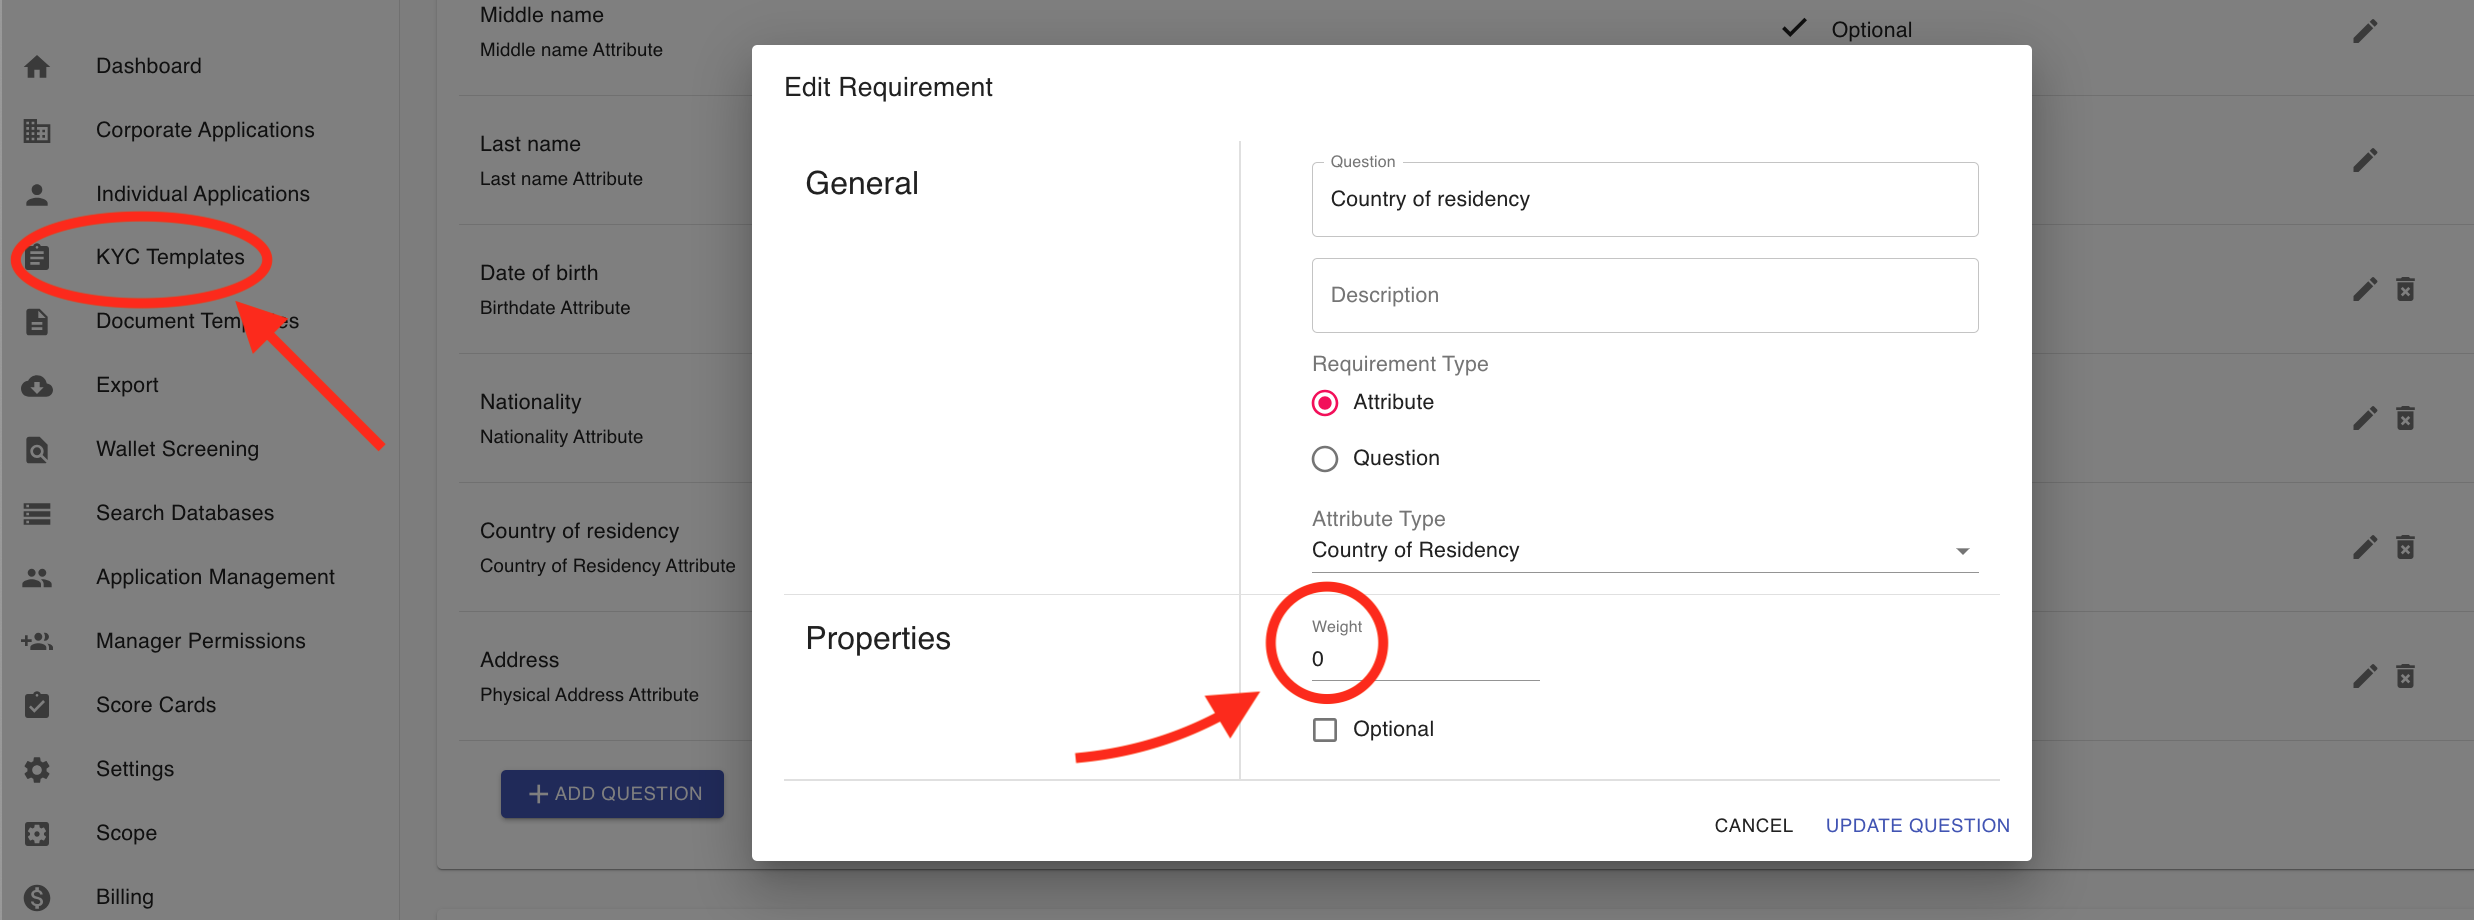
How to delete member application from the Coporate KYB?
Managers can delete member applications linked to a Corporate KYB template by navigating to the "Members" tab and selecting the appropriate application to remove.
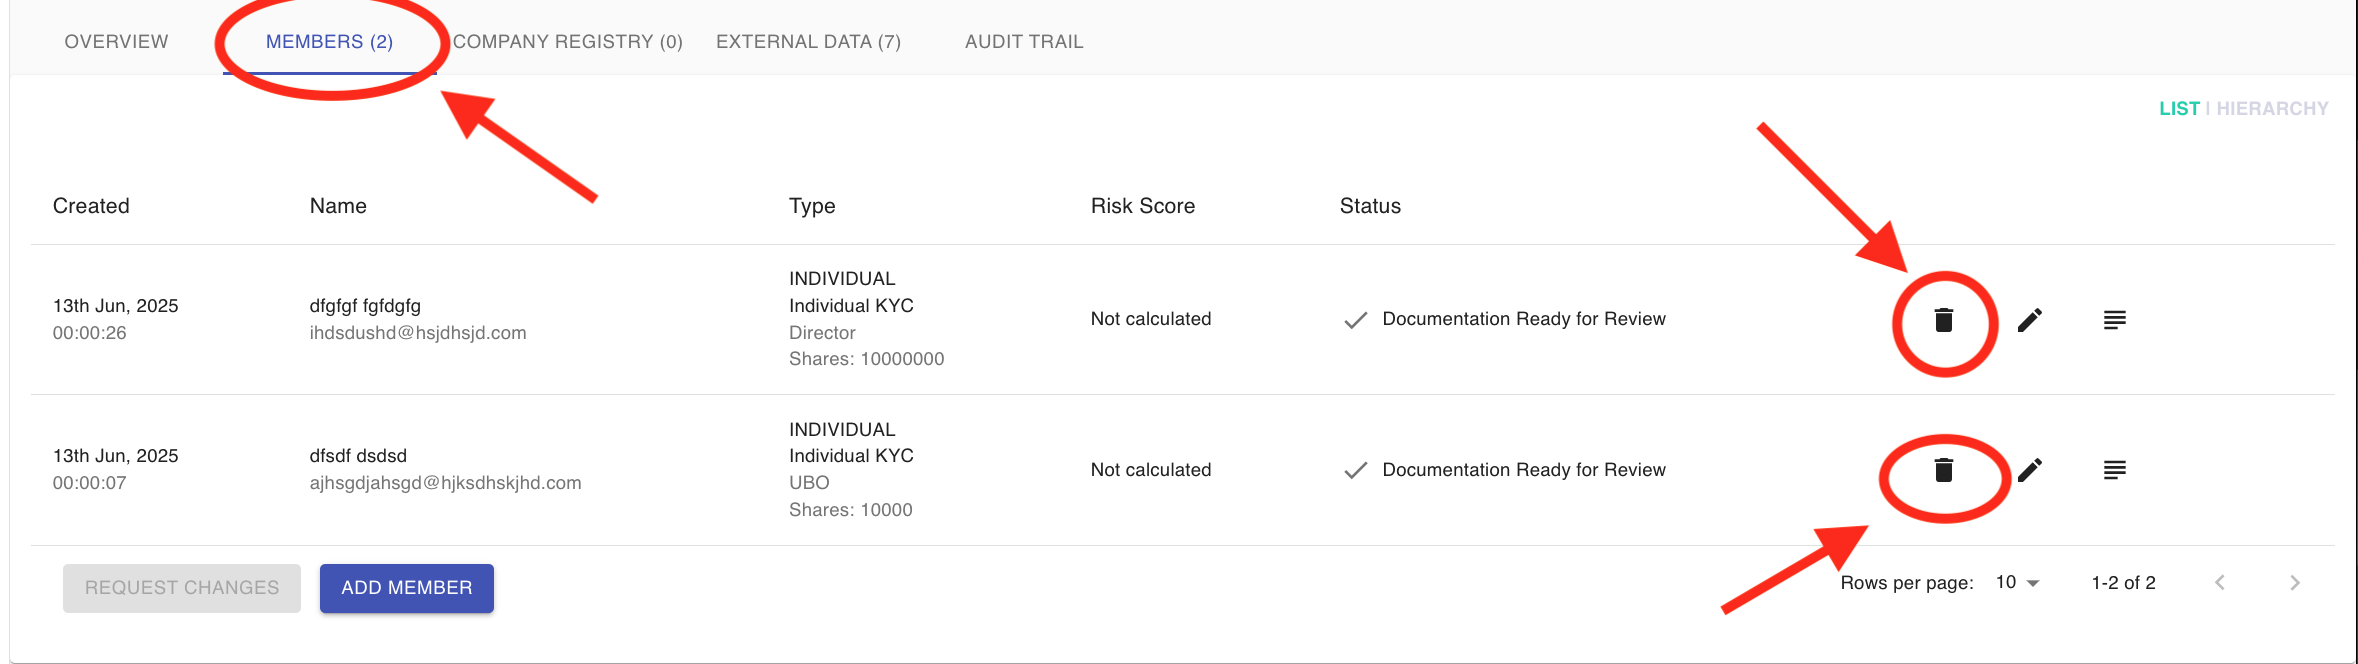
How long does it typically take to complete the KYC application?
Most users complete the KYC process in 5–15 minutes, provided all required documents/information are readily available. Delays may occur if:
- Verification requires manual review,
- Supporting documents are unclear or incomplete,
- Third-party checks (e.g., government databases) are pending.
For real-time status, please check application dashboard.
What are the key considerations and steps for transitioning from a test to a production environment?
Key Considerations and Steps for Moving from Test to Production in KYC-Chain:
Transitioning from test to production is essential for secure, compliant onboarding. Here’s what to keep in mind:
- Data Isolation: Keep test and real applicant data completely separate.
- Configuration Review: Double-check all production settings, KYC templates, integrations, and notifications.
- Integration Updates: Use production API keys and endpoints for all external services.
- User Access: Grant live system access only to authorized personnel.
- Compliance: Ensure all regulatory and data retention settings are correct.
Steps to Go Live:
- Request Production Access: Switching to live mode requires action from our support team. Please contact support to enable live mode for your instance.
- Finalize Settings: Confirm all templates, branding, and user permissions are set up as needed for production.
- Update Integrations: Swap test credentials for live ones and update webhooks.
- Security: Enable SSL/TLS and set up backups and logging.
- Test in Production: Run a few internal test applications to confirm workflows.
- Go Live: Invite real applicants and monitor for any issues.
Tip: Document differences between test and production setups for your team.
If you need help with this process, reach out to our support team and we’ll be happy to assist!"
Why do onboarding invitation emails frequently go to the customer's spam folder?
Onboarding invitation emails often go to the customer's spam folder because the sending domain is not verified or DKIM (DomainKeys Identified Mail) is not configured.
When the domain isn’t verified, email providers may flag messages as suspicious. Without DKIM, emails can’t be authenticated and are more likely to be marked as spam. Other factors, like a poor sender reputation or missing DKIM records, can also contribute.
To improve deliverability, always verify your sending domain and set up DKIM records. This helps ensure your emails reach the inbox instead of the spam folder.
What causes UI/sizing issues, such as overlapping elements, on the embedded instance?
UI or sizing issues—such as overlapping elements—on an embedded instance are often caused by conflicts with the parent website’s CSS, incorrect iframe sizing, or custom layout adjustments that do not account for dynamic content. To help us assist you more effectively, please provide additional information and, if possible, a screenshot of the issue. This will allow us to analyze the problem in detail and offer the most accurate solution.
How is remote access provided to the deployed instance for support or management?
Clients can access the management portal of the deployed instance remotely using their login credentials. For enhanced security, two-factor authentication (2FA) can be enabled. This ensures that only authorized users are able to manage or support the instance, regardless of their physical location.
What are the hosting environment requirements for on-premise deployment?
We do not offer on-premise deployment. Our solution relies on cloud-based hosting using AWS, Google Cloud, or a Minio setup for data storage and management.
What are the guidelines for setting up and managing the platform in a development environment, including URL, network, and access considerations?
"For setting up and managing the KYC-Chain platform, including URL, network, and access considerations:
URL:
The sandbox environment for the platform is available at https://<name>.app.kyc-chain.com. During the initial setup, you will specify how you would like the name to be spelled in the application and its URL.
Access Considerations:
- User Access: Email addresses of the team members who will use the application are required for setup. Manager Permissions allow for assigning specific roles and editing permissions to define access levels and authority within the platform. Two-Factor Authentication (2FA) can be enabled for user accounts by scanning a QR code with an authentication app.
- Data Access Security: Connections to the database are SSL encrypted, Two-Factor Authentication (2FA) is used, and IP addresses are whitelisted.
Network and Storage Considerations:
- Document Storage: You can specify a preferred storage location for your documents, with integration options for AWS S3 or Google Cloud. These storage buckets are provisioned by you, the client, and will store documents and files saved in the software. These documents are encrypted at rest and are entirely under your control.
- Database Storage: Settings and other data related to your instance are stored in KYC-Chain's MongoDB Atlas account, which is kept securely under KYC-Chain's control.
- Data Protection: Data is encrypted with AES-256 encryption using a passphrase unique to your instance. Storage volumes and backups are encrypted.
- Backup and Recovery: The database is automatically backed up four times a day, and data recovery to a specific point in time is supported."
What are the best practices, configurations, and methodologies for ensuring the comprehensive coverage and accuracy of automated Sanctions, PEP, and Adverse Media screening, especially in complex scenarios?
AML Checks (Sanctions, PEP, Adverse Media):
- Enable ongoing monitoring to ensure continuous compliance.
- Fine-tune fuziness to accommodate name variations and minimize both false positives and negatives.
- Implement a manual review process for all flagged matches before making final decisions.
- Apply risk-based triggers so that higher-risk applicants undergo more frequent or stringent checks (automatic notifications)
- Maintain detailed audit trails of all checks, reviews, and outcomes for regulatory compliance.
ID Data Checks:
- Check with the support team on coverage, as some data verification services only cover 10% of the population.
- Configure all relevant data fields to ensure thorough and accurate matching.
- Set up alerts for mismatches or suspicious data to prompt further review.
- Escalate uncertain or partial matches to manual compliance review:
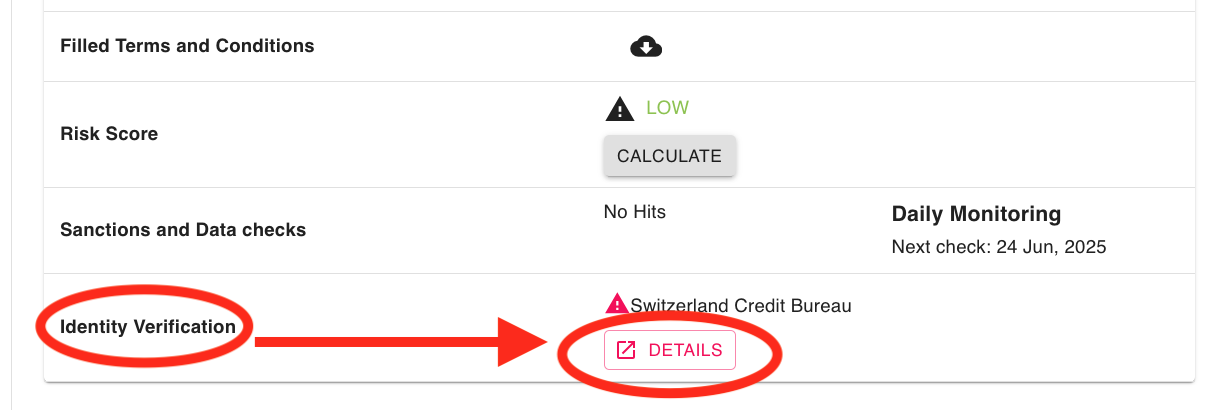
ID Document Checks:
-
Collect ID Document and Selfie with Passive Liveness Check: Require applicants to submit an ID document and a selfie, with passive liveness detection enabled. This ensures the person is physically present and drastically reduces the risk of identity fraud or spoofing.
-
Restrict Uploading of Existing Photos: For maximum security, do not allow applicants to upload pre-existing photos of ID documents or selfies. Require real-time capture during the verification process—this supports liveness checks, prevents the use of stolen or manipulated images, and improves data quality.
-
Enable "Selfie with ID in Hand" Verification: Prompt applicants to take a selfie while holding their ID document. This step helps confirm that the individual possesses the actual document and further matches their identity in real time.
Summary of Recommended Settings:
- Enable collection of ID document and selfie with liveness check
- Enable "Selfie with ID in Hand" verification
- Disable uploading of existing images—require real-time capture

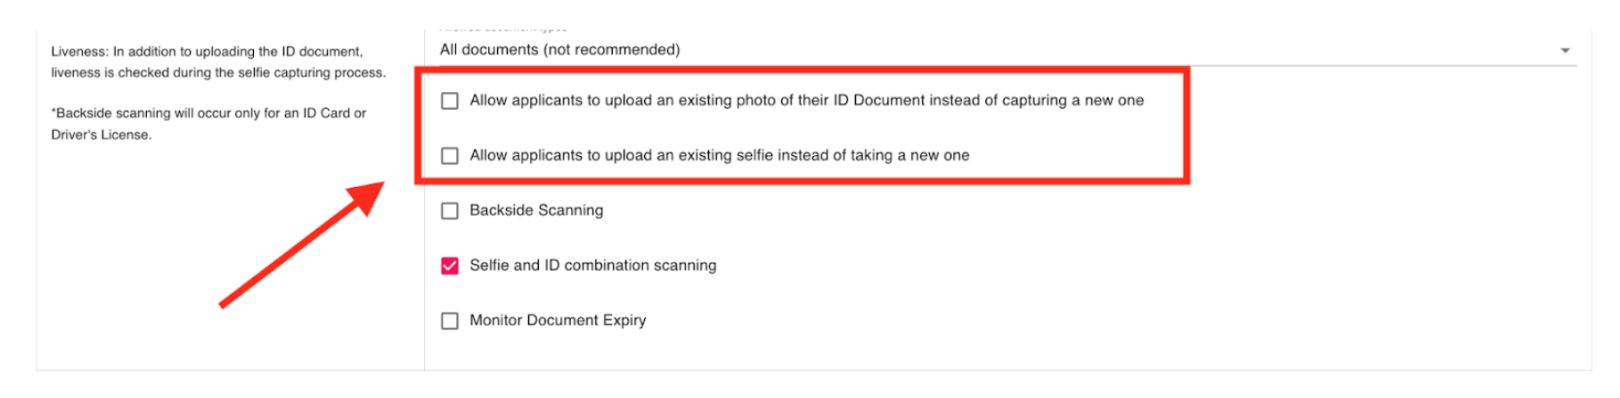
Wallet Screening Checks (Crypto Address Screening):
- Automatically screen submitted blockchain wallet addresses for sanctions, illicit activity, and risk levels at onboarding.
- Conduct periodic re-screening of wallet addresses, especially for high-value or high-risk users. (Transactions monitoring feature is not yet available)
- Carefully review wallet reports and document all decisions and outcomes in the audit trail.
Summary: Automate checks where possible, use ongoing and interval-based monitoring, ensure data sources are current and comprehensive, implement structured manual review processes, and maintain complete audit records. Adjust screening workflows and strictness according to the risk level of each applicant or transaction.
If you need a detailed checklist or configuration guide for any specific workflow, please let us know—we’re happy to assist!
Does the system detect if an applicant is using a VPN?
No, system can't detect if VPN was used.
Can custom domain settings be modified after initial setup?
Yes, custom domain settings can be modified, please contact our help desk at help@kyc-chain.com
What are the requirements for integrating a storage gateway with KYC-Chain?
Storage support and requirements:
V5 version of KYC-Chain API supports following storage providers
Filesystem (DEVELOPMENT ONLY) Amazon S3 Google cloud storage Minio
AWS S3 AWS S3 is a object storage system provided by Amazon. https://aws.amazon.com/s3/
Customer must create an IAM user with access to a S3 storage bucket.
Required permissions:
{
    ""Version"": ""2012-10-17"",
    ""Statement"": [
    {
        ""Effect"": ""Allow"",
        ""Action"": [
            ""s3:PutObject"",
            ""s3:GetObject"",
            ""s3:DeleteObject""
        ],
        ""Resource"": [""arn:aws:s3:::bucket-name-here/*""]
    }
    ]
}
Customer must provide following credentials:
AWS_ACCESS_KEY AWS_SECRET_KEY BUCKET_NAME REGION
Google Cloud storage GCP is a object storage system provided by Google https://cloud.google.com/products/storage/
Customer must provide access to a bucket with following details:
Google cloud platform JSON key (user key) Cloud platform project ID Storage bucket ID
The service account needs to have storage.objectAdmin role for the bucket Add this permission to the service account: storage.objects.create
Minio
Minio is a distributed object storage system which provides S3 compatible API to different storage layers. It acts as a gateway between KYC-Chain API and customer's storage system. https://min.io/product/overview
Customer must provide credentials to a configured Minio installation:
Bucket name Access KEY ID Secret KEY Minio instance endpoint URL"
What are the troubleshooting steps when automated adverse media results are not found by the system?
If you are expecting adverse media results but none are being found automatically, please open a support ticket. Our team will need to review your application details and template settings. This issue may be related to the fuzziness level being set too low, which can result in fewer matches. However, we will need to investigate further to determine the exact cause.
Can we edit the email templates sent to applicants? Yes, the content and branding can be customized and edited at any moment. You will need to submit the request with the details to your account manager.
Is there an option to reject terms and conditions during the application process?
No, it is not possible to allow applicants to reject the terms and conditions.
Is it possible to customize the signature block to include specific applicant details like first name, last name, and National ID number?
No, the signature block only allows users to enter their signature, initials, or upload an image of their signature. However, you can add additional fields to collect information such as first name, last name, and National ID.
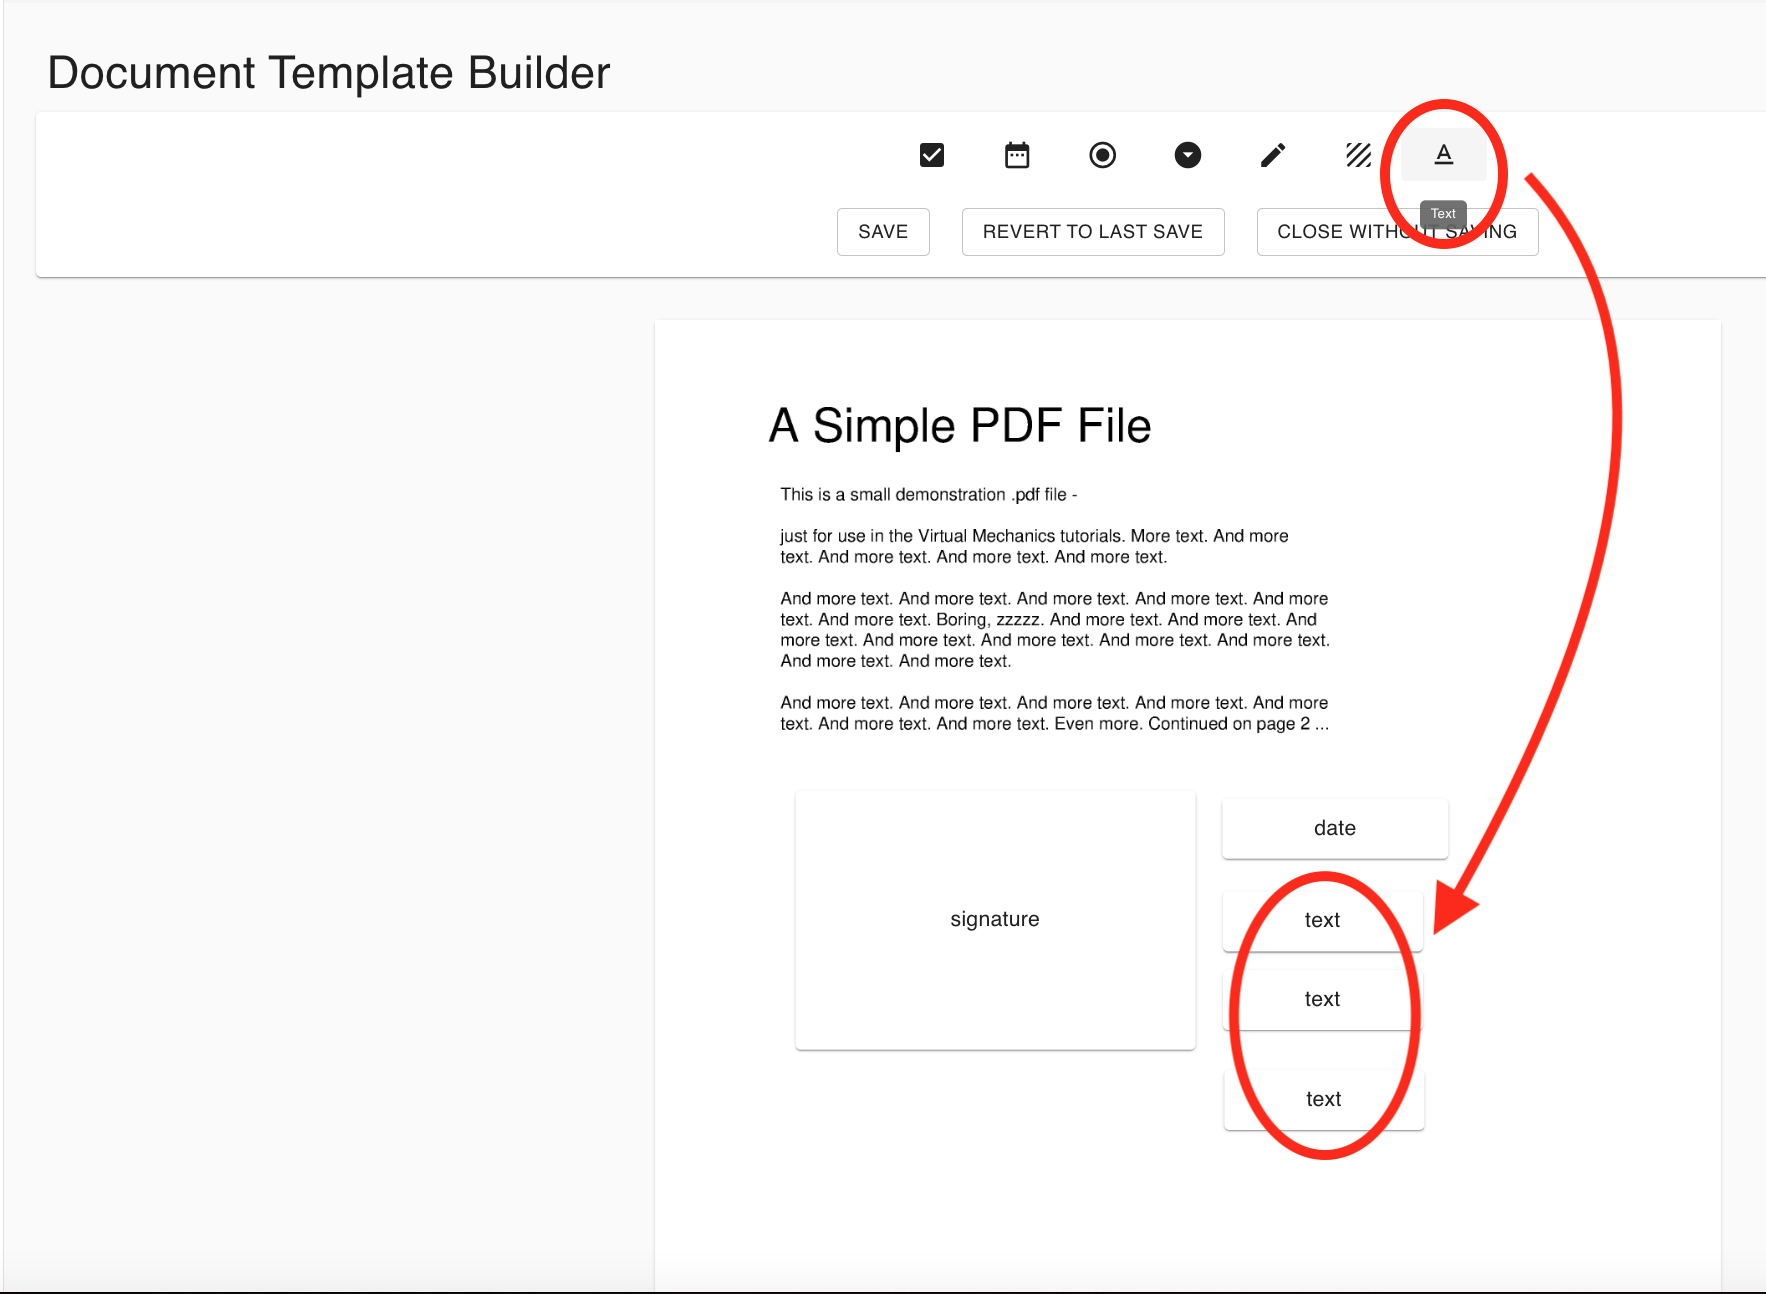
Can an applicant submit several applications with the same email address? Applicants can only have one active process open per email address per KYC template. If an applicant with the same email address has an open KYC Process with that template, the user won’t be able to apply again with the same email address.
How can I delete all data pertaining to an application? Please refer to the Applicant Management tool referenced in section 3.8. (Self-correction: Original doc referred to 3.8, but Application Management is 3.61. Corrected to 3.61). Please refer to the Applicant Management tool referenced in section 3.61.
File Size and Format Requirements for Document Uploads:
-
ID Document Verification:
- Maximum file size: 20 MB
- Supported formats: JPG and PNG
- Minimum resolution: 400 x 500 pixels
-
Other External Uploads (e.g., Proof of Address):
- Maximum file size: 40 MB
When is a KYC process ready for review? You can see the status of all open KYC Processes in the Individual Processes and Corporate Processes pages. When an applicant (or manager) submits the application for review the status will change to “Documentation Ready for Review”.
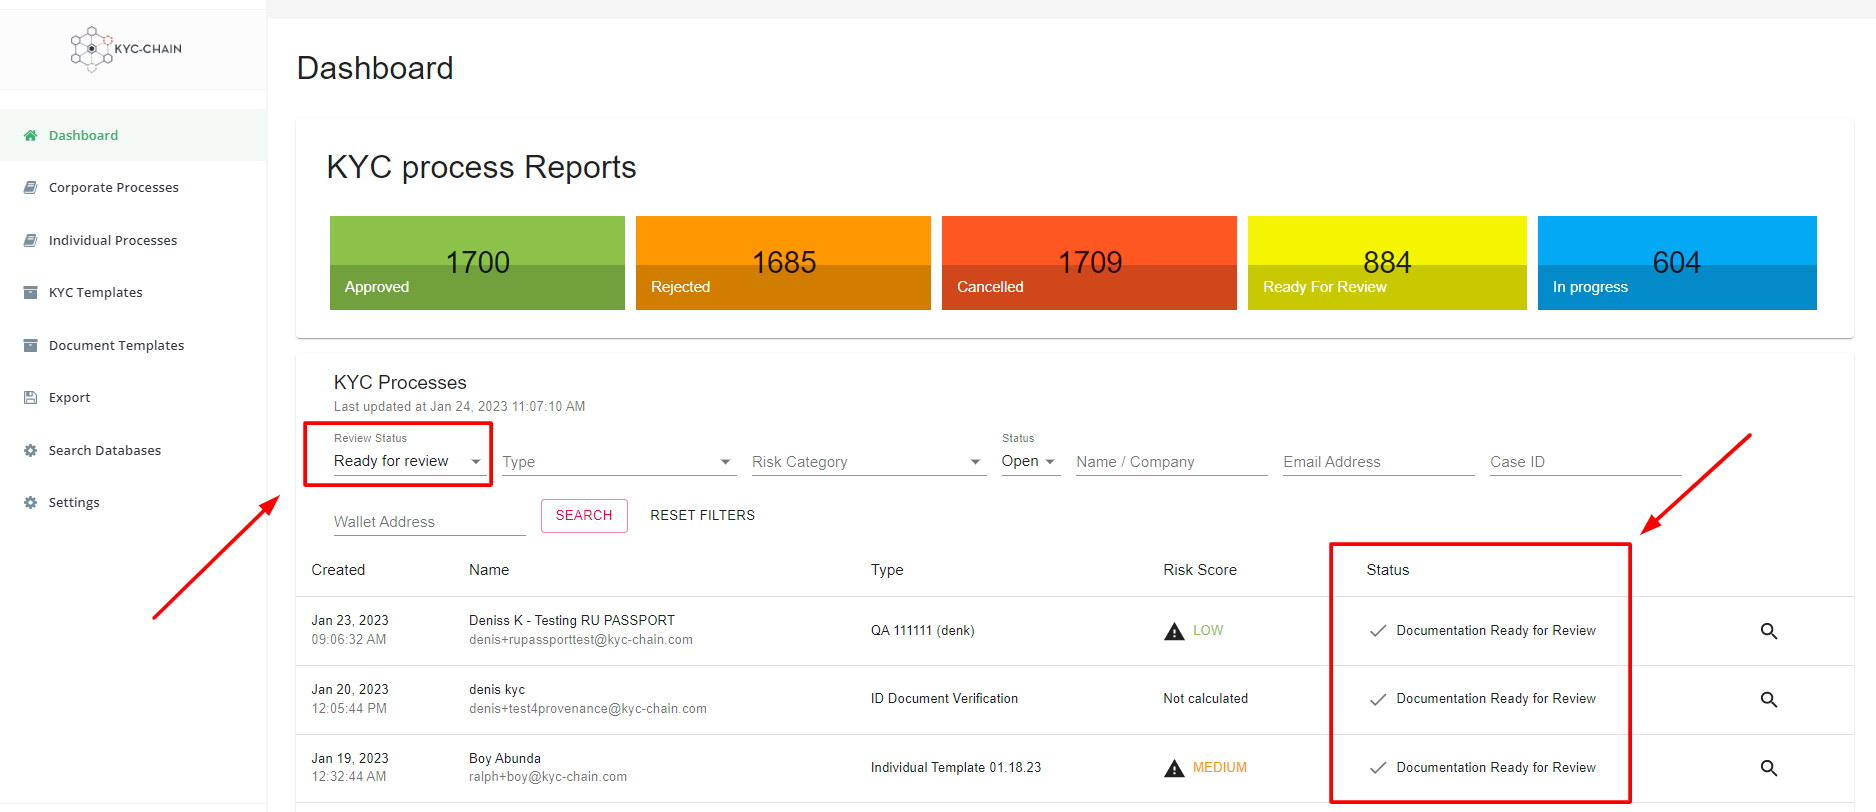
What steps should I take if a manager is unable to log in?
Please ensure that the manager is attempting to access the management portal, not the KYC portal, as these are two distinct platforms. The management portal URL should include /management/login. If you are on the correct page, the next step is to try resetting your password by clicking the "Forgot Password" button. You will receive an email with instructions—please follow them carefully. If you continue to experience issues accessing the management portal, please create a support ticket.

Several applications are incomplete. Applicants didn’t send all the documents or haven’t answered all the questions. What can I do? To avoid applications from remaining incomplete, you can use our “reminders” feature. On the “Settings” page, in the “Reminders” tab, you can enable email notifications after X days of inactivity. If the reminders are enabled, inactive applicants will receive an email notification reminding them to complete the KYC process.

Can applicants always edit their KYC application? An applicant is free to edit their KYC process anytime before submission. As soon as the KYC process is submitted, applicants won’t be able to make any changes. A “processing” message will display when they log into the app. However, if a manager requests that they submit or resubmit any requirement, applicants will be able to edit the KYC process until they submit it again.
If I edit a KYC Template, will my changes apply to all KYC processes? Any changes in a KYC Template will ONLY apply to KYC processes initiated after the change. If an applicant started the process before the KYC Template was edited, they will see the previous version of the template. In this case you can request applicants to start a new process or simply request additional requirements manually.
An application was submitted but the risk score says "not calculated" There are a few possible causes for this. Please check the following:
- Is Risk Scoring enabled on your instance? You can check this by going to "Settings" and ensuring that the Risk Scoring settings tabs are visible.
- Does the KYC Template applied to this KYC Process have a Risk Score Card associated with it? This can be checked by going to "KYC Templates", clicking "edit" for the relevant template, and checking that a Risk Score Card is selected from the Risk Scoring dropdown.
- Does this KYC Process request all of the required attributes for this Risk Score Card? If the risk score depends on the nationality or age of the applicant, then the KYC Process needs to ask for the applicant's nationality and date of birth before the score can be calculated.
- Have you checked the External Data tab for any AML hits? You will need to confirm all results as either confirmed or false positive for the system to calculate the risk score correctly.


If the answer to all of the above questions is "yes" and a risk score is still not being calculated, please feel free to contact your KYC-Chain representative.
How can I automate the entire process of approving or rejecting applications? You can configure the system to automatically approve or reject applications by setting actions on the risk scoring card.
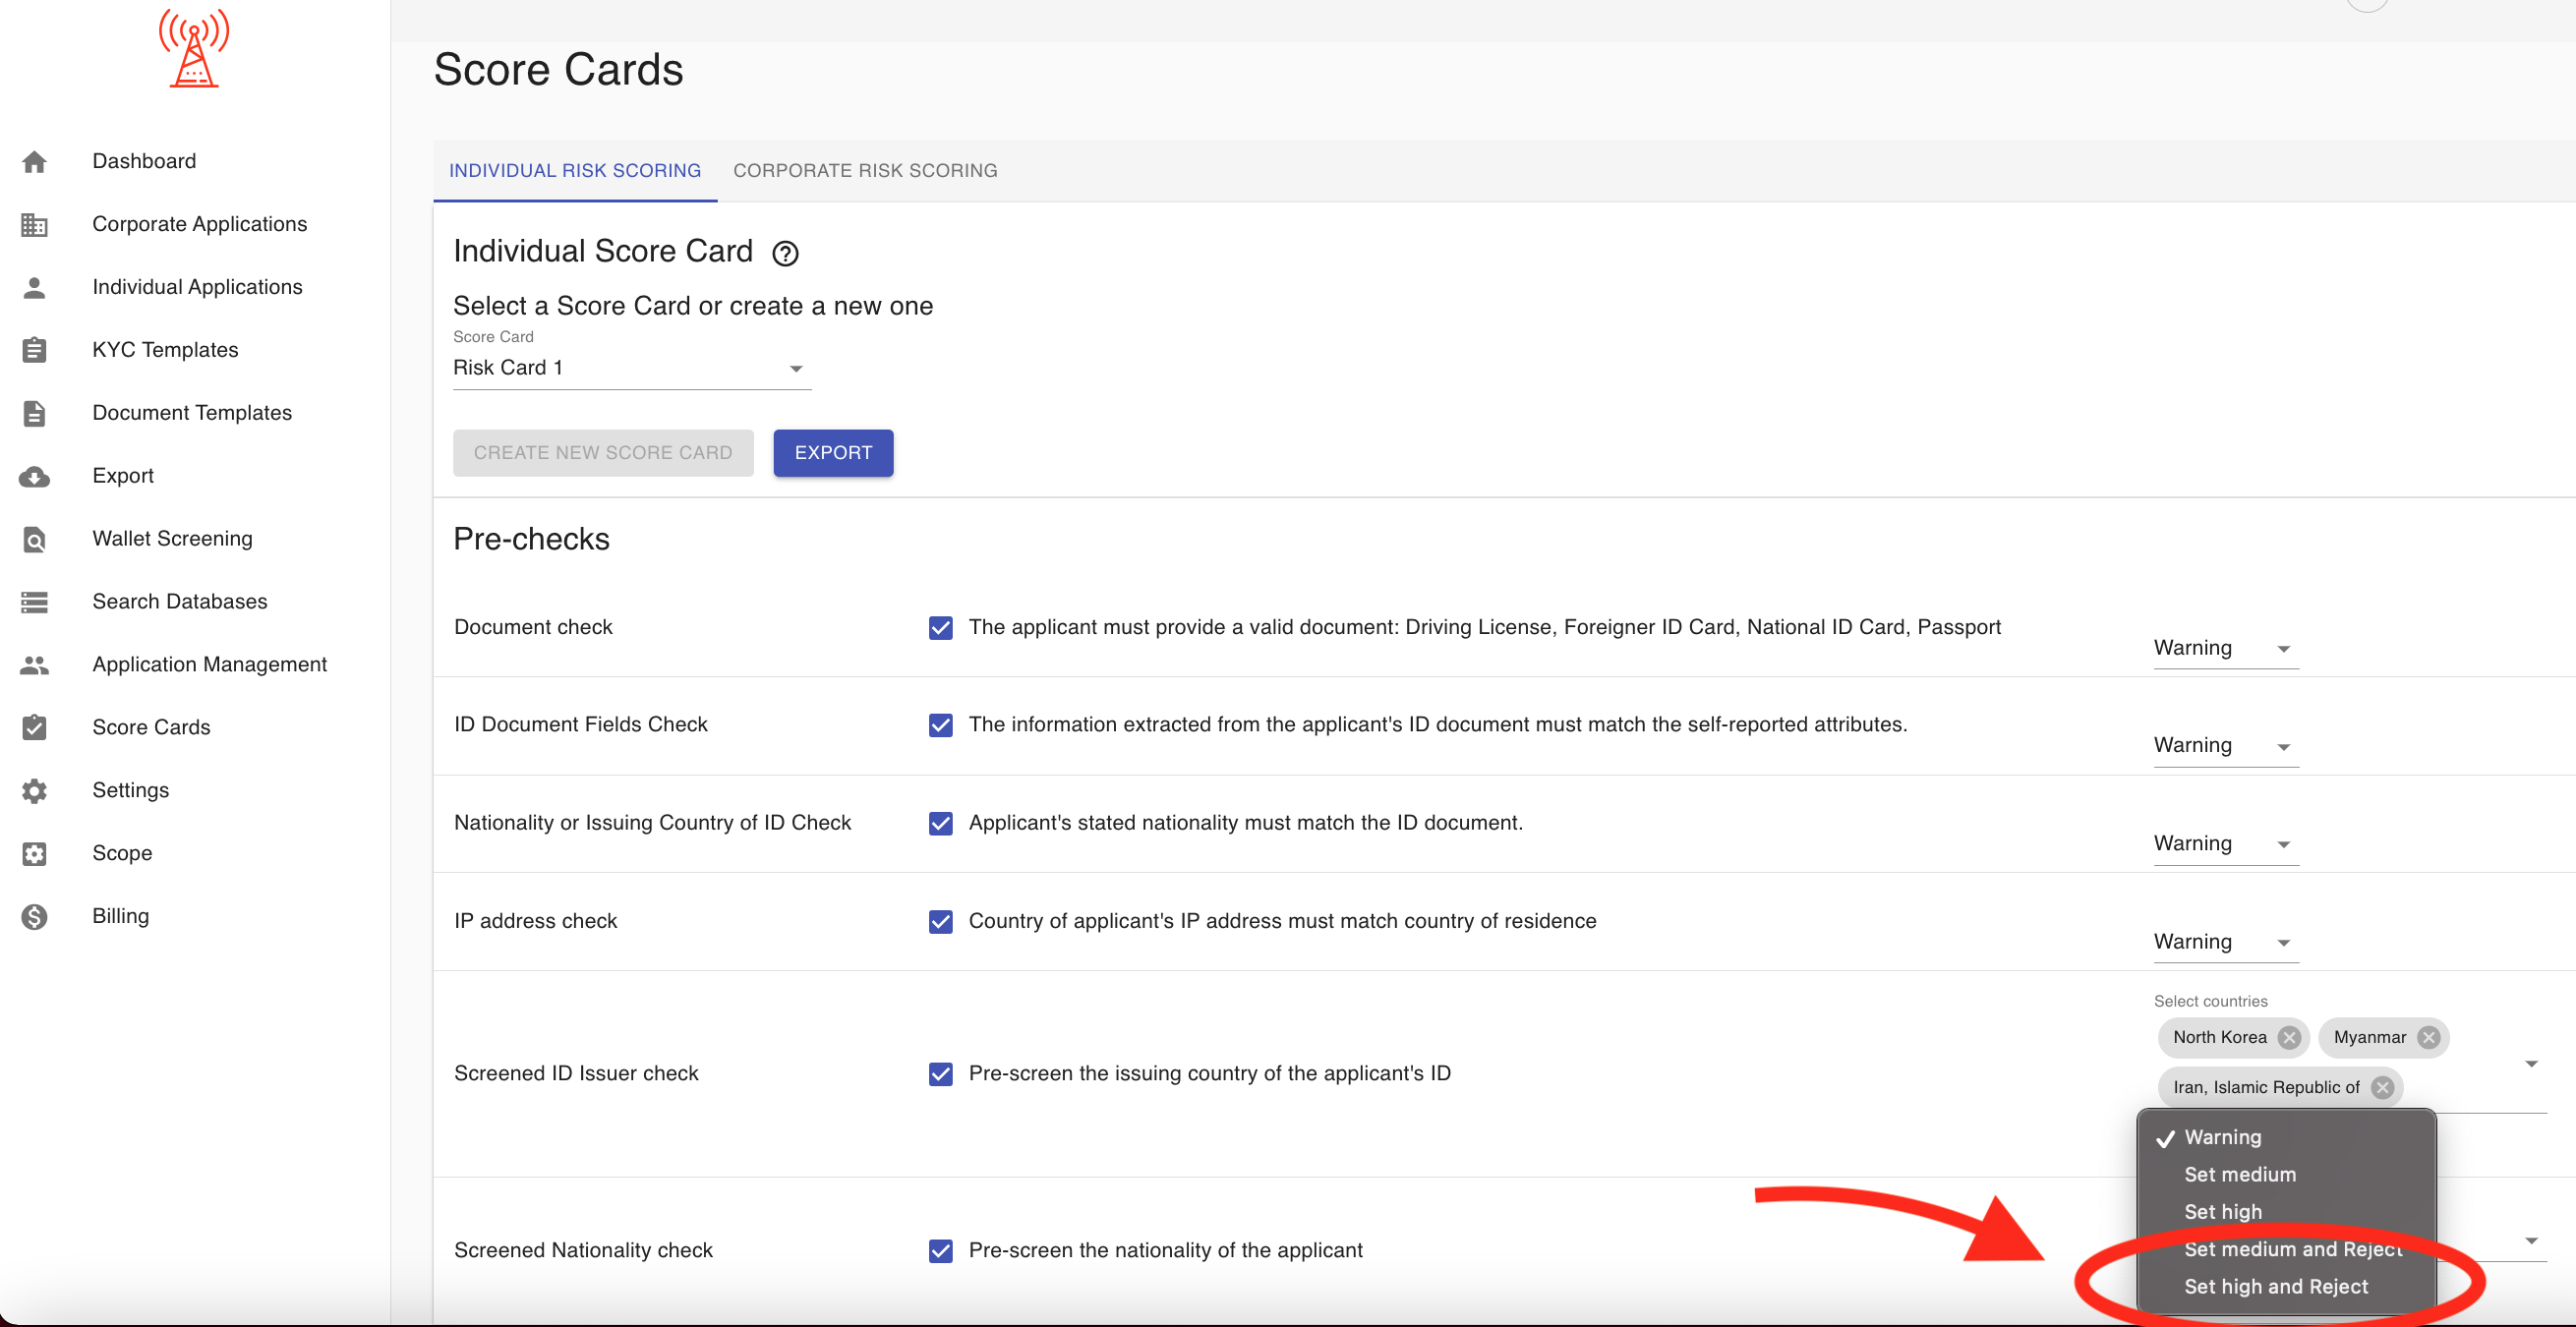
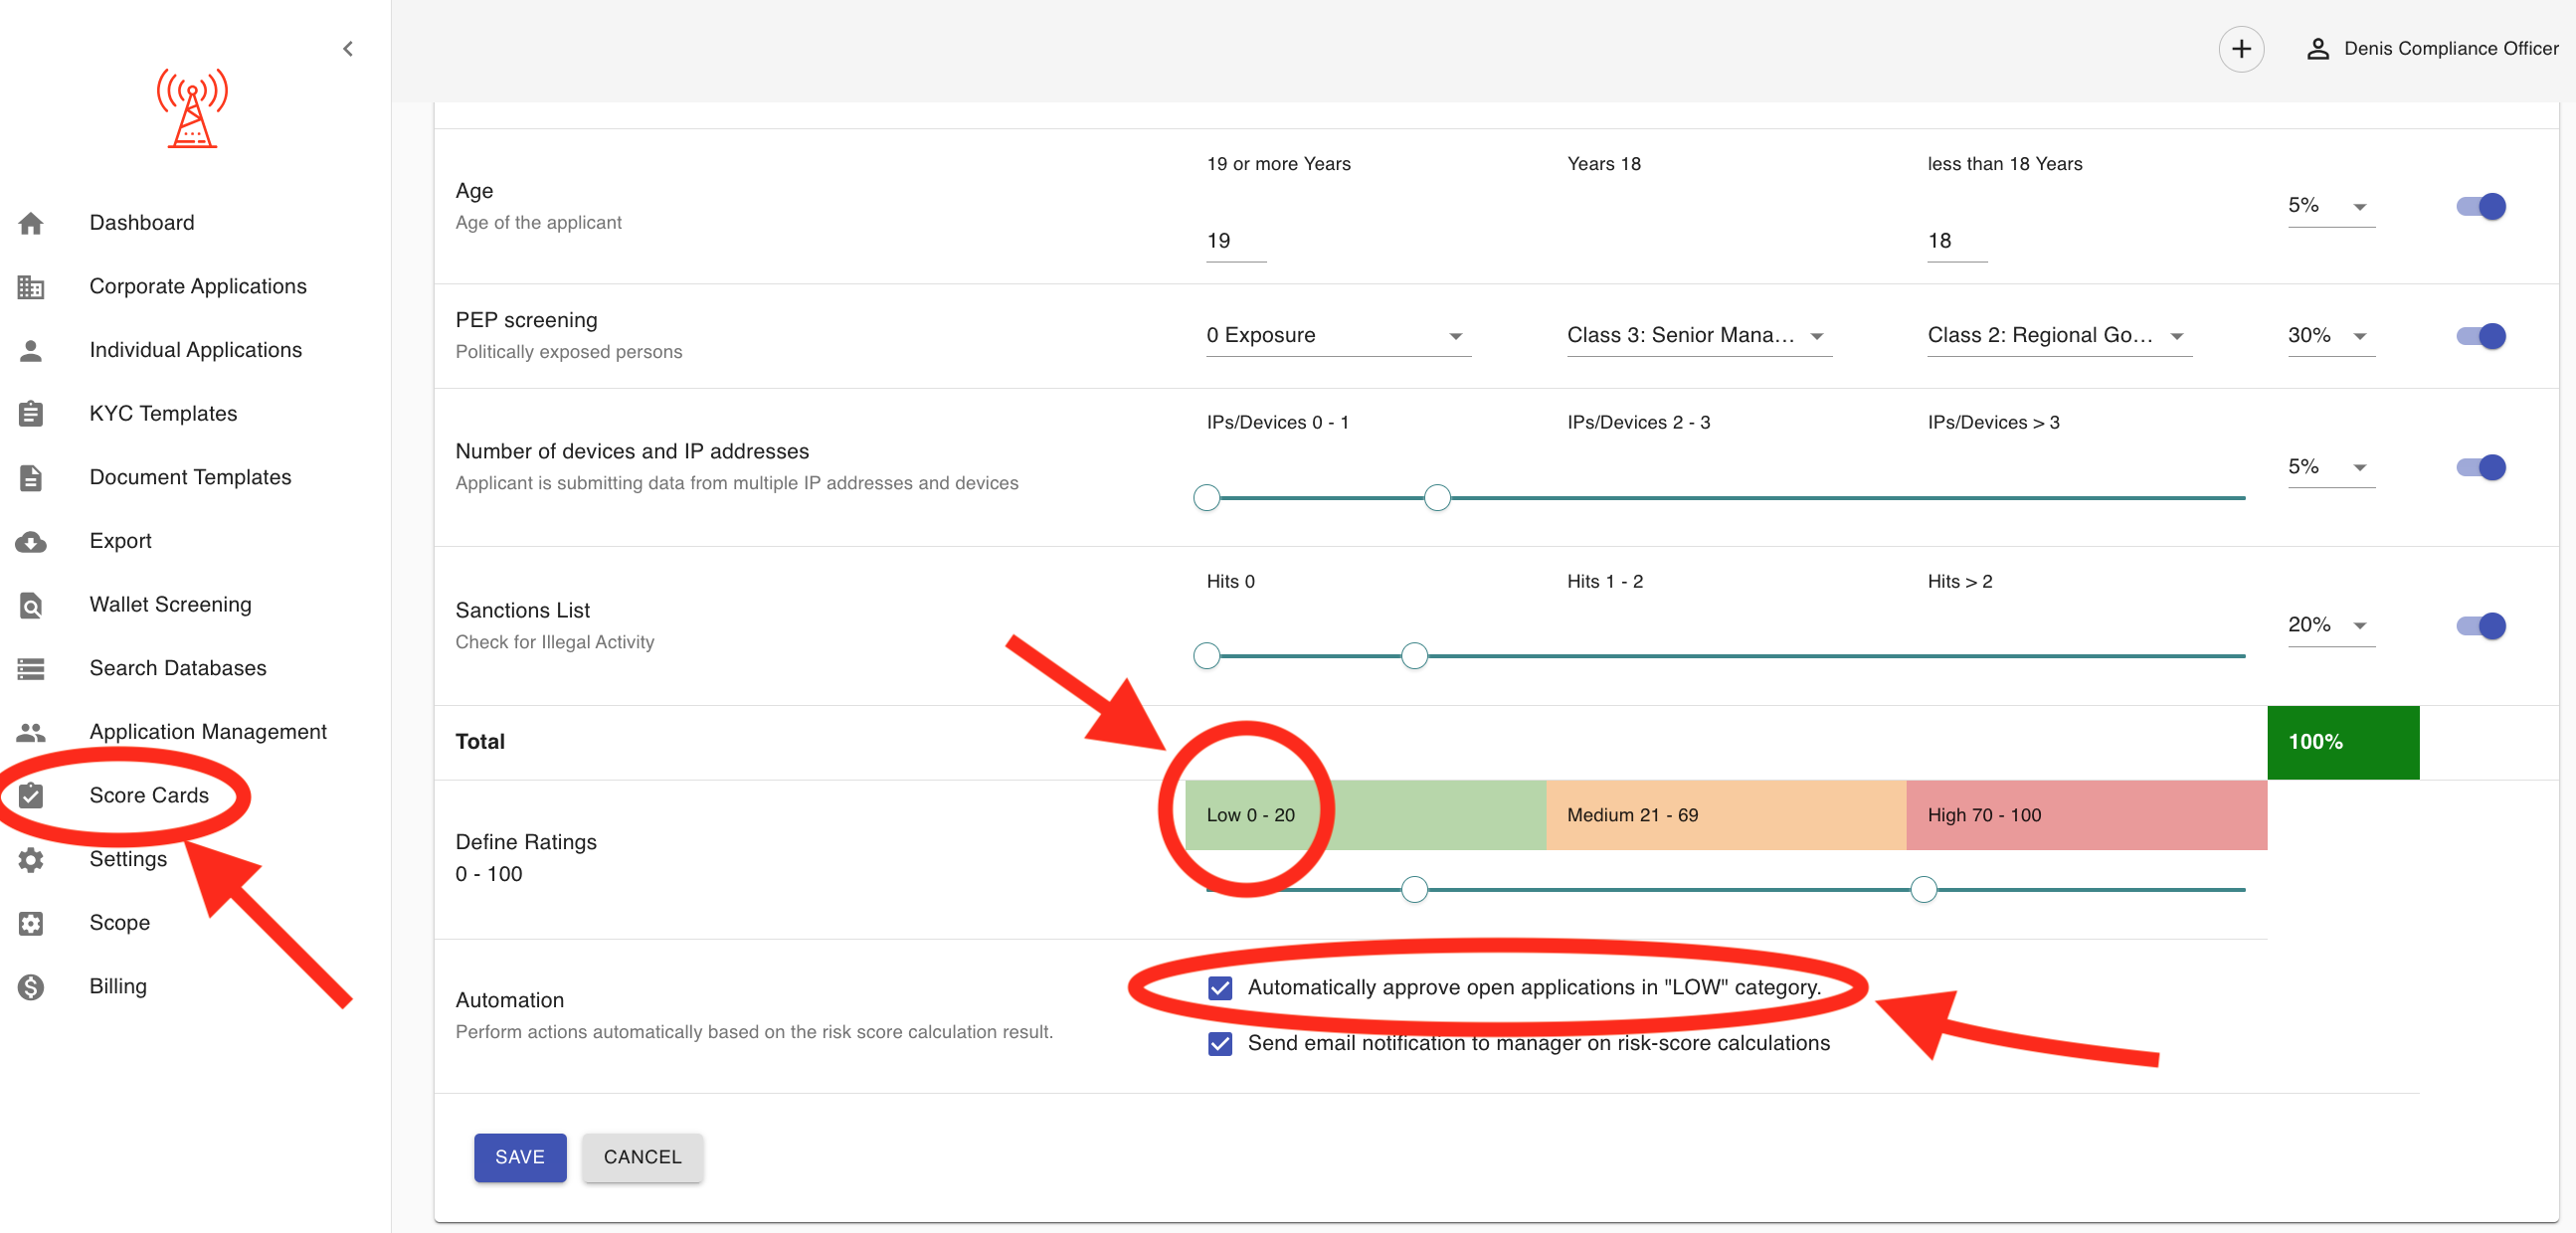
How do I generate a JSON key for a service account?
To generate a JSON key for a service account, you typically need to have admin or appropriate permissions in your service provider’s management console (such as Google Cloud, AWS, or similar). The exact process depends on the provider, but here’s a general outline for Google Cloud Platform as an example:
Step-by-Step Example (Google Cloud Platform):
- Sign in to the Google Cloud Console.
- Navigate to IAM & Admin → Service Accounts.
- Select the relevant service account.
- Click Manage Keys → Add Key → Create new key.
- Choose JSON as the key type.
- Click Create to automatically download the key file.
Critical Security Note:
🔒 Safeguard the downloaded JSON key—it grants full access to your service account. Store it securely (e.g., encrypted secrets manager). Never commit to version control.
Do you provide blockchain wallet screening service?
Yes, our wallet screening service provides automated risk assessment and real-time monitoring for cryptocurrency addresses, helping you meet AML and compliance requirements. The platform analyzes wallet transactions, screens against global watchlists and red flags, and assigns risk scores based on activity, counterparties, and behavioral patterns.
Key Features:
- Supports screening of both deposit and withdrawal wallet addresses
- Monitors for links to high-risk entities (e.g., scams, ransomware, mixers)
- Flags transactions involving sanctioned or high-risk jurisdictions
- Customizable risk scenarios and thresholds
- Real-time alerts and reporting for compliance or investigations
- Detailed risk scoring and audit-ready reports
Top 20 Supported Blockchains:
- Bitcoin (BTC)
- Ethereum (ETH) and all ERC20 tokens
- Litecoin (LTC)
- Bitcoin Cash (BCH)
- Dash (DASH)
- XRP Ledger (XRP)
- Tezos (XTZ) and FA2 tokens
- Tron (TRX, TRC10, TRC20)
- Binance Smart Chain (BSC, BEP20)
- Polygon (MATIC, ERC20)
- Avalanche (C-Chain, AVAX, ERC20)
- Solana (SOL)
- Base (Base & ERC20)
- TON (The Open Network)
- Arbitrum (ARB, ERC20)
- Optimism (OP, ERC20)
- Blast (BLAST, ERC20)
- Bitcoin Gold (BTG)
- Bitcoin SV (BSV)
- Stellar (XLM)
Our service also supports over 90 additional blockchains with basic screening functionality. For the latest and most comprehensive coverage details, please contact us.

What types of KYC verifications are supported? The platform covers ID document, Selfie, biometric (Passive Liveness), Identity Data (first name, last name, DOB, address), AML screening, Blockchain Wallet screening and Business Verification.
Which Malaysian identification documents are accepted for verification?
We accept Malaysian Passport and National ID card
How to send out an invitation to start KYC or KYB Process?
Step 1: Select the Appropriate Process Type Choose between the "Individual" or "Corporate" process based on your applicant:
- Select "Individual" for personal applicants requiring KYC verification
- Select "Corporate" for business entities requiring KYB verification
Step 2: Initiate the Invitation Click the "Invite Person" button (for individuals) or "Invite Company" button (for corporations).
Step 3: Complete Required Information Fill out all required details in the form fields, ensuring accuracy and completeness of the information.
Step 4: Send the Invitation Click the "INVITE" button to send out the invitation by email.
Your client will receive an official invitation to begin their verification process—either KYC (Know Your Customer) for individuals or KYB (Know Your Business) for corporations.


How to Enable Two-Factor Authentication (2FA):
- Click the user icon in the top right corner to access your profile.
- Scroll down to the "Two-factor authentication" section.
- Toggle "Enable 2FA" to activate two-factor authentication.
- Scan the displayed QR code with your authentication app or browser extension.
- Follow the prompts in your app to complete the setup.

How can applications originating from a development environment be distinguished?
Applications originating from a development environment are typically identified by clear warnings like "TEST MODE". For more information, please refer to the following screenshot:
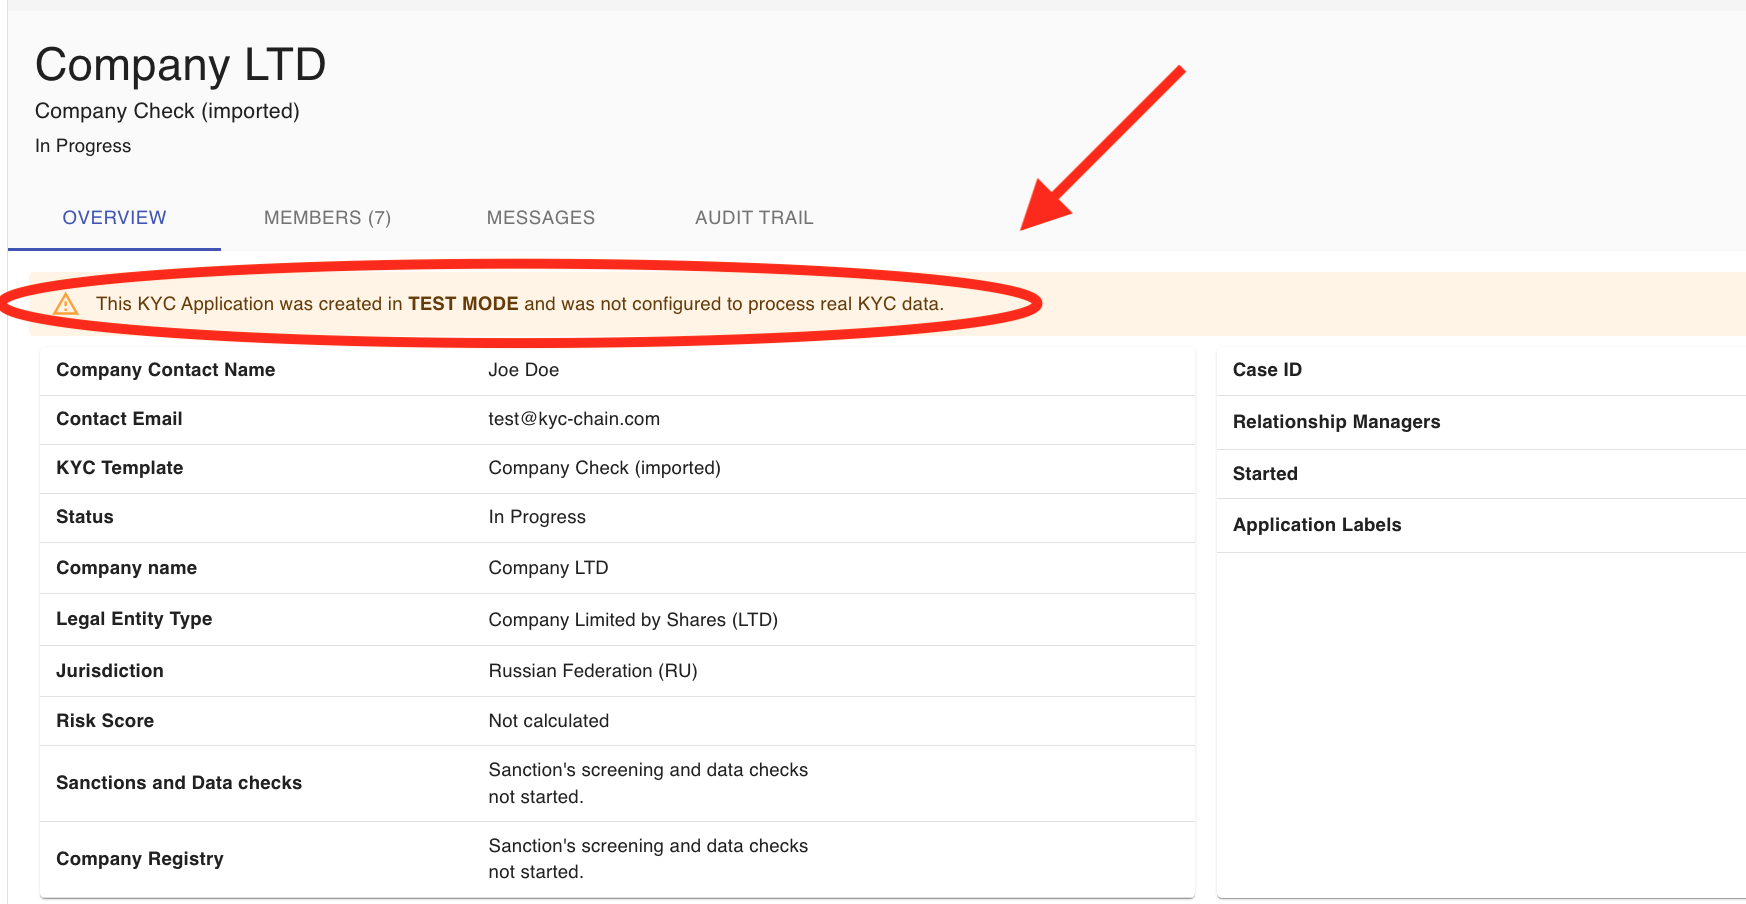
How do I set up my login credentials for first-time access after receiving an invitation?
When a new manager is added to the KYC management portal, they will automatically receive an invitation to set their password. The same applies to applicants, who will receive an invitation link to begin the KYC process.
If you would like to enable a passwordless KYC journey for your applicants, please submit a support ticket.
Can clicking an invitation link multiple times cause login or access issues?
No, the invitation link is valid for 24 hours.
What should a user do if they encounter an "Invalid sign up link" or similar error during initial access?
If a user encounters an "Invalid sign up link" or a similar error during initial access, they should try the following steps:
-
Request a new link: If the link has expired or is no longer valid, request a new sign-up or invitation link from the sender or support team.
-
Clear browser cache or try a different browser: Sometimes, browser issues can interfere with link functionality.
-
Contact support: If the problem persists after trying the above steps, reach out to the platform's support team with a screenshot of the error message for further assistance.
Why am I encountering login errors or being redirected when attempting to access the Customer Portal?
Login errors or unexpected redirects when accessing the Customer Portal can occur for several reasons:
-
Incorrect or expired session: Your login session may have expired or become invalid. Try logging out completely and logging back in.
-
Multiple accounts or browser sessions: If you’re logged into multiple accounts or have several sessions open, the portal may redirect or behave unexpectedly. Close other tabs, clear your browser cache, or use an incognito window.
-
Insufficient permissions or incorrect link: You may be using a link that doesn’t match your account's access level or scope. Ensure you’re accessing the portal using the correct URL provided to you.
-
Browser compatibility issues: Some features may not work correctly in older browsers. Try updating your browser or switching to a different one (e.g., Chrome).
-
Access scope set to view-only or inactive: If your instance is set to a view-only or inactive state, you may be restricted from performing actions. Contact your administrator or support to confirm your access status.
If the issue continues, please contact the support team and include details such as the URL used, a screenshot of the error, and your account email.
How are users notified about the completion of service decommissioning, and what are the subsequent steps regarding billing?
Users are notified about the service decommissioning process via an official email from the support or account management team. This initial notification includes the exact date of decommissioning and important instructions for next steps.
Key points to note:
-
Data export deadline: Users are strongly advised to export all necessary data via the API before the specified decommissioning date. After this deadline, the instance and all associated data may be permanently deleted and unrecoverable.
-
Final invoice issuance: If applicable, a final invoice will be issued to cover any remaining usage up to the decommissioning date.
-
Billing termination: All billing related to the decommissioned service will be stopped as of the decommissioning date.
-
Refunds or adjustments (if applicable): Prorated refunds or billing adjustments may be processed, depending on the terms of the service agreement.
For any questions about billing, data export, or account status, users should contact the support team as early as possible to ensure a smooth transition and avoid data loss.
How do I generate PDF reports using the API?
To generate PDF reports via the API, please refer to our official API documentation. You can request access and view the documentation using the following link: 👉 https://apidocs.kyc-chain.com/
The documentation provides detailed guidance on the available endpoints and parameters required to generate and retrieve PDF reports.
To gain access to our API documentation, please reach out to our support team.
How can I get assistance or verification when testing API functionalities?
If you need support while testing API functionalities, our team is here to help. You can:
-
Contact Support: Reach out to our support team with details of your test case, the endpoint used, and any relevant request/response data. This will help us quickly assist or verify the expected behavior.
-
Use the API Documentation: Our API documentation provides detailed guidance on how to structure requests, expected responses, and common troubleshooting tips.
-
Request Test Data or Sandbox Access: If needed, we can provide sample data or a sandbox environment for safer testing.
Feel free to contact us at any time during your testing—we’ll be happy to assist and confirm that everything is working as expected.
Are there alternative methods for receiving data or notifications, such as webhooks?
Yes, the KYC-Chain API supports webhook notifications for verification status changes. These notifications allow you to receive real-time updates without the need to constantly poll the API.
Status Notifications via Webhooks:
A webhook URL can be configured during the creation of an ID verification and passed as a parameter. Once set, the system will send a POST request to the provided webhook URL whenever the application status changes. The payload includes:
{
  "applicationId": "507f1f77bcf86cd799439011",
  "status": 4,
  "updatedAt": "2019-03-27T11:45:30.060Z"
}
applicationId: The ID of the application that changed statusstatus: The new status code (e.g., 2 = approved, 3 = rejected, 4 = submitted, etc.)updatedAt: Timestamp when the status change occurred (not when the webhook was sent)
Please note that while webhooks are a powerful tool, delivery is not guaranteed, so it’s recommended to implement retry or verification mechanisms on your end.
More Information
To configure webhooks, obtain API keys, or set up live instances, please contact the KYC-Chain team directly. They’ll be happy to assist with technical setup and access to the relevant documentation.
How can the main account or contact email address be changed?
To change the email address that is technically linked to the application, please contact our support team. This update requires backend adjustments to ensure the application can be found using the new email address. However, if you only wish to update the contact email for communication purposes, you can do so on the Overview page using the Easy Fill feature, provided it is enabled for your account. For more information, please refer to the following screenshot:

Are new access links or credentials provided when transitioning to live mode?
No, the instance URL remains the same when transitioning from development to production mode. Your login credentials also remain unchanged, though passwords can be updated at any time. Additionally, Two-Factor Authentication (2FA) can be enabled for enhanced account security.
The main difference is in the scope status of the instance:
- In development mode, you can test the platform without being charged.
- In production mode, the instance becomes live, and usage is subject to billing based on your plan.
If you need help enabling 2FA or switching to production, feel free to contact the KYC-Chain support team.
How are customers notified about their service usage, remaining balance, and when they are approaching or have exceeded their account limits?
Clients can view their current account balance and usage at any time by navigating to the Billing section, located on the left-hand side of the platform.
When certain usage thresholds are reached—or if the account balance goes negative—client will be notified by email by the payments team, requesting a top-up to continue uninterrupted service.
Additionally, we are in the process of implementing automatic top-ups via Stripe. Once enabled, the system will automatically charge the client’s saved payment method when the balance falls below a defined threshold.
If you have any questions or need help managing your billing settings, feel free to contact our support team.
What does the "solution fee" cover?
For more information, please check your contract or reach out to your account manager.
What is the platform's threshold for Suspicious Activity Report (SAR) generation?
KYC-Chain itself does not automatically generate Suspicious Activity Reports (SARs) or enforce a specific threshold for SAR generation. Instead, the platform equips your organization with the tools to monitor, review, and flag suspicious activities according to your compliance program and applicable regulations.
How it works on KYC-Chain:
- The platform provides robust risk scoring, ongoing AML monitoring, and alerts. Automated checks (sanctions, PEP, adverse media, ID verification, etc.) help identify potential risks or suspicious behavior.
- You can set up customizable risk assessment criteria and thresholds for alerts within the risk scoring configuration.
- Managers can manually add notes, flag applications, and trigger review processes if suspicious activity is detected. Reporting responsibilities:
- It remains the responsibility of your compliance/AML team to determine what constitutes suspicious activity and when to generate and submit a SAR to authorities, based on your jurisdiction’s regulatory standards (such as transaction values, behavioral red flags, or other compliance triggers).
Is a detailed report on compliance available?
Yes, KYC-Chain provides several ways to access and generate compliance reports, including a powerful all-in-one PDF report feature:
✅ 1. All-in-One PDF Report Generation
From any KYC application’s Overview page, managers can generate a complete PDF report that includes all submitted data, documents, results, risk scoring, and verification outcomes. To do so:
- Go to the Overview tab of the specific application.
- Click "GENERATE PDF".
- The system will compile and download a full, formatted report with all results.
This feature is ideal for auditors, internal compliance reviews, or regulatory record-keeping.
✅ 2. Wallet Screening PDF Reports
For blockchain wallet checks, you can generate and download standard or enhanced wallet screening reports as PDFs. These contain:
- Risk score
- Sanctions exposure
- Associated crime or fraud flags
Accessible via the Wallet Screening tab within each KYC application.
✅ 3. CSV Data Exports
KYC-Chain allows exporting full or filtered user/application data in CSV format for custom analysis (e.g. reporting on timeframes, risk categories, AML flags).
✅ 4. Audit Trails
Every KYC application includes a built-in audit trail that logs:
- Status changes
- Reviewer actions
- Document uploads/updates
- External check results
This ensures full traceability for compliance purposes.
How can country-specific risk ratings be configured and manually adjusted within the system?
Configuration of Country-Specific Risk Ratings:
To configure or manually adjust country-specific risk ratings within the system, please follow these steps:
-
Submit a Request
- Open a support ticket via the designated portal or contact your system administrator.
- Clearly specify:
- Your project name
- The countries requiring rating adjustments
- The requested risk ratings (including justification, if applicable)
-
Review & Implementation
- Our team will validate the request.
- Upon approval, the ratings will be updated in the system (typically within 1–2 business days).
-
Verification
- You’ll receive a confirmation once the changes are live.
Key Improvements:
- Structured Steps: Clearly outlines the end-to-end process.
- Actionable Details: Specifies where to input data (e.g., Risk Management module).
- Transparent Timeline: Sets expectations for implementation.
- Compliance Emphasis: Highlights potential need for documentation.
- Professional Tone: Remains concise yet thorough.
What should I do if I encounter a Cloudflare error when using the platform?
If you encounter a Cloudflare error while using the platform, please contact our help desk. Make sure to include the exact URL of the page where the error occurred, along with any error code or message displayed. This information will help us investigate and resolve the issue more efficiently.
What should I do if a page does not load or an action does not complete as expected?
Here’s a clear and professional response:
What should I do if a page does not load or an action does not complete as expected?
If a page fails to load or an action doesn't complete as expected, please try the following steps:
-
Refresh the page and ensure your internet connection is stable.
-
Clear your browser cache and try again using an up-to-date browser (we recommend Google Chrome).
-
If the issue persists, contact our help desk and provide the following details to help us troubleshoot:
- The URL of the page you're experiencing issues with
- A brief description of the action you attempted
- Any error messages or unusual behavior you observed
- Your browser and operating system details
Our support team will investigate and assist you as quickly as possible.
How can users configure address fields to require all components (e.g., street, city, postcode) rather than just the first line?
This setting can be configured within the KYC template. For more information, please refer to the following screenshot:
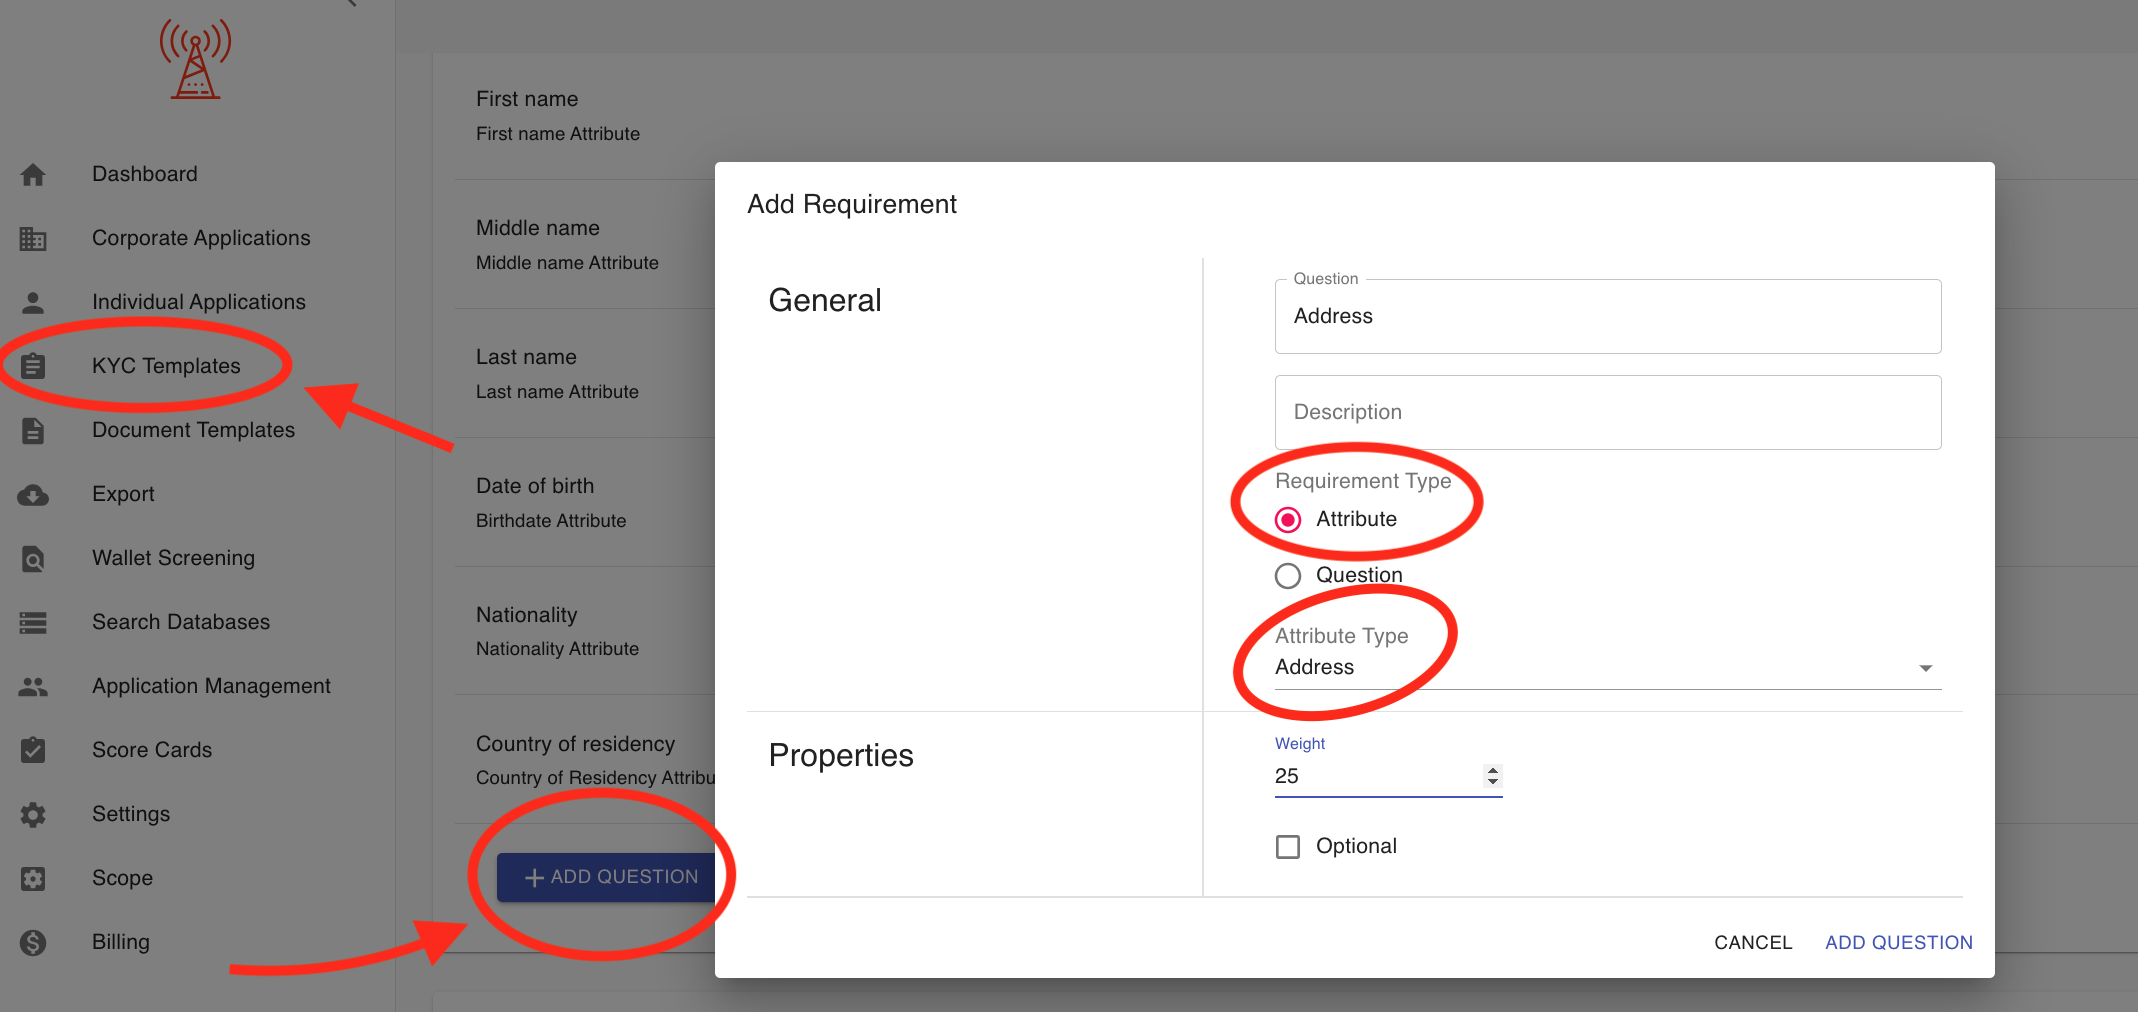
What are the typical setup times for the platform?
Here’s a professional and relevant response to the question:
What are the typical setup times for the platform?
Setup times for the KYC-Chain platform can vary depending on the complexity of your project and the level of customization required. However, most standard implementations are completed within Up to 3 business days after we receive all the necessary configuration details, such as:
- Company and project information
- Branding assets (logo, colors, etc.)
- User roles and access settings
- Preferred storage and email configurations
- Required KYC templates and workflows
For more advanced setups involving API integrations, member-level KYC workflows, or custom features, additional time may be required. Our team will work closely with you to ensure a smooth and timely deployment.
If you're on a tight timeline, feel free to let us know — we’re happy to accommodate where possible.
What is the geographic coverage for KYC services?
KYC-Chain provides KYC/KYB services with broad global coverage. We support identity, document, and business verification across most countries and regions worldwide, leveraging a wide range of data sources, external databases, and international watchlists (Sanctions, PEP, Adverse Media). The specific coverage—such as available government registries, document types, and verification strength—can vary depending on the country or region.
If you need details about coverage for a particular country or specific KYC checks available in your workflow, please let us know which location(s) you are interested in!
How do I resolve issues with the 'replace file' functionality in Document Templates?
If you encounter any issues with the 'replace file' functionality in Document Templates, please contact the help desk and provide detailed information about the problem.
What endpoint URL does the system use for sending callbacks?
The endpoint URL used for sending callbacks is the specific callback URL that you or your technical team configure within the KYC-Chain platform, either in the integration settings or via API configuration. KYC-Chain does not use a default endpoint; the system will send callbacks to whatever URL you designate.
How this works:
- When setting up API integrations or workflow automations in KYC-Chain, you specify the endpoint (your external system’s URL) where you want to receive status updates and event callbacks.
- All status update notifications, including application status changes or other configured events, will be POSTed to this URL.
To summarize:
The callback endpoint is fully customizable and is defined by your team within your organization's integration or developer settings in KYC-Chain.
How are widespread or recurring technical issues reported and resolved?
Widespread or recurring technical issues can be reported directly to our support team through our designated support channels. Our technical team will investigate, prioritize, and work to resolve such issues as quickly as possible, keeping you updated throughout the process.
How are charges applied for subsequent or duplicate searches?
In most cases, you are charged for each individual check performed. To prevent being charged for duplicate searches, ensure that Sybil checks are enabled—this feature automatically cancels applications with duplicate data before they are processed.
How can I create an API key?
To create a new API key, follow these steps:
- Go to the Settings section in the main left-hand menu.
- At the top of the Settings page, select the API KEYS tab.
- Click the CREATE NEW button.
- Follow the on-screen prompts to generate your new API key.
You will then see your new API key listed along with its creation date and expiration date. You can also revoke any active API key from this page.
(Refer to the highlighted areas in the screenshot above for guidance.)
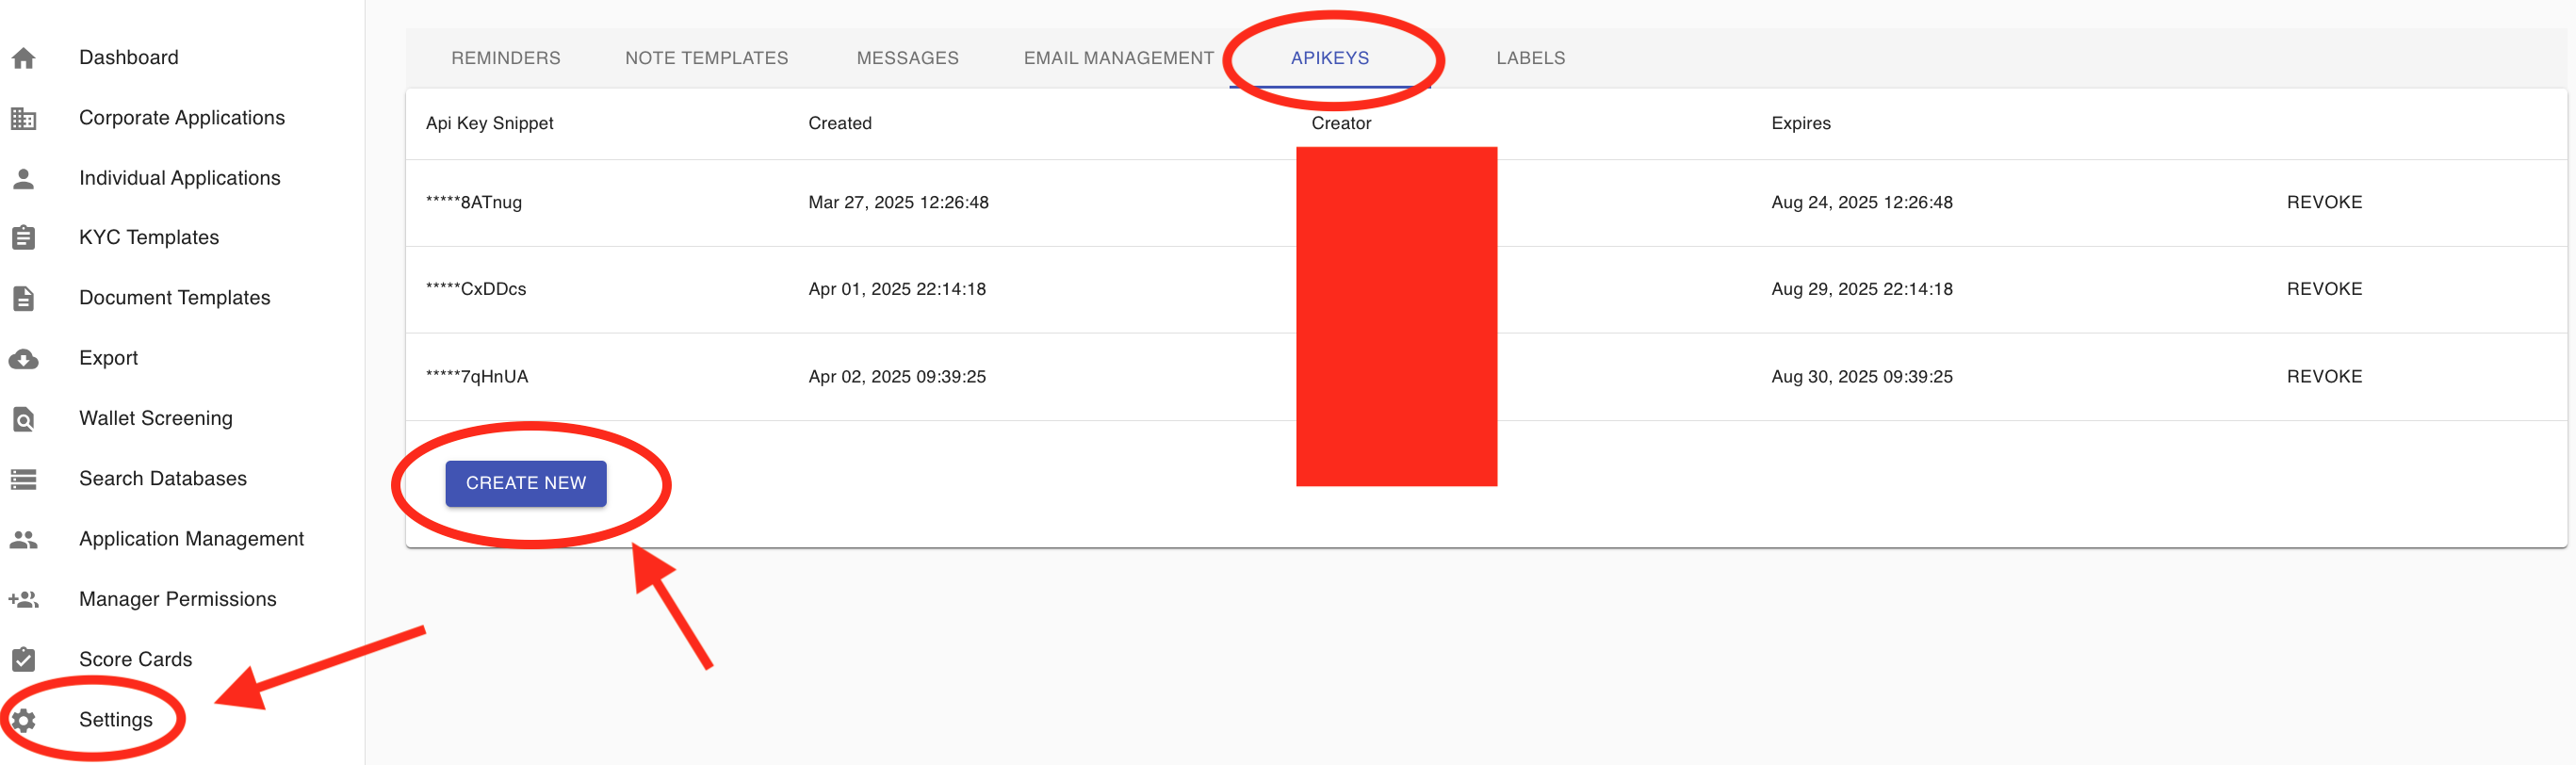
How do I authenticate API requests with an API key?
To authenticate API requests with an API key in KYC-Chain, you need to include your API key in the request headers when making calls to the KYC-Chain API. Here’s how to do it:
- Obtain Your API Key:
Typically, API keys are generated in the KYC-Chain portal under (settings) section. 2. Include the API Key in the Header:
For each API request, add the following header:
Authorization: Bearer your_api_key Replace your_api_key with your actual API key value. 3. Example cURL Request:
curl -X GET 'https://your_scope.kyc-chain.com/api/v1/applications' -H 'Authorization: Bearer your_api_key' 4. Security Tips:
Keep your API key confidential and do not expose it in client-side code. Regenerate the key if you suspect it might be compromised. Use HTTPS endpoints to encrypt the transmission.
Summary:
Always pass your API key in the Authorization header, prefixed with Bearer. All requests to KYC-Chain’s API should include this header for successful authentication.
Why am I receiving a 401 error when making API requests?
A 401 error (“Unauthorized”) means your API request is not properly authenticated. The most common reasons for receiving a 401 error when making requests to the KYC-Chain API include:
-
Missing Authorization Header: The request does not include an Authorization header.
-
Incorrect Format of Authorization Header: The header should look like this:
-
Authorization: Bearer your_api_key Make sure you use the word “Bearer” followed by a space and then your API key.
-
Invalid or Expired API Key: The API key you’re using may be incorrect, disabled, revoked, or expired.
-
API Key Lacks Required Access: The API key might not have permission to access the endpoint you are calling.
-
Request Sent to Wrong Endpoint: Double-check you are sending your request to the correct KYC-Chain endpoint (for example, sandbox vs production).
What you can do:
- Review your Authorization header for proper formatting.
- Confirm that your API key is valid and active in the KYC-Chain portal.
- Ensure you have the right permissions and are calling the intended environment (production/sandbox).
If the issue persists, consider regenerating your API key. If you still encounter the 401 error after checking these points, please let me know. I can help create a ticket for our support team—just provide any relevant details (API key last 4 digits, environment, and endpoint used) so we can assist you promptly.1.
How to reactivate or deactivate a manager? To deactivate a manager and remove their access to the platform, simply remove their assigned role. If you want to give access to an existing manager who was deactivated, toggle the "Show Inactive Managers" switch in the Manager Permissions section. This will display all inactive managers. Locate the manager you wish to reactivate and assign them a role; this will automatically reactivate their account and restore their access to the software.

Is Swagger recommended for testing API endpoints in a production environment?
No, please use Postman instead for testing our API.
Why does an application remain in "In Progress" status after submission?
The status "In Progress" typically appears only if a manager has requested additional documents or information from the applicant after the application was submitted. Under normal circumstances, once an application is submitted, its status should transition to "Ready for Review."
If there has been no request for additional information from the manager and the status still shows as "In Progress," this may indicate a technical issue. In such cases, we recommend reaching out to our support team so we can investigate and resolve it promptly.
Why is the system not prompting for specific national identification numbers (e.g., Tax ID) based on an applicant's citizenship?
The system is designed to adapt dynamically based on the applicant’s jurisdiction and applicable regulatory requirements. However, in some cases, specific national identification numbers such as Tax IDs may not be prompted automatically due to one or more of the following reasons:
-
Data Vendor Limitations: Not all data vendors provide or require validation of national identifiers for every country. Where local regulations or vendor coverage do not mandate collection, the system may not enforce it.
-
Citizenship vs. Residency Considerations**: The system typically prompts identification fields based on the applicant’s citizenship, rather than their country of residence. If an applicant enters personal details tied to their citizenship but provides an address from their country of residence, the system may not validate the information correctly. This is because, for most checks, the address is expected to align with the country of citizenship, not the country of residence.
That said, we continuously review and enhance our workflows to align with evolving global compliance obligations. If you believe a specific national ID number should be collected for a particular use case, we’d be happy to explore a configuration update or custom rule based on your compliance requirements.
How can a KYC template be restored or reverted to a previous configuration?
If a KYC template has been deleted or you wish to revert it to a previous configuration, please submit a ticket to our help desk. Our team will review the request and assist you with restoring the template or applying the previous settings as needed if possible.
How can I verify that a feature is fully active?
You can verify whether a feature is active by reviewing the KYC template. Some features will be clearly marked as enabled or disabled, while others may display a message prompting you to contact the support team for activation.
For full clarity, we recommend reaching out to the support team directly to confirm which features are currently enabled on your instance.
Technical Questions:
Does KYC-Chain validate Bitcoin addresses? Yes, KYC-Chain checks that the bitcoin address has the correct number of characters and computes a checksum of the address. We consider SegWit addresses to be valid.
Does KYC-Chain validate Ethereum addresses? Yes, KYC-Chain validates that the Ethereum address provided by the user begins with ‘0x’ and then is followed by a 40-character string, also confirming that the characters within the string fall between 0-9 and a-f.
How does KYC-Chain store customer data? KYC-Chain stores customer data in 2 places.
- The first is a storage bucket provisioned by you, our client, which will store the documents and files that are saved in our software. These documents are encrypted at rest and are entirely under your control.
- The second is our MongoDB Atlas account which stores the settings and other data related to your instance. This is kept very securely under our control.
How is our customers’ data protected?
- Storage volumes are encrypted.
- Backups are encrypted.
- Connections to the DB are SSL encrypted, 2FA is used, and IP addresses are whitelisted.
- Data is encrypted with AES-256 encryption using a passphrase that we generate unique to your instance. Backup and recovery
- Our database is automatically backed up 4 times a day. Disaster recovery
- Data recovery to a specific point in time is supported.
For more details please ask for a copy of our security practices.
How can users get a demonstration or walkthrough of specific features?
To request a demonstration or walkthrough of specific features, please open a support ticket to schedule a call with our team.
Document Verification Questions:
Can you compare facial biometrics of a person with and without beard? We identify a set of facial landmarks and use them to extract the facial features. The results of each extraction are compared to produce a reliable result of how similar faces on two photos are. Our algorithms recognize natural changes between the selfie and photo in an ID document, including:
- Changes in hairstyle
- Facial hair (beard)
- Make up
- Skin imperfections
- Varying facial expressions
- Small age gaps
- Small changes in head pose
Why do we see a document scan ‘failed’ result? The ID document validation can fail if:
- The ID document is expired
- The ID document has been manipulated
- A copy of the ID document has bad quality
- Data from the ID document can't be properly extracted
Do you check passport expiry date? Yes, if the passport has expired the validation will fail, and you will see a ‘failed’ result for the Document scan.
External Data Questions:
What does Sanctions Screening mean?
- No result: Higher level of trust in the applicant as according to the data the applicant doesn't appear in any sanctions list.
- Positive result(s): Possible involvement in illegal activities or risk to be involved. Your compliance team will have to analyze the data and take a decision accordingly (for example, double check the name, country and date of birth is the same to avoid a false positive match).
What Sanctions Screening lists are used by KYC-Chain? For detailed information about our standard and advanced AML screening solutions, contact your account manager.
What do I do if one of my applicants appears in one or multiple sanctions screening lists? Make sure that the applicant in question matches the individual identified by the sanctions screening list. This can be achieved by looking at the names and pseudonyms identified via the sanctions screening list. Click on the “View More” button and determine whether it is an exact, or only potential, match. You may need to use other details, such as name, country of residence and date of birth, to rule out a false positive. If there is a confirmed match, you can refer to the sanctions screening list to determine the risk based on your compliance program.
How can I screen members of a corporation? Our system automatically runs sanctions screening on members of corporations (directors, UBO, shareholders, etc.) You can find the results in the individual KYC Process for each member in the "Members" tab.
Step 1: Open your Corporate KYC template. Step 2: Enable the options for "Members" and "Ask members how many shares they own." Step 3: Scroll down to select the KYC template that will be used for screening members (this should always be the Individual KYC template), and save your changes.
In the examples below, the Company Check template will be used to perform KYB checks, while the Individual KYC template linked to the Company Check will be used to run KYC on corporate members, including all roles such as UBO, Director, and Shareholder. This setup is fully customizable—you can configure member types and roles by adding new conditions as needed.
Please also ensure that when adding a linked Individual KYC template for corporate member screening, ID document verification is properly enabled so that both the ID document and selfie checks, including a passive liveness check, are triggered. As this setup can be complex, we strongly recommend contacting a customer support representative to verify your configuration and avoid any potential misconfiguration.


When does ongoing AML monitoring begin for an application?
Ongoing AML monitoring does not begin immediately upon an application’s approval. Instead, the initial monitoring check is scheduled for a specific future date, and subsequent checks will then occur at configured intervals. This feature helps managers keep AML results for their applicants up-to-date. The monitoring interval can be set for each risk category (Low, Medium, High) within the KYC Templates (Daily, Weekly, Monthly, Every 6 Months, or Annually).
Important Notes: Monitoring is only performed for applications that have a data check result. * Applications with ‘Cancelled’, ‘Rejected’, or ‘Ready for Review’ statuses are ignored. * Managers receive an email notification if any changes are detected in external databases for a monitored application. * The ‘Overview’ section of an application displays when the next AML check is scheduled.
How can I check my balance? The Billing section, as shown in the screenshot, gives you a clear overview of your account balance and all related charges. Here, you can easily see your remaining balance at the top right and use the TOP-UP BALANCE button to add more funds whenever needed.
This section also allows you to view a detailed report of all billing events, including the cost per check. You can use the Filters at the top to search and sort billing reports by check type (such as AML, Wallet Screening, Data Verification, etc.) and by date range. This makes it easy to analyze which specific checks are generating costs.
In the billing table below, you’ll find information on the date each check was run, the type of check, its cost, and a link to VIEW APPLICATION for more details on each transaction.
Overall, the Billing section helps you keep track of your spending, manage your balance, and understand exactly where your funds are going.

How can I update my logo? You can update your logo in the "Scope" section. Please ensure that the file you upload is a transparent PNG:
![]()
How can I generate a report including all data and results?
- Open the application, ensure you are on the OVERVIEW page.
- Click the "GENERATE PDF" button to start the process.
- Wait for the PDF report to be generated and download to your device.

What does Company Registry mean?
- No result: This means that the company name and jurisdiction that we searched did not return any results from the relevant companies registry. The company might not exist, or the information provided by the applicant might be incorrect. Your compliance team should confirm that we support the relevant jurisdiction and then double check with the applicant or proceed however you see fit.
- Result: This means that the company exists, and you can see all its details in our system. It is important that your compliance team compares the information provided by the applicant and the information available in the official registry to ensure that the search result is the same entity as the one applying.

Does the KYC-Chain management app support multiple display languages, such as Simplified and Traditional Chinese? The KYC-Chain management app itself does not include a language switcher for its interface. However, it allows you to configure and manage translations for the customer portal, enabling applicants to switch between supported languages such as Simplified and Traditional Chinese.
How to Set Up Language Support for the Customer Portal:
- Navigate to KYC Templates: On the left menu, select KYC Templates.
- Access Translations: Click on the TRANSLATIONS button in the top right corner of the template editing page.
- Add Translations: In the pop-up window, enter the relevant translations for each field in both Simplified and Traditional Chinese as needed.
- Save Changes: Once you have added and reviewed all translations, click SAVE TRANSLATIONS.
After saving, the customer portal will allow applicants to switch between Simplified and Traditional Chinese using the language switcher.
Note: The language switcher functionality is available only in the customer portal, not in the management app interface.
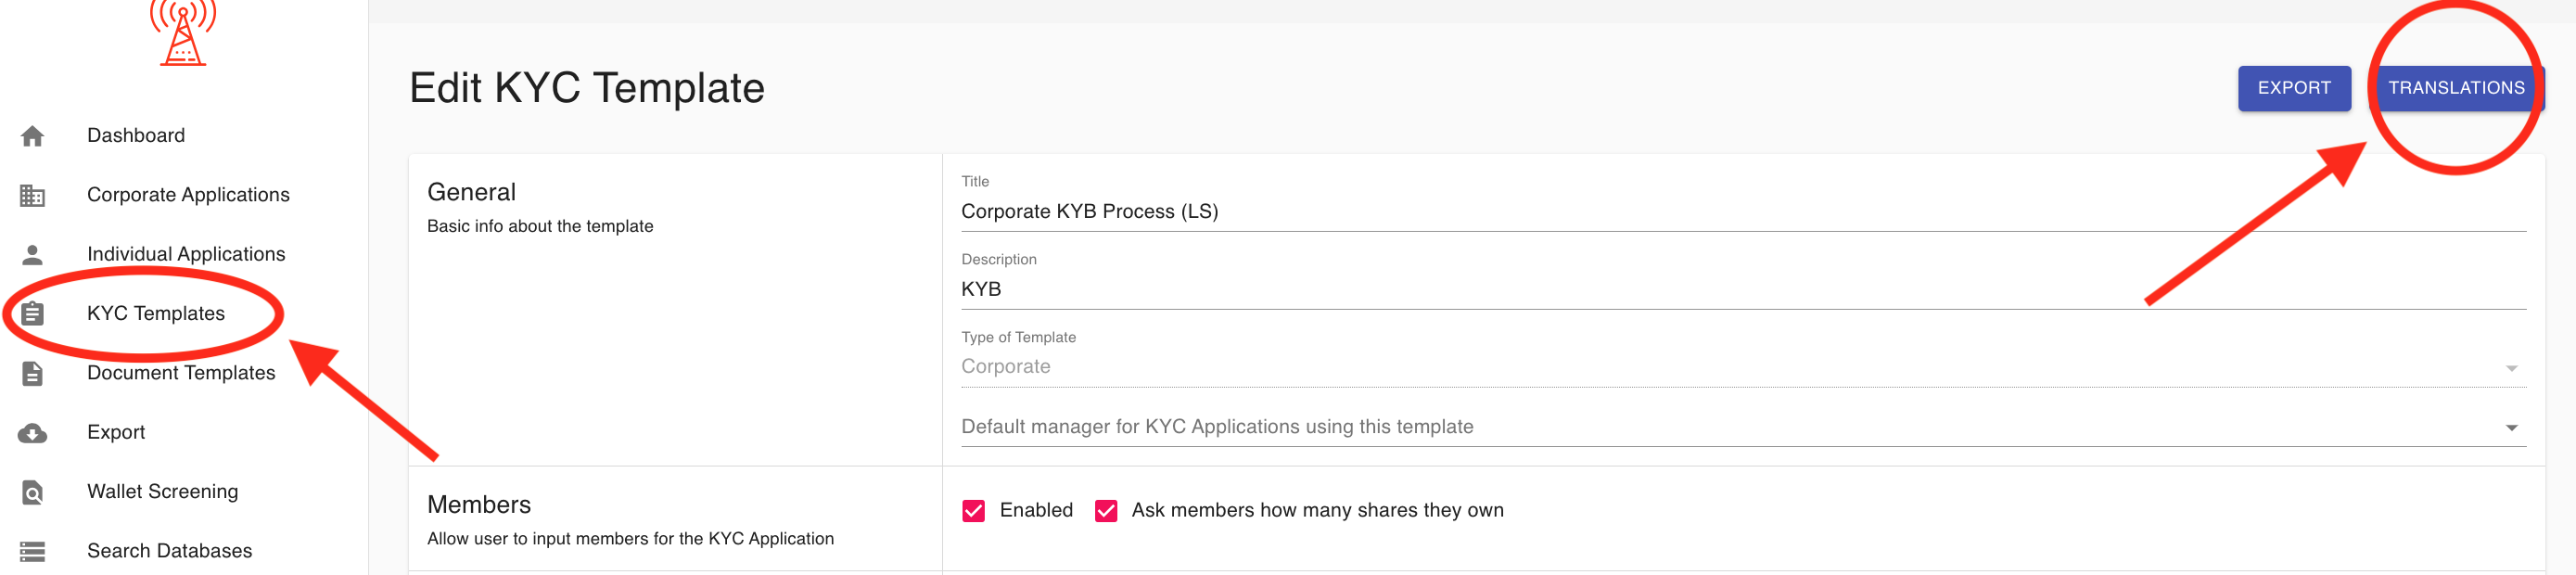
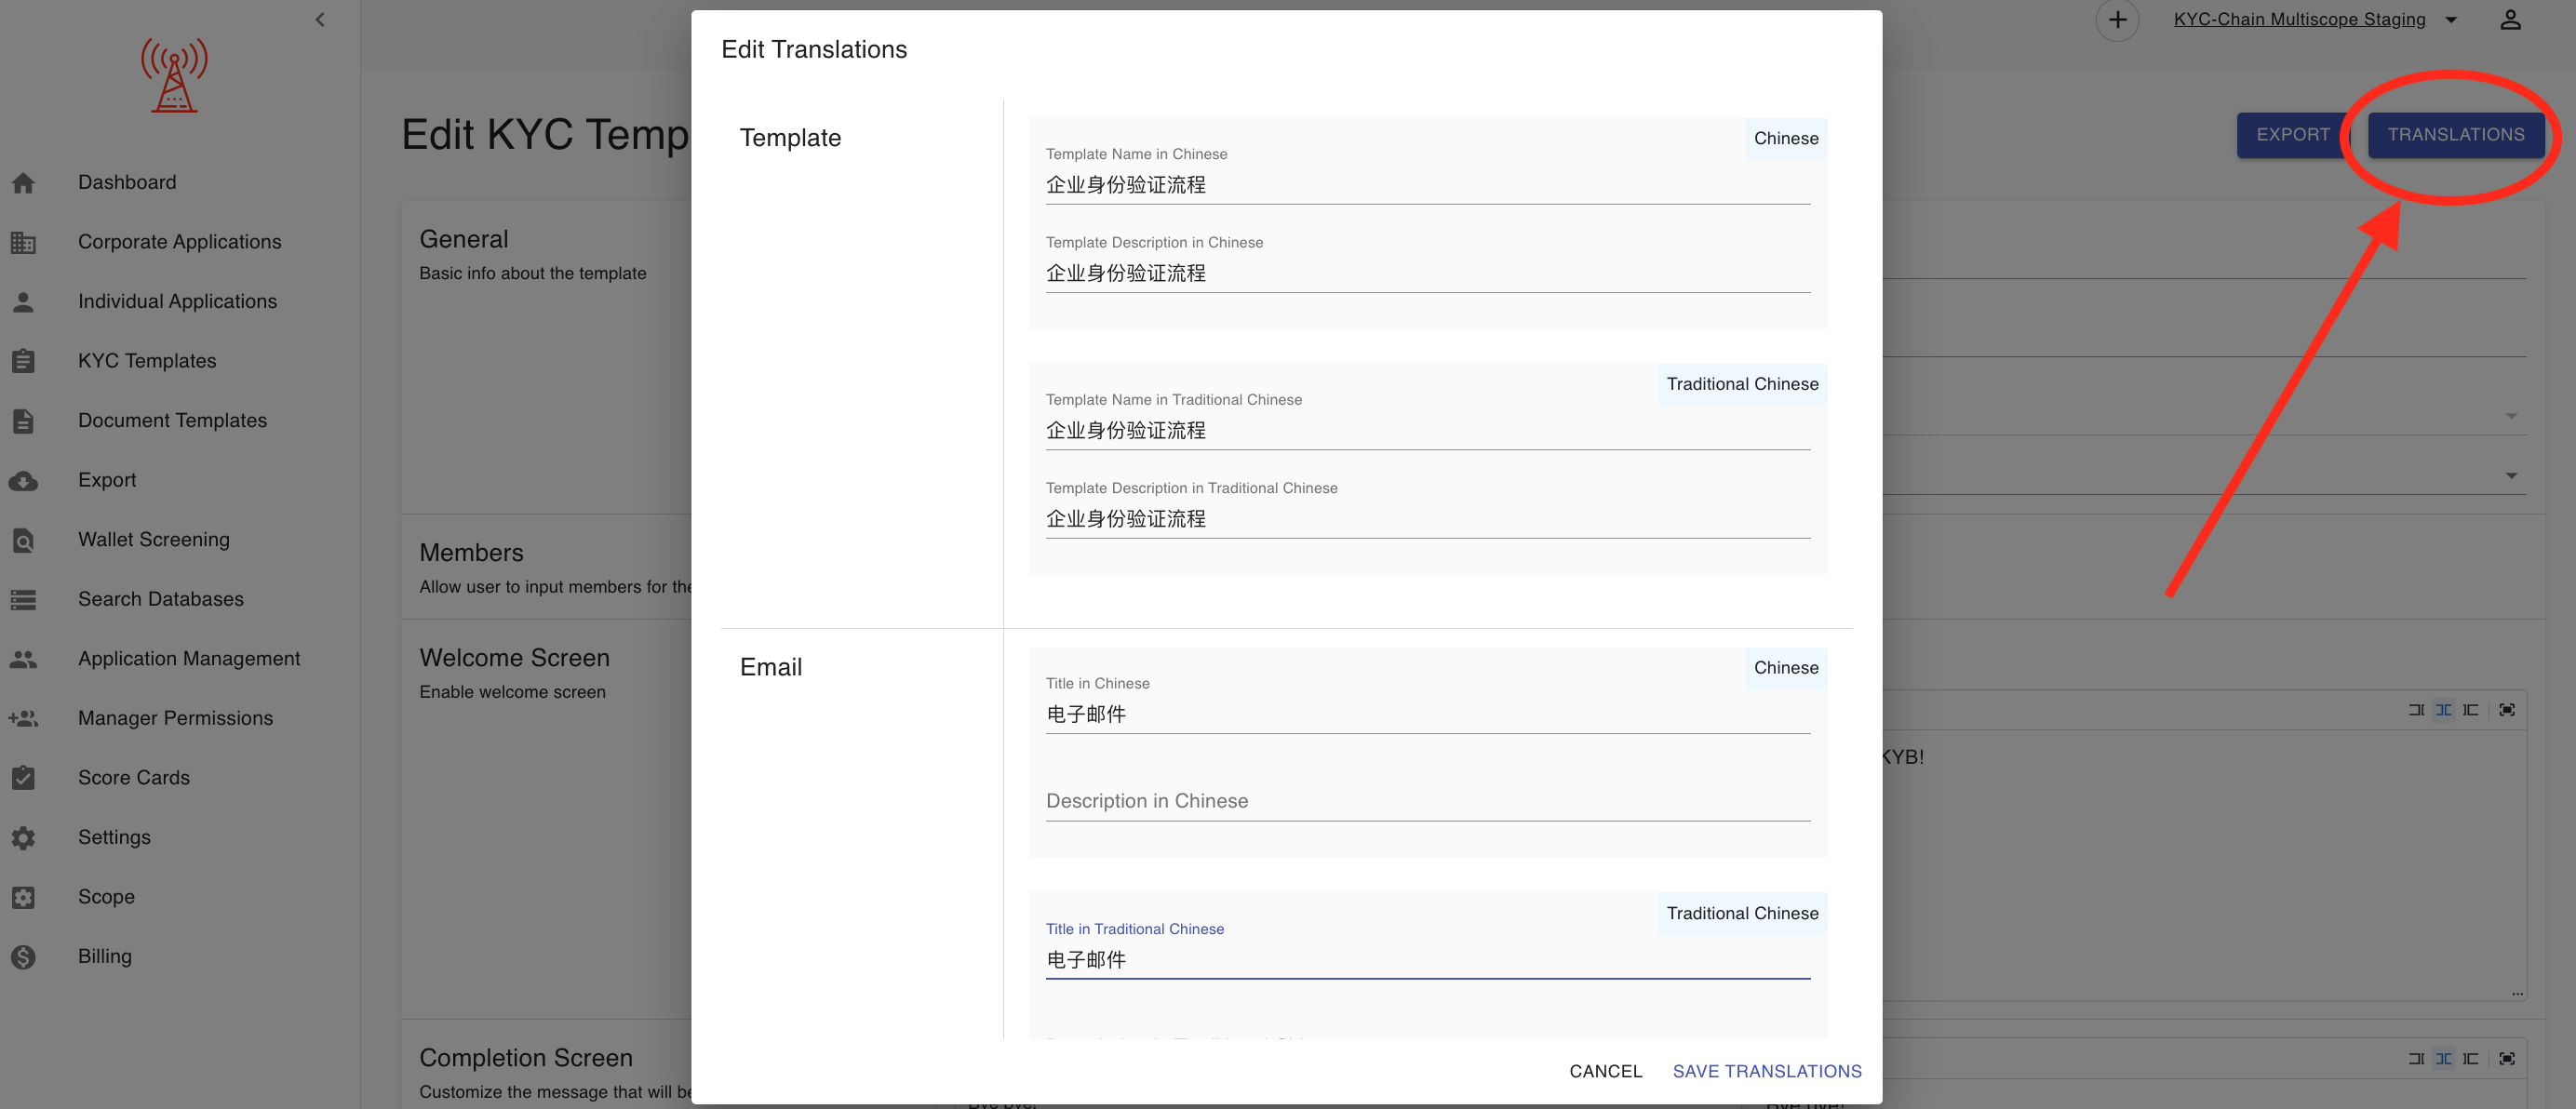
Summary: You can provide a multilingual experience for your applicants by adding and saving translations within the management app. Once configured, applicants can easily choose their preferred language—such as Simplified or Traditional Chinese—when using the customer portal.
I have more questions, what can I do? If you have a question that hasn't been answered here, please contact your support representative: help@kyc-chain.com